
Is GSM Flasher ADB Legit? Full Review To Bypass Your Itel P40+ Phone FRP Lock
Is GSM Flasher ADB Legit? Full Review To Bypass Your Itel P40+ Phone FRP Lock
When encountering factory reset protection (FRP) locking on your device, the search for solutions often leads to recommendations for the GSM Flasher ADB Bypasser FRP tool.
But before you are thinking of using it, make sure you understand its features, benefits, and how to download and use this tool effectively. This article provides you a comprehensive overview of the GSM Flasher Adb Bypass FRP tool, covering essential information that will guide you through the FRP bypass process.
Part 1. Full Review of the GSM Flasher ADB Bypasser FRP Tool
The GSM Flasher ADB Bypasser FRP tool is a reliable solution designed for users encountering FRP activation on their Android devices. It offers a quick and effective solution to regain access to your locked device by bypassing the FRP lock in just a few minutes.
To help you make an informed decision about using this tool, let’s explore its key features:
- Helps you to unlock various screen locks on Android, including patterns and PIN locks
- Exhibits broad compatibility, extending its support to a majority of Android devices
- Free of charge
While the GSM Flasher ADB Bypass FRP boasts a visually appealing interface, it’s worth noting that the software may present a steeper learning curve for some users. If you are not familiar with Android debugging and ADB processes, you might find the initial setup somewhat challenging.

GSM Flasher ADB Bypasser FRP compatibility list
The GSM ADB FRP Tool is compatible with a wide range of Android devices and Windows operating systems. Here’s the breakdown of its compatibility list:
Android:
Android 5.1 Lollipop, Android 6 Marshmallow, Android 7 Nougat, Android 8 Oreo, Android 9 Pie, Android 10, Android 11, and Android 12.
Windows:
Windows XP, Windows 7, Windows 8, Windows 10, Windows 11 (X32 and X62 bit).
Supported phone models
| Samsung | Samsung A3, A5, A7, A9, A40, A10, A30, A20, J7, J2, J7 Prime, J5, J1, core 2, M10, M20, M30, M40 |
|---|---|
| Moto | Moto G3, Moto E, Moto G4 Play, Moto E 4 Plus, Moto M, Moto G 5S Plus, Moto G Turbo, Moto Turbo |
| ZTE | ZTE Sonata 3, ZTEZ982, ZTE Z835, ZTE Blade, ZTE Z833, ZTE N9560, ZTE Zmax Pro, ZTE Z831, ZTE Z981 |
| LYF | Jio LYf Phone, Jio Keypad Phone |
| Intex | Intex Aqua, Aqua Star 2, Aqua Power Plus, Aqua Y2 |
| Lenovo | Lenovo Z2 Plus, Vibe K5, A2010, K5, Vibe, A6600, Lenovo A1000 |
| LG | LG Aristo, LG stylo 3, LG K10, LG K20, LG Stylo 2, LG G6, LG G4, LG G5, LG G20, LG K20 Plus |
Pros and Cons of Using GSM Flasher ADB Bypass FRP Tool
Dealing with FRP lock using the GSM Flasher tool also comes with its share of drawbacks. Let’s break down its strengths and weaknesses to help you decide if it’s the right fit for your needs.
Pros:
- A free solution to unlock their Android devices from FRP lock
- While it works with other Android devices, Samsung users have higher success rates of unlocking their devices with this tool
Cons:
- You need to disable antivirus software when using the tool, raising security concerns
- The tool does not work uniformly across all Android devices and versions
- The tool’s usability may pose a challenge, especially for beginners
Part 2. How To Use GSM Flasher ADB Bypasser FRP Tool
Now, we are moving on to the crucial aspect: How to use the GSM Flasher FRP tool. Employing this tool to unlock your Android device from FRP lock requires a systematic approach. If you’ve decided to use this bypasser FRP tool, the first step is to download GSM flasher tools and install them from this link.
Once the installation is complete, you can proceed with the following step-by-step guide to efficiently use GSM Flasher ADB Bypasser FRP and regain access to your locked Android device.
- Step 1: Make a connection between your phone device and your PC
After completing the tool download, employ a USB cable to connect your Itel P40+. The GSM Flasher FRP tool will be recognized by your Android device, while the tool will identify the name and Android version of your connected device at the same time.
- Step 2: Perform FRP lock bypass
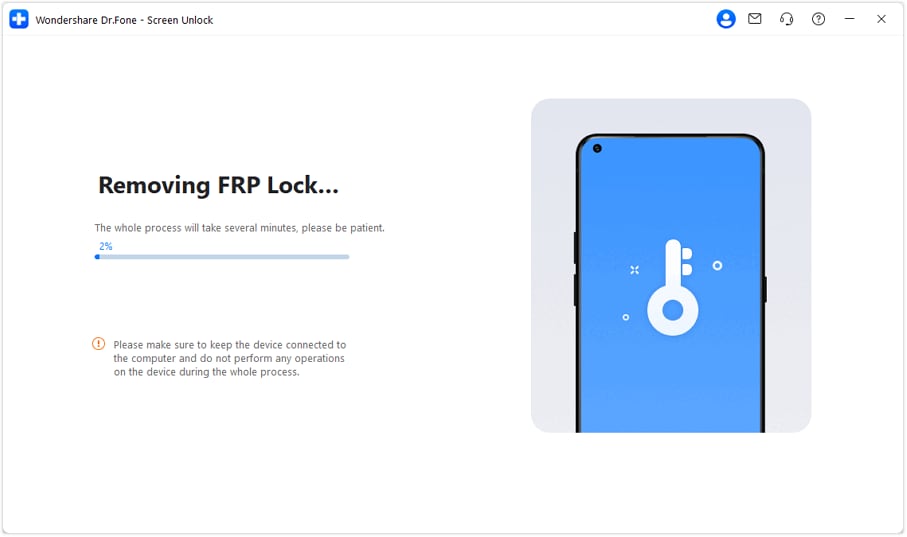
Proceed by clicking “Remove FRP” on your computer. It’s essential to be aware that this process will require a few minutes, so be patient until the tool successfully unlocks the FRP lock on your phone.

Part 3. Quick and Easy Bypasser FRP Tool Alternative
If your phone model is not compatible with GSM Flasher ADB or if the tool doesn’t seem to suit your needs, a reliable and swift alternative for FRP bypass is Wondershare Dr.Fone. Dr.Fone offers the Screen Unlock feature that is intricately crafted to streamline the FRP bypass process, ensuring both ease and efficiency.
Additionally, Dr.Fone offers support for a vast array of over 2000 Android phone models, providing a comprehensive solution that caters to a more diverse range of devices.
List of features:
- Supports a vast range of iOS and Android device models
- Minimizes the risk of data loss during the FRP unlocking process, preserving crucial files and information
- Dependable to unlocking Android devices when faced with forgotten screen lock credentials
How to bypass Google verification using Dr.Fone’s Screen Unlock:
- Step 1: Launch Dr.Fone Screen Unlock and connect Android device.
Launch Wondershare Dr.Fone on your computer and connect your Android devices. Go to Toolbox > Screen Unlock.

- Step 2: Select Remove Google FRP Lock.
On the next screen, choose Android as your device type and select Remove Google FRP Lock to proceed.

- Step 3: Select the Android device model.
Pick your Android device model and proceed by clicking the Start button.

- Step 4: Choose the Android version.
Now, specify your Android version. If you’re unsure about the Android OS version on your Android or prefer the quickest method to eliminate the Google Lock, select the All Android versions (One-Click Removal) option. Click “Start” to continue.

- Step 5: Follow the instructions to access an Emergency Call.
Follow on-screen instructions to open Emergency Call on your Android. Dial #0# to open a secret menu and click Next on your computer.
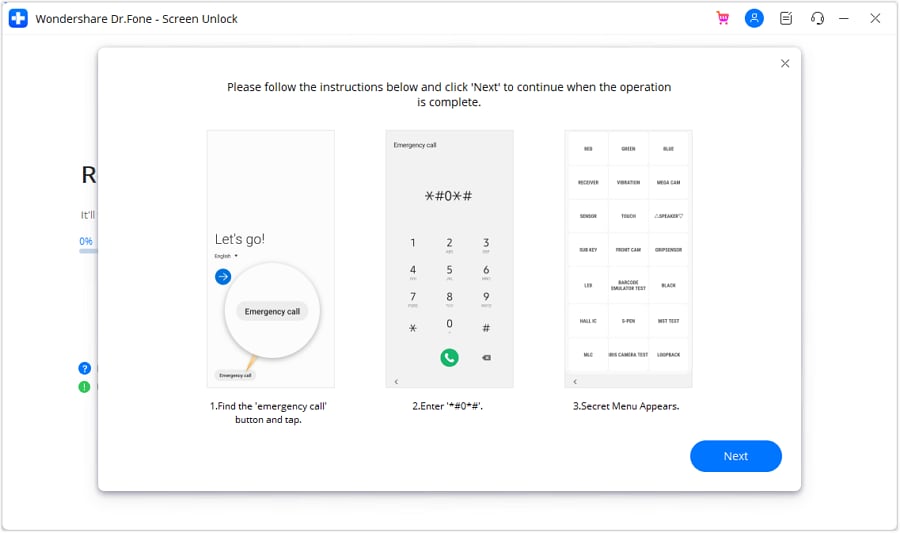
- Step 6: Enable USB debugging.
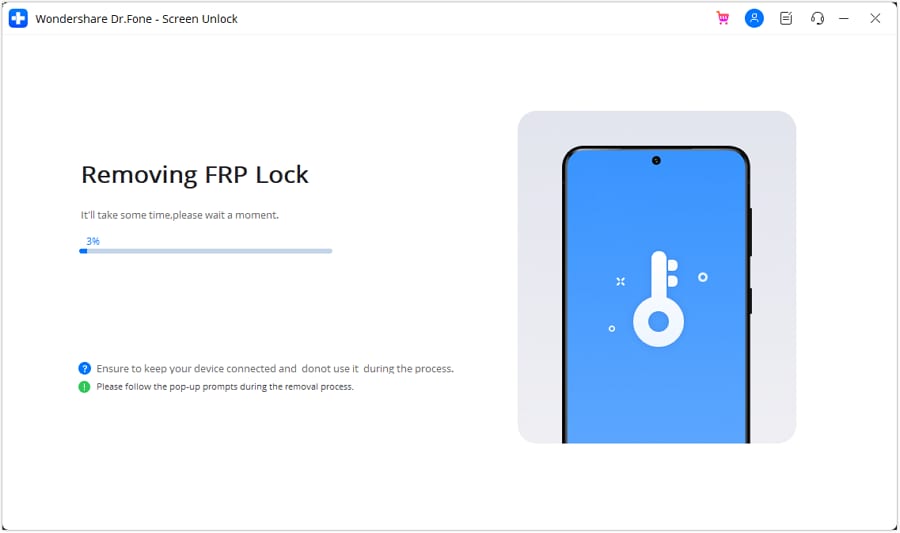
Now, your Android screen will display a notification to enable USB debugging. Once you grant permission on your phone device, proceed to click “Authorized” on your computer screen.

On your computer, the next screen will show that the FRP lock is being removed from your Android device. Once it’s successfully removed, a window will pop up saying it’s done. Click “Done” if you’ve completed the process successfully.
Tips: Are you searching for a powerful FRP Unlock tool? No worries as Dr.Fone is here to help you. Download it and start a seamless unlock experience!
Conclusion
The GSM Flasher ADB Bypasser FRP tool offers a cost-free and versatile solution to bypass FRP locks on a range of Android devices. While it provides an effective means to unlock your device, you might need to consider its compatibility, potential legal implications, and the learning curve associated with its usage.
As an alternative, tools like Dr.Fone can be explored for additional compatibility and ease of use. And, of course, the choice between these tools depends on your preferences and specific device requirements.
Easy Guide How To Bypass Itel P40+ FRP Android 10/11/12/13
Security measures have become increasingly robust nowadays to protect user data. One such security feature is Factory Reset Protection (FRP). This feature is designed to prevent unauthorized access to a device after a factory reset. FRP serves its purpose of safeguarding personal information. At times it can pose a challenge for users who find themselves locked out of their own devices.
This tutorial will guide you through a step-by-step Itel FRP bypass Android 10, 11, 12, and 13 processes. By following these instructions carefully, you’ll regain access to your Itel smartphone even if you’ve forgotten the associated Google account credentials.
Part 1: Basic Understanding of FRP
Before going after Itel FRP bypassing Android 12, it is important to understand what FRP is. Knowing what it is and how it works will help you bypass this lock. Factory Reset Protection (FRP) is a powerful security feature developed and implemented by Google for all Android smartphone companies. It works on Android devices starting from Android 5.1 Lollipop and above.
Working of FRP
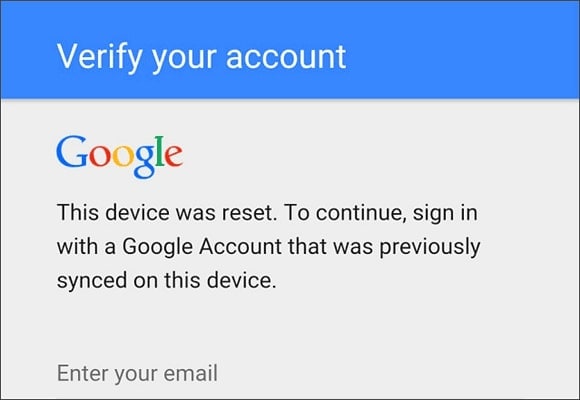
The primary purpose of FRP is to prevent unauthorized access to a device after it has been factory reset. It acts as a safeguard against theft or misuse of personal data. Moreover, FRP ensures only the original owner can access the Itel P40+ device data and applications. When FRP is enabled on an Android, it becomes tied to the Google account that was previously used on the Itel P40+ device.
After a factory reset, the Itel P40+ device will need the user to enter the Google account credentials. It is the same account associated with the Itel P40+ device. This prevents someone who doesn’t know the account details from gaining access to the Itel P40+ device.
Significance of FRP
FRP plays a crucial role in protecting personal data stored on Android devices. It acts as a strong deterrent against unauthorized access. This ensures that the data remains inaccessible even if a device falls into the wrong hands. This security measure is particularly important in cases of device theft or loss. It helps prevent sensitive information from being accessed by unauthorized individuals.
By implementing FRP, Google aims to enhance the overall security of Android devices. This also greatly helps in protecting user privacy. It adds an additional layer of protection for your device. FRP makes it more difficult for unauthorized users to bypass the Itel P40+ device’s security measures.
Part 2. Preparing for FRP Bypass
It is crucial to make sure you’re prepared before you go after the Itel FRP bypass the Android 13. This section will guide you through the essential steps to ensure a successful bypass process. Following these measures will reduce the chances of encountering any obstacles. So, let’s get started by taking care of a few key aspects before proceeding with the FRP bypass.
Ensuring Device Compatibility
First, verify that your Itel smartphone is running one of the supported Android versions, specifically Android 11, 12, or 13. This tutorial is specifically tailored to these versions. Attempting to bypass FRP on incompatible devices may lead to unexpected results. Confirming device compatibility will ensure that the provided instructions are relevant. It will also ensure the given instructions are applicable to your specific situation.
Backup Important Data
Backing up data can be possible even in this case; however, you should not have factory reset your Itel before backing up your data. This is because the FRP lock gets enabled after factory resetting the Itel P40+ device. While using your Itel with a Google account logged in, you will have to take the services of a third-party tool.
Wondershare Dr.Fone – Phone Backup turns out to be an assistance in this case. The service can be utilized to back up all necessary data before the FRP lock is removed from the Vivo.
Charging the Itel P40+ device Adequately
Ensure that your phone has enough charge to avoid any complications during the FRP bypass process. It is recommended to charge your Itel device to at least 50%. The ideal way is to connect it to a power source during the procedure. This will prevent any unexpected shutdowns that could potentially disrupt the bypass process.
Connecting to Stable Internet
A stable and reliable internet connection is crucial for a successful FRP bypass. Ensure your phone is connected to a secure Wi-Fi network or stable cellular data connection. A strong internet connection is required to download necessary files or tools during the FRP bypass process. By ensuring a stable connection, you’ll avoid potential delays or complications.
Part 3. Method 1: Using Official Google Account
The FRP lock on your Itel smartphone is directly linked to your Google account. The reason you find yourself in this situation is due to the inability to recall your Google account password. However, there is a solution — by recovering your Google account, you can successfully bypass the FRP lock.
This process will only work if you at least remember the Gmail ID. Follow the straightforward steps provided below to reset your Google account password:
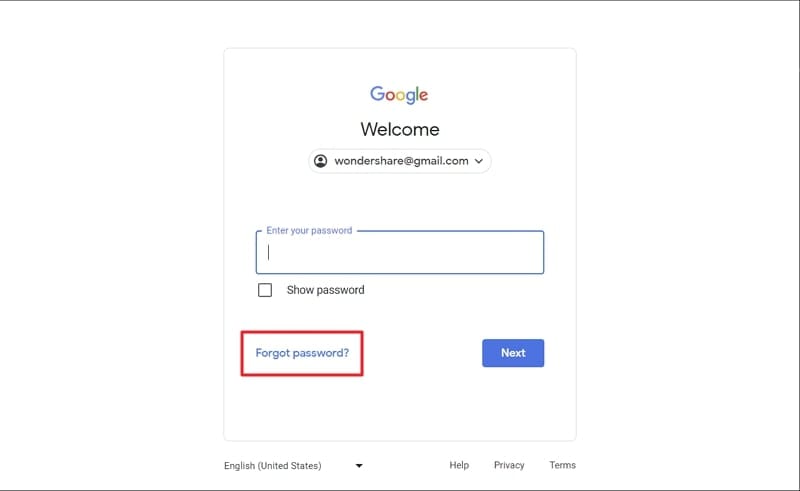
- Step 1: Access the Google Sign-in page on your computer using a web browser. Enter your Google account email address. When asked for the password to add, proceed with the “Forget Password” option.
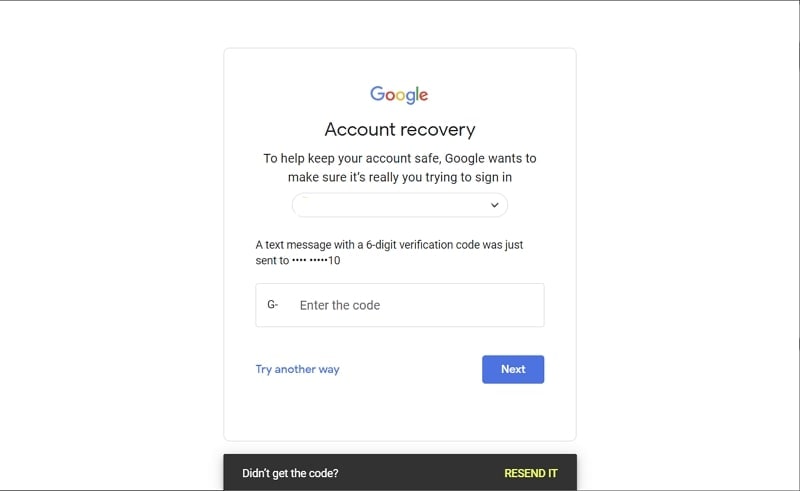
- Step 2: To verify your identity, utilize the phone number or recovery email associated with your Google account. You will receive a verification code on the phone number or recovery email. Once received, enter the code provided.
- Step 3: After completing the verification process, you can create a new password for your Google account. Take note that it may take approximately 24 hours for Google to synchronize the new password across all your devices. Once the new password has been synced, you can sign into your Google account on your Itel smartphone, successfully bypassing the FRP lock.

Part 4. Method 2: Using FRP Bypass Tools
One way to Itel Y20 FRP bypass Android 12 is to use a specialized FRP bypass tool. Among the various tools available, we highly recommend using Wondershare Dr.Fone . It is a reputable and reliable tool for FRP bypass on Android devices from all major brands. These include over 15 brands with 2000+ Android devices where Dr.Fone can do its magic.
Dr.Fone - Screen Unlock (Android)
Bypass Itel Google FRP in a Flash
- Pattern, PIN, password, fingerprints & face screen lock can all be unlocked.
- Bypass Android FRP lock without a PIN or Google account.

- Unlock mainstream Android brands like Samsung, Vivo, Xiaomi, etc.
- No tech knowledge required, Simple, click-through, process.

3,981,454 people have downloaded it
Wondershare Dr.Fone is trusted by users worldwide for its effectiveness in bypassing FRP locks. With its intuitive interface and comprehensive features, Dr.Fone simplifies the bypassing process. Its compatibility with Android 10, 11, or 12 Itel devices makes it an ideal choice. Following are the detailed steps to Itel FRP bypass the Android 11 process:
- Step 1: Navigate To Remove Google FRP Lock in Wondershare Dr.Fone
Install the latest Wondershare Dr.Fone phone toolkit from the official website on your computer and launch it. Now move the “Toolbox” tab and go for “Screen Unlock”. As Itel is an Android brand, on the next screen, click “Android”. Among the various available option for screen unlocking, choose “Remove Google FRP Lock”.
- Step 2: Choose Itel As the Brand
The next step is to choose the targeted phone brand, which in this case is “Vivo”. After selecting the brand, click “Start”. It will begin the process of downloading the related driver for Itel FRP bypassing.
- Step 3: Complete the Itel FRP Bypassing Process
After downloading the driver, move to your Itel smartphone and turn it off. Connect the turned-off device to the computer while pressing both volume keys for at least 3 seconds. It will kickstart the Itel FRP bypassing process , which will take a few minutes.
 safe & secure
Part 5. Method 3: Contacting Itel Support
In specific scenarios, all methods at hand can be unsuccessful in Itel FRP bypassing Android 12. Here contacting Itel Support can be a viable option to bypass FRP on your Itel smartphone. This section will discuss when it is appropriate to consider contacting Itel Support. Moreover, it will discuss the available support channels and the steps to follow when seeking their help.

When to Consider Contacting Itel Support
You may consider contacting Itel Support in the following situations:
- If you have exhausted all other methods and cannot bypass FRP on your Itel device.
- If you need specialized help or guidance from Vivo’s technical team.
- If you encounter any difficulties or issues during the FRP bypass process. Now you need expert help to resolve them.
Available Options for Itel Support Channels
Itel offers various support channels to cater to the needs of its users. These channels typically include:
- Official Itel Website: Visit the official Itel website and navigate to the support section. Here, you can access resources such as FAQs, user manuals, and troubleshooting guides.
- Customer Support Hotline: Contact the Itel customer support hotline to speak with a representative. They will be able to provide guidance and help over the phone.
- Email Support: Send an email to Vivo’s support team detailing your issue and request for help. They will respond to your inquiry accordingly.
- Live Chat: Itel websites offer a live chat feature where you can interact with a support agent in real time.
Steps To Follow When Seeking Help From Itel Support
When contacting Itel Support for FRP bypass help, follow these general steps:
- Prepare Necessary Details: Before reaching out, gather essential information about your device. These include the model number, IMEI, and a brief description of the FRP bypass issue you are facing.
- Choose a Support Channel: Select the most convenient support channel based on your preferences. It can be the hotline, email, or live chat.
- Provide Accurate Information: Clearly describe your situation, including the steps you have already taken. You should also mention the methods you have attempted to bypass FRP.
- Follow the Instructions: Listen carefully to the guidance provided by the Itel Support representative. Moreover, follow the instructions provided via email or live chat.
- Provide the Required Information or Documents: If requested by Itel Support, provide any necessary information or documents. You will need such documents to prove your ownership of the Itel P40+ device.
You might also interest:
_ The Complete Guide to Unlock Mi Account Without Password _
_ Ultimate Guide to Bypass FRP with PC _
_ Complete Method: How to bypass Xiaomi FRP _
Part 6. Troubleshooting and Tips
You may encounter certain issues or errors during the FRP bypass process on your Itel device. This section will address some common problems that users may face and provide ways to help you resolve them:
Common Issues and Their Solutions
Before we lead into an assessment of the tips that one can follow to avoid issues with their Itel FRP bypass process, it is necessary to guide users with the problems involving the process. However, along with the issues, all the required solutions are associated with them.
1. Faulty USB Connection
During the bypass process, your computer may fail to detect your Itel device when connected via USB.
Solution: Ensure your Itel device is properly connected to your computer via a USB cable. Moreover, try using a different laptop port or USB cable but confirm it is original to fix any connection-related issues.
2. Device Compatibility Issue
The FRP bypass tool you are using may not be compatible with your specific Itel device model or Android version.
Solution: Confirm that the FRP bypass tool you are using supports your Itel device model and the specific Android version installed on your device. Consider trying an alternative tool if compatibility issues persist.
3. Retry Bypass Methods
The bypass method you have chosen may not be successful in bypassing FRP on your device.
Solution: Attempt the process again by following the instructions meticulously. Double-check that you have entered the correct information and followed each step accurately.
4. Network Connectivity Problems
Instability in your internet can cause issues with the downloading or verification process. As a result, your attempt to bypass FRP fails.
Solution: Ensure you have a stable and high-speed internet connection to avoid interruptions during the FRP bypass. If not, try switching to a different network, such as taking a mobile hotspot from your family member or friend. You can also reset your network settings if connectivity issues persist.
General Tips for a Successful FRP Bypass Process
To increase the likelihood of a successful FRP bypass on your Itel device, consider the following general tips:
1. Research and Understand the Method
Familiarize yourself with the Viva Y20 FRP bypass Android 12 method you intend to use. Read tutorials, watch videos, and gather information. Ensure that you have a clear understanding of the instructions involved for your selected methods to perform successfully.
2. Ensure Device Compatibility
Verify that the FRP bypass method or tool you plan to use is compatible with your specific Itel device. It should be compatible with the model and the Android version it is running. Using incompatible methods can lead to errors and unsuccessful bypass attempts.
3. Follow the Instructions Carefully
Pay close attention to each step of the Itel FRP bypass Android 13 process. Follow the instructions precisely. At times even a minor mistake can hinder the success of the bypass.
4. Stable Internet Connection
Ensure that you have a stable internet connection throughout the FRP bypass process. A stable connection is necessary for downloading required files or using online FRP bypass tools.
5. Seek Professional Help If Needed
If you encounter difficulties during the FRP bypass process, consider seeking professional help. You can seek help from authorized service centers or contact Itel Support. They can provide guidance and help troubleshoot any issues you may face.
Conclusion
To conclude, we have explored various methods and tools to assist you in Itel FRP bypassing Android 12. Throughout the journey, one tool has stood out as a reliable solution: Wondershare Dr.Fone. Regarding FRP bypass, Dr.Fone - Screen Unlock (Android) has proven to be a top choice for Itel devices. It is compatible with a range of Itel models and Android versions.
This makes Dr.Fone an excellent option for a hassle-free bypass experience. Dr.Fone provides step-by-step instructions for the FRP bypass process. It ensures that you are guided through each stage of the bypass procedure.
Pangu FRP Bypass and Best Alternative Tool For your Android Device
Pangu FRP Bypass is a popular tool claiming to unlock Factory Reset Protection (FRP) on various Android phones. FRP is automatically enabled when you set up your Android device and link it to a Google account.
The FRP lock activates if someone tries to do a factory reset in an untrusted environment without removing the Google account. Without entering your Google credentials, you won’t be able to use your phone. It renders your phone useless for resale or personal use.
Then are you curious about the safety of the Pangu FRP bypass tool? What is this tool, and how does it work? If you have similar questions, this guide has the answers. Here, we’ll show you what you need to know about the bypass tool and alternative software.

Part 1: What Is Pangu FRP Bypass Tool?
FRP is a security feature implemented by Google on Android devices running Lollipop (5.1) and later. It ties your Google account to the Itel P40+ device, requiring you to enter the account credentials after a factory data reset. The FRP lock discourages phone theft and protects your data.
The Pangu FRP Bypass tool aims to get around the FRP lock. It grants you access to your device without needing the Google account credentials. The tool uses the loopholes or flaws in the security system to gain access and disable FRP.
The tool can be helpful in situations where you:
- Forgot your Google account credentials
If you can’t remember your Google account password, Pangu FRP unlocker can help you bypass the verification and access your device.
- Bought a used phone
If you purchased a used phone with a previous owner’s Google account linked, the Pangu FRP tool can help you remove that account and set up your own.
- Need to reset your phone but don’t want to lose access
If you need to factory reset your phone but don’t want to lose access to your Google account, it can help you bypass the FRP after the reset.

How Does It Work?
There are two main versions of Pangu FRP Bypass tools:
- Pangu FRP Bypass APK
This app is downloaded and installed on the FRP-locked device. It directs you through steps, using weaknesses to reach hidden settings. By doing so, the Pangu FRP Bypass APK removes the FRP lock, allowing access to the home screen.
- Pangu FRP Bypass Tool for PC
This software runs on your computer and requires connecting your device via USB. It then performs similar operations to the APK version. That is using the computer connection to control the Itel P40+ device’s system and bypass the FRP lock.
Is It Legal?
The legality of using the Pangu FRP Bypass remains a gray area. While it’s not inherently illegal, using it for purposes like accessing stolen devices is unlawful. Use it responsibly and ethically.
Part 2: What Are the Supported Brands for the Pangu FRP Bypass Tool?
The Pangu FRP Bypass boasts extensive compatibility with several Android brands, covering:
- Samsung
- Lenovo
- LG
- Oppo
- HTC
- Micromax
- Vivo, and more

Different devices and Android OS versions may have varying compatibility within each brand. That includes Oreo, Marshmallow, and Nougat. Some older or newer models may not support the Pangu FRP Bypass APK, even though it works well on many models. Its file size can also differ based on the version you download.
Part 3: How To Download and Install Pangu FRP Bypass APK?
Before downloading the APK file, you’ll need a USB drive and an OTG cable to connect your Android device to your PC. Once you have these ready, you can move on to the installation steps. Follow the steps below to download and install the Pangu FRP Bypass on your Android phone.
- Step 1: Download the tool’s APK from a trusted source. You can get it from the Pangu official website, if available.

- Step 2: Copy the downloaded tool to a USB drive using a computer.
- Step 3: Connect the USB drive to your FRP-locked Android phone using an OTG cable.
- Step 4: Open the file manager on your Android device, locate the Pangu FRP Bypass APK on the USB drive, and install it. If you encounter issues, proceed to the next steps.
- Step 5: Open the Google Play Store app, then tap the profile icon at the upper-right corner.
- Step 6: Go to Play Protect, then tap the Settings icon at the upper-right side of the screen.

- Step 7: Toggle off the Scan apps with Play Protect option and tap Turn off on the dialogue box. This setting allows the installation of apps from outside the Google Play Store.

Part 4: How To Use Pangu FRP Unlocker on Android?
Before you start, ensure you have permission to unlock the FRP on the Android device. Also, check your internet connection, have enough phone charge, and a backup of your phone data. Now, follow these steps to use Pangu and remove the Google account FRP lock on your phone:
- Step 1: Launch the Pangu FRP bypass on your phone and tap the menu icon in the top right.

- Step 2: Follow the on-screen guide to detect and unlock your device.
- Step 3: Tap the browser sign-in icon and enter a new Google Mail ID. Then, press Next to continue.
- Step 4: Create a password you can remember in the future. Once satisfied, tap the Finish icon to proceed.
- Step 5: Wait for your details to upload. Once completed, restart your Android phone with the designated key combination.
- Step 6: On the Google Mail account page, enter the profile details you created and tap Next. Your device will show, “FRP is trying to accept Gmail + password.“
Part 5: Is Pangu FRP Bypass the Best FRP Removal Tool for You?
Pangu FRP bypass tool is free and works on older Android versions. But there are reasons to consider other options. Let’s explore them.
Technical Knowledge Required
It can be a bit complex to use for some users, especially if you’re not tech-savvy. Using it involves downloading and installing APKs, which can be risky and time-consuming. It’s not as beginner-friendly as some alternatives in the market.
Limited Customer Support
Thetooldoesn’t provide official support via live chat or phone. This leaves you without direct help if issues arise during the bypass process. Depending on online forums for troubleshooting can be time-consuming and unreliable.
Limited Compatibility
Pangu FRP bypass is primarily focused on Samsung devices and may not work on the latest Android brands or versions. Also, it needs an OTG cable and USB drive, making it less convenient. Consider FRP bypass alternatives for broader compatibility and ease.

Safety Concerns
Some Pangu FRP bypass APK versions have been flagged as potentially containing malware or viruses. While this isn’t always the case, it’s crucial to be cautious and download the tool from a trusted source.
Low Success Rate
While the bypass tool can sometimes be effective, its success rate isn’t guaranteed. It can be frustrating if you go through the entire process only to find it didn’t work on your device. Choosing other FRP bypass software with a higher success rate can save you time.
Choosing between Pangu and an alternative depends on your needs and tech skills. If you’re comfortable with downloading APK, Pangu can work. But if you prefer ease of use, broader device compatibility, and safety, consider dedicated tools like Wondershare Dr.Fone - Screen Unlock (Android).
Part 6: Wondershare Dr.Fone - Screen Unlock for Android: Best Alternative to Pangu
Dr.Fone is one of the best alternative tools for Pangu FRP bypass. With its user-friendly and intuitive interface, you can effortlessly remove the FRP lock in several steps. Dr.Fone is a reliable choice to bypass Google FRP on Android, even if you don’t have a Google account or PIN code. Dr.Fone - Screen Unlock can bypass FRP and is compatible with Samsung, Vivo, Realme, Oppo, Redmi, and Xiaomi Android phones.
Aside from that, it can also do the following:
- Remove four types of lock screens: pattern, PIN, fingerprint, and password.
- Unlock your lock screen without erasing your data so you can access your phone.
How To Use Dr.Fone - Screen Unlock To Bypass Google FRP?
If your Android OS is version 14 or below, Dr.Fone can help you eliminate the FRP lock on Android in a few minutes. Download the app, launch it on your computer, and follow the steps below.
- Step 1: Connect your phone to your desktop using a USB cable, then select Screen Unlock from the Toolbox homepage.
- Step 2: Select Android as your device type to continue the FRP bypass process.

- Step 3: Select Remove Google FRP Lock on the next screen.
- Step 4: Select your phone brand from the list of supported brands, then click Start to proceed.
- Step 5: Follow the next in-app instructions, which may vary based on the brand of your Android device.
- Step 6: Wait while Dr.Fone removes the FRP lock on your phone.
- Step 7: Click Done to confirm successful FRP bypass or click Try Again to repeat the process (available for Samsung devices.)

Conclusion
Bypassing FRP on Android can be challenging. Downloading APK tools like Pangu FRP Bypass may be unreliable and risky. They often lack support for newer devices and have an inconsistent success rate.
Wondershare Dr.Fone offers an easier, faster, and user-friendly solution for bypassing FRP on almost all Android models, regardless of their version. Its intuitive interface and high success rate empower you to regain access to your devices. Don’t let a locked screen stand in the way of your data. Explore Dr. Fone’s Screen Unlock (Android) tool for a reliable solution to future FRP-lock issues.
Tips: Searching for a powerful FRP bypass tool? No worries as Dr.Fone is here to help you. Download it and start a seamless unlock experience!
Also read:
- [New] Leading Edge Photography The Best 4K Mirrorless Cameras
- [Updated] In 2024, Personalize Your YouTube Experience with Altered Rhythms
- 2024 Approved Enjoy Every Frame Best Free Download Apps for Mobile Devices
- Excellent Image Reconstructor Program
- Facebook Pivots to Clarity with New Policy Hub Introduction
- Fixing Boot Issues: How To Get Your Computer To Properly Shutdown Windows 10
- In 2024, A Quick Guide to Infinix Smart 8 Pro FRP Bypass Instantly
- In 2024, About Infinix Hot 40 FRP Bypass
- In 2024, How Can We Bypass Tecno Camon 20 Pro 5G FRP?
- In 2024, How to Bypass FRP from Samsung Galaxy A05?
- Latest Guide How To Bypass Itel S23 FRP Without Computer
- Nubia ADB Format Tool for PC vs. Other Unlocking Tools Which One is the Best?
- Quick Fix Guide: Retrieving Your Lost Vimeo Footage Without Hassle
- Redefine Mobile Browsing - Bing's Intelligent Search Now Available
- Title: Is GSM Flasher ADB Legit? Full Review To Bypass Your Itel P40+ Phone FRP Lock
- Author: Lynn
- Created at : 2024-12-15 20:35:45
- Updated at : 2024-12-21 07:58:52
- Link: https://bypass-frp.techidaily.com/is-gsm-flasher-adb-legit-full-review-to-bypass-your-itel-p40plus-phone-frp-lock-by-drfone-android/
- License: This work is licensed under CC BY-NC-SA 4.0.