
In 2024, Ultimate Guide from Itel P40 FRP Bypass
Ultimate Guide on Itel P40 FRP Bypass

FRP (Factory Reset Protection) is an Activation Lock system for preventing unauthorized Factory Resetting on your Itel phone. But if you forget your Google Account credentials, you might want to learn a few Itel P40 FRP bypass techniques. So this 3-minute read discusses the most effective Itel FRP bypass methods. Note that these methods apply to all Itel phone models, including Spark, Comon, Pop, etc.
Part 1: What Will You Get After Itel P40 FRP Bypass Android 11?
FRP is a mandatory security system embedded in Android 5.1 (Lollipop) or newer. But there are many reasons why you may want to bypass Itel FRP. Here are some of them:
You’re the new owner and get whole control of your Itel phone
Did your cousin or parent send you their Itel phone but forget to Factory Reset it? If that person is living far from you, that can be a real challenge. So, unless they give you their Gmail credentials, you might be stuck and unable to use the phone. If you bypass FRP, you’ll reset the phone and restore it to its brand-new state.
Remove viruses and malware
Although uncommon, your Android phone can start malfunctioning due to a virus or malware infection. You can get these unwanted programs from unknown email attachments, file downloads, website links, etc. So, because merely deleting these files won’t resolve the issue, you’ll need to bypass Itel FRP to Factory Reset the phone and erase everything. Fortunately, you don’t need a phone technician to help you with that.
Increase the resale value
Sometimes you may need to do away with your old Itel phone after purchasing a brand-new one. So, instead of keeping or gifting it out, you can sell it and recoup a few coins. Unfortunately, most buyers will want the phone in its brand-new state so that they can install their own apps, add music, movies, etc. If you don’t Factory Reset the phone, your bargaining power also reduces. I’m sure you don’t want that.
Important note: Bypassing FRP is absolutely legal and easy too. But some users may look to bypass FRP on a stolen phone. That’s why we clarify that this post is strictly for educational purposes. Get the consent of the original owner of the phone before bypassing FRP.
Part 2: How to Bypass Google FRP on Itel Android 11 without PC
Now that you have all the reasons to bypass FRP on Itel P40 or any other model, let me introduce you to the best method to avoid this feature without a PC. TechnoCare APK is an Android software that allows Itel users to bypass FRP on any Itel brand. It’s straightforward; this app lets you create another Google Account on your locked Itel phone without unlocking it. In short, you’ll link a new Google Account with a password that you can easily remember.
TechnoCare APK Features
- Safe and straightforward Android APK.
- Install custom ROMs on Itel.
- No registration is required.
- No age restrictions to use.
- User-friendly and quick FRP unlock.
Steps to bypass Itel P40 FRP with TechnoCare APK
- Step 1: Start by enabling the Talkback feature on your phone. To do that, tap the Home key three times consecutively on the welcome screen.
- Step 2: Now go to the Talkback Menu and then open Talkback Settings. Then, click the Search icon and enter “Getting started with Talkback.”
- Step 3: Play the video on the “Getting Started” screen. Then, tap the three dots before clicking the Share > Google Plus icon.
- Step 4: YouTube will open where you’ll tap “Terms and Privacy Policy” to open the Google browser. Here, click Bookmarks and then tap History.
- Step 5: The Download History will open with File Manager, where you’ll click My Files and then choose SD card.
- Step 6: After opening the SD card directory, tap Apex Launcher APK and install Apex Launcher. The menu will automatically transform to the Apex Launcher interface.
- Step 7: Now click Settings and then tap Lock Screen and Security. Then, tap Other Security Settings > Device Administrators. After that, disable the Find My Device option.
- Step 8: Navigate back to the Itel P40 device Settings and choose App. Then, tap the Ellipsis icon and tap “Show system apps.” From the list, choose Google Account Manager and disable it. Do the same with Google Play Services.
- Step 9: Open the downloaded TechnoCare FRP APK and install the Technocare app. After installing it, tap Next and then tap Settings > Accounts. Now choose Add account to add another Google Account.
- Step 10: Go to Device Administrator and enable Android Device Manager.
- Step 11: Navigate back to Settings, click Apps, and enable Google Play Services and Google Account Manager.
- Step 12: Lastly, restart the locked phone and enjoy the services.
Part 3: How to Bypass All Itel Locked Screens without Password
Unlocking FRP using TechnoCare APK is free, quick, and exciting. However, sometimes you may want to unlock your PIN, password, pattern, and other lock systems that you might have forgotten. In that case, use Wondershare Dr.Fone . It’s a desktop program that lets you unlock passwords, PINs, and patterns on Itel, Samsung, Nokia, OPPO, Xiaomi, and other Android phone brands.
![]()
Dr.Fone - Screen Unlock (Android)
Get into Locked Itel Locked Screens without Password
- Pattern, PIN, password, fingerprints & face screen lock can all be unlocked.
- Unlock 20,000+ models of Android phones & tablets.
- Everybody can handle it without any technical background.
- Provide specific removal solutions to promise good success rate.
4,008,669 people have downloaded it
Let’s walk through the simple steps:
- Step 1: Install and run Dr.Fone on your PC and connect your Android phone to the PC using USB.
- Step 2: Then, click Screen Unlock > Android and tap Unlock Android Screen.

- Step 3: Select the Itel P40 device brand Itel that you want to unlock the screen.

- Step 4: Lastly, follow Dr.Fone’s on-screen instructions to enter the specific mode and unlock your phone. That’s it!
You can watch the video below to unlock Itel patterns, passwords, PINs, and fingerprints with Wondershare Dr.Fone
Part 4: How to Disable Google FRP Feature on Itel
You don’t always need to Factory Reset your phone before selling it or handing it over to someone else. Instead, you can manually disable the Activation Lock feature and let the new owner Factory Reset it by themselves. Follow me:
- Step 1: Open Settings and then click Accounts.
- Step 2: Tap Google, and then you’ll see all the linked Google Accounts.
- Step 3: Tap the Google Account you want to remove and tap the Ellipsis icon on the upper-right corner.
- Step 4: Click Remove Account and press Ok to erase the Gmail account. You can remove all the linked accounts if you want.
Conclusion
And that’s the best Itel Android 11 FRP bypass method. With TechnoCare APK, you can quickly bypass APK by adding a different Google Account with an easy-to-remember password. Also, use Dr.Fone to unblock PIN, password, pattern, TouchID, and FaceID on Itel and other Android brands. And another thing, you can manually disable FRP before selling or gifting your phone away. I hope this helps!
 safe & secure
A Step-by-Step Guide on Using ADB and Fastboot to Remove FRP Lock on your Itel P40
Factory Reset Protection is one of the security measures available on Android 5.1 and later devices to prevent intruders’ unauthorized factory resetting of the Itel P40 device. Among the several ways to fix this issue and remove the lock, one is ADB and Fastboot commands. So, if you are aware of using Android Debug Bridge, the below content will help you understand how it can be used to remove the FRP lock.
You can watch the video below to bypass FRP lock without hassle!
Part 1: Quick Overview of ADB and Fastboot Commands
1. What are ADB and Fastboot?
Standing for Android Debug Bridge, ADB and Fastboots are the methods through which communication with an Android device can be done through a computer. Under this method, the commands and the actions that are sent from the system are performed on your Android device.
Several issues can be resolved, and multiple functions can be performed using the ADB format tool and Fastboots, and this also includes removing the FRP lock on your Android device. To use this method, USB debugging should be enabled on the Itel P40 device.
For specific brands of Android phones, specific utility tools are available like the Vivo ADB format tool and the Samsung ADB format tool, which are used explicitly for Vivo and Samsung phones, respectively.
2. How Do ADB and Fastboot Bypass FRP?
Using the versatile ADB command-line tool and Fastboots, the Google FRP lock can be removed using several commands depending on the OS version. This is a client-server program that includes a client who sends the commands, a daemon used to run the commands on the Itel P40 device, and a server that facilitates communication between the client and the daemon.
ADB comes included in the Android SDK Platform-Tools package, and this can be downloaded using the SDK manager.
3. What Are the Android Versions that ADB and Fastboot Command Support?
The Android versions on which ADB and Fastboot commands can be used are as follows:
_Android 5 – Lollipop__Android 6- Marshmellow__Android 7 – Nougat__Android 8- Oreo__Android 9- Pie__Android 10 – Q (expected to work though not tested as yet)_
Part 2: How to Set Up ADB and Fastboot Commands to Remove FRP Lock on Android?
To remove FRP lock using ADB, you first need to install and set up ADB and then remove them using the command. The steps for the same are enlisted below.
Steps to remove FRP using ADB

Step 1. Firstly, download the ADB installed setup file and then extract the files from the toolkit on your system in a folder.
Step 2. Next, you need to run adb.setup.exe and then type Y for installing the drivers for ADB and Fastboot.
Step 3. Again, enter Y for installing the drivers and when done successfully, the command window will close.
Step 4. Next, power on your Android device and connect it to your PC using a USB cable. Here also ensure that USB debugging mode is enabled on your Android device.
Step 5. Next, hold down the Shift key and then right-click at any place blank in the ADB folder, and then choose the Open command window here option.
Step 6. Now to remove the FRP you need to enter the following commands at the command prompt one by one where enter needs to be clicked after every line.
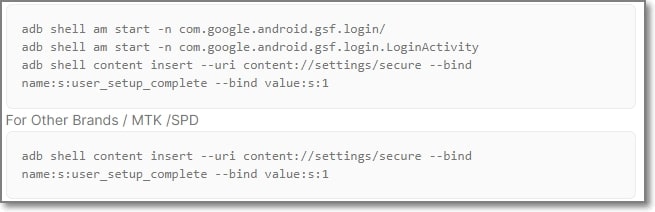
_Adb shell am start -n com.google.android.gsf.login/__adb shell am start -n com.google.android.gsf.login.LoginActivity__adb shell content insert –uri content://settings/secure –bind name:s:user_setup_complete –bind value:s:1_Step 7. The above commands are for Samsung devices. If you want to remove the FRP on other brands, enter the following commands:
_Adb shell content insert –uri content://settings/secure –bind__name:s:user_setup_complete –bind value:s:1_
After the execution of the commands, the FRP lock will be removed from your Android device.
Steps to remove FRP using Fastboot
Step 1. Put the Android device into the bootloader or fastboot mode. (depending on the model and brand of your Android device, the process of entering into the fastboot will differ).
Step 2. Connect your phone to your PC using a USB cable.
Step 3. Next, depending on the system, enter the following command in the CMD window:
_Lenovo FRP command__fastboot erase config__fastboot reboot__XIAOMI FRP command__fastboot -w__MICROMAX YU YUPHORIA FRP__Fastboot -i 0x2a96 erase configFastboot -i 0x2a96 reboot__DEEP/HTC/Other Brands FRP__fastboot erase configfastboot reboot_
Part 3: Limitations of Using ADB and Fastboot Command Method
The ADB and Fastboots command is a workable solution for removing the FRP lock on your Android device, the drawback is that the method is quite complicated and requires thorough technical know-how of ADB and its working. There are several limitations associated with this method as enlisted below.
- Requires technical know-how
To remove FRP using the ADB command you need to have a thorough knowledge of using the tool. The tool has a deep learning curve which makes this method little for the majority of the users.
- Might not unlock the phone
You can try the ADB method for removing the FRP lock but there is no guarantee that the results will be positive and your device will be unlocked.
- Issues with the drivers
Several times while using this method, you might encounter driver issues when your device is not detected as proper drivers are not installed.
- Unexpected issues and errors
ADB is a command-based method, and thus it is important that the commands are entered right. If there is a slight error in the typing of the command, it might lead to major issues and can even be the Itel P40 device damaged.
- The process is not user-friendly
ADB is a technical process aimed toward the geeks, and thus the overall process is not user-friendly and complicated.
Part 4: The Best ADB Alternative to Bypass FRP Lock on Android Phones
Considering the several limitations of the ADB and Fastboot command method, the need for a simple, user-friendly, and workable solution for removing FRP lock on Android devices arises. One of the best software here that we recommend is Dr.Fone - Screen Unlock (Android) which helps in removing and bypassing many Android phone screen locks including the one appearing due to FRP lock.
Dr.Fone - Screen Unlock (Android)
Remove Google FRP on Samsung without PIN code or Google accounts.
- Pattern, PIN, password, fingerprints & face screen lock can all be unlocked.
- Bypass Google FRP on Samsung without pin code or Google accounts.
- No tech knowledge asked, everybody can handle it.
- Work for Samsung, Xiaomi, Redmi, OPPO, etc.
4,005,551 people have downloaded it
The process of using the software is user-friendly and thus can also be used by non-techy users.
Steps for removing FRP lock on Android using Dr.Fone Screen Unlock
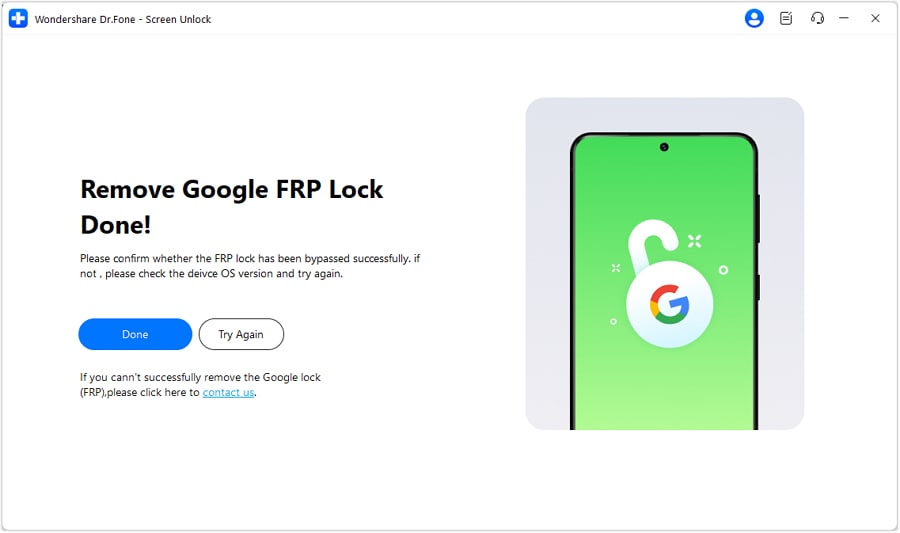
- Step 1. Launch the installed software and choose the Screen Unlock option from the main interface. Choose Android and then select the Remove Google FRP Lock option.
- Step 2. Select the model brans from the options shown on the interface, and then connect your phone to your PC using a USB cable. The connected device details will appear on the interface.

- Step 3. Follow the next steps as they appear. Once the FRP lock is successfully removed, the prompt window will show its completion. Click Done if you have successfully executed the process.
The above is the brief steps for the process. You can check the bypass Samsung FRP lock guide in detail.
Conclusion
If you are well versed with the commands of ADB and Fastboots you can go ahead and use the ADB bypass FRP tool for removing the FRP lock but if this command line method seems complicated for you, Dr.Fone Screen Unlock is the best tool to use.
How Can We Bypass Itel P40 FRP?
After you hard reset your Itel smartphone, you must open the FRP lock before using it. If you can’t pass the FRP lock, Google will block your device for privacy and security. You can easily pass the Itel FRP lock with your Google account and password. You will get stuck there if you don’t know your account and password. Although it seems like a big problem, there is no need to panic because you can bypass it using other methods.
One of the fastest ways to remove the FRP lock is to use the Itel FRP code. If you don’t want to use this method, you can also use the talkback method to bypass FRP. Both of these methods work perfectly every time, so the choice is up to you. Here, we will give you an easy guide to bypass FRP on your Itel .
Part 1: What is Itel FRP Bypass Code?
Factory reset protection is a Google security feature that protects your phone from unauthorized access. The FRP activates when you log in with a Google account on your smartphone. When you reset your device, the FRP asks for Google verification. The FRP lock doesn’t allow device access without your Google account and password. You can enter the Itel FRP bypass code to open the FRP lock on your device without your Google account and password.
Even for smartphones from the same brand, the method to bypass FRP varies for each model. Instead of using complex methods to bypass FRP on your device, you can use the bypass code to remove the lock in seconds. The English Itel FRP code is *#813#, and the Chinese code is *#812#. You can learn how to use these codes from our step-by-step guide.
Part 2: Efficient Ways to Bypass Itel FRP
In this part, we will explore three efficient methods to bypass Itel FRP and weigh the advantages and disadvantages of each.
A Comprehensive Comparison of Three Methods to Bypass Itel FRP
| Method | Advantages | Disadvantages |
|---|---|---|
| Wondershare Dr.Fone [Fast & Easy] | 1. Efficiency: Wondershare Dr.Fone offers a fast and efficient FRP bypass process, ensuring quick access to your Itel device. | |
| 2. User-Friendly: The software comes with an intuitive interface, making it accessible to both novice and experienced users. | ||
| 3. Comprehensive Solution: Beyond FRP bypass, Wondershare Dr.Fone provides additional features for data recovery and device optimization. | Cost: While the software may require a purchase, the cost is justified by its effectiveness and additional functionalities. | |
| Itel Emergency FRP Code | 1. Official Solution: This method is officially supported by Itel , ensuring compatibility and reliability. | |
| 2. No Additional Software: The Emergency FRP Code doesn’t require third-party software installations, simplifying the process. | 1. Limited Accessibility: Obtaining the Emergency FRP Code may involve contacting Itel support, leading to potential delays. | |
| 2. Complexity: The process might be more complex for users unfamiliar with official support channels. | ||
| Talkback Method to Bypass | No External Software: This method doesn’t require additional software installations, making it a straightforward option. | 1. Technical Skill Required: The Talkback Method involves navigating through device settings, which might be challenging for users without technical expertise. |
| 2. Time-Consuming: Compared to software solutions, this method may take longer to complete. |
1: Recommended: Use a powerful software-Wondershare Dr.Fone [Fast & Easy]
Facing the FRP (Factory Reset Protection) lock on your Itel phone can be a roadblock, but with the right tools, the process becomes seamless. In this step-by-step guide, we’ll walk you through the easy and effective steps to bypass the FRP lock on your Itel phone using the reliable Dr.Fone - Screen Unlock (Android) .
![]()
Dr.Fone - Screen Unlock (Android)
The Best FRP Lock Removal Tool for Itel
- Pattern, PIN, password, fingerprints & face screen lock can all be unlocked.
- Bypass Android FRP lock without a PIN or Google account.

- Unlock mainstream Android brands like Samsung, Itel , Xiaomi, etc.
- No tech knowledge required, Simple, click-through, process.

4,008,671 people have downloaded it
Step-by-Step Guide to bypassing Itel Frp Lock
Follow these straightforward steps to bypass the FRP lock on your Itel phone using Dr.Fone:
- Step 1. Launch Wondershare Dr.Fone and select Toolbox > Screen Unlock.
- Step 2. Choose Android and then click Remove Google FRP Lock button on the next page.
- Step 3. Then you will see various device brands and select OPPO among the options.
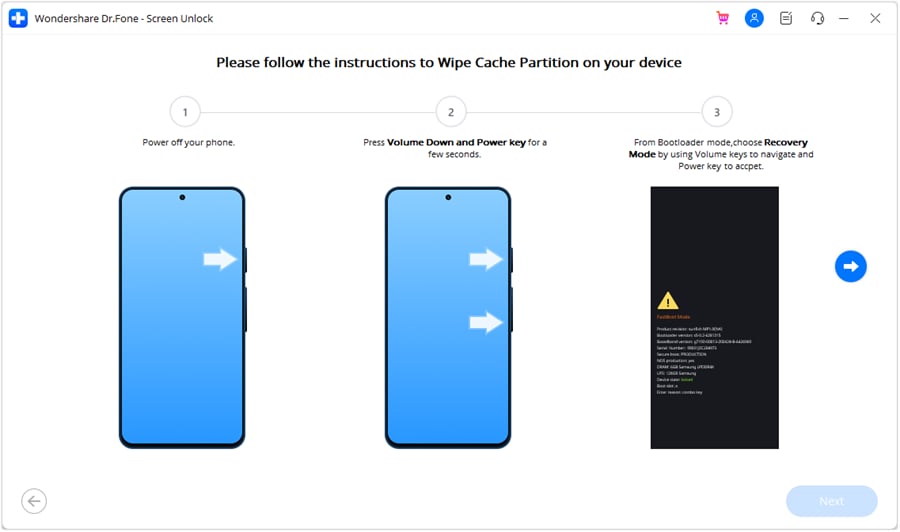
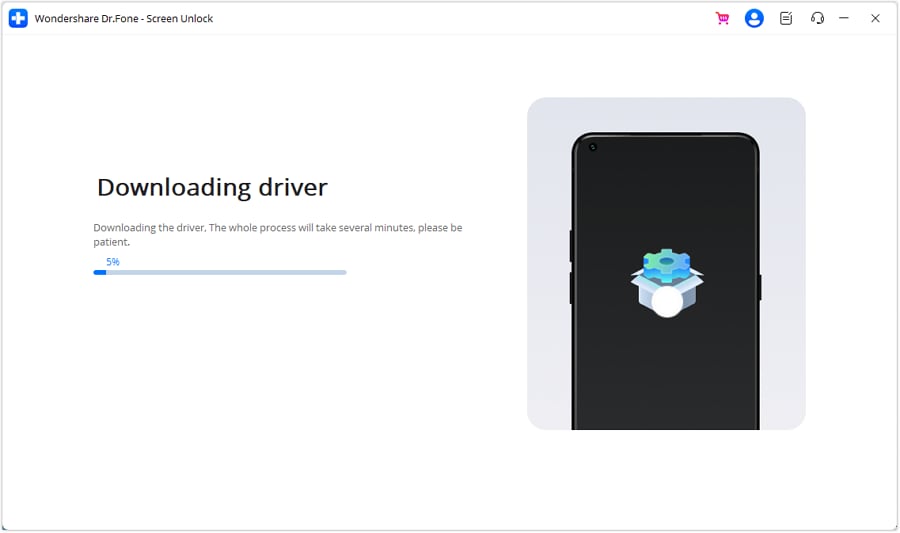
- Step 4. Once you have selected the Itel P40 device brand, Dr.Fone will initiate the downloading process of FRP.
- Step 5. When it finished downloading, please turn off your device and connect it to the computer. Press the Volume Up and Down buttons for about 3 seconds during the connecting process.
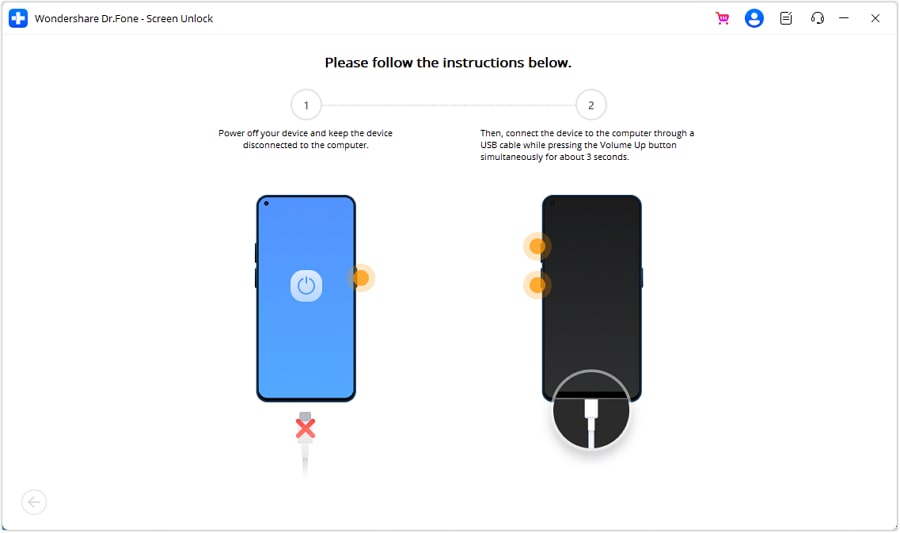
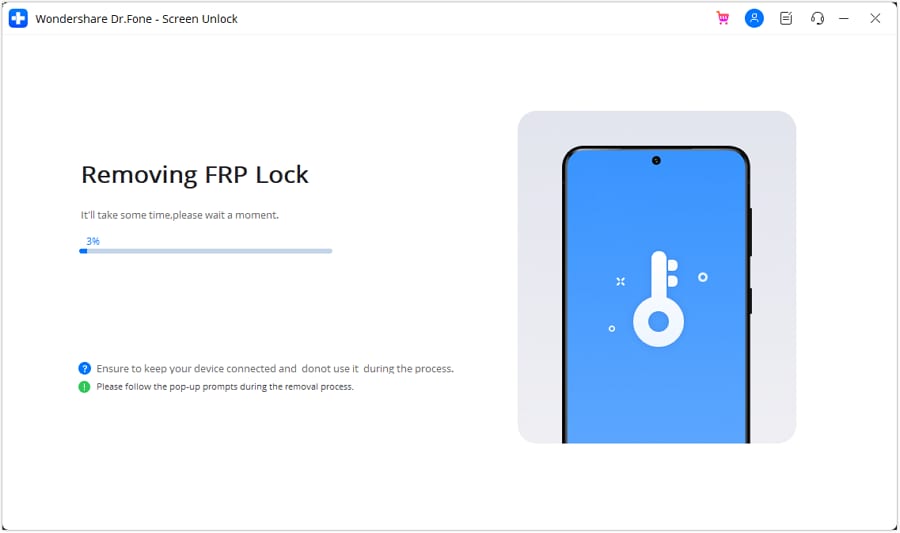
- Step 6. Wait for a few minutes until the FRP is unlocked.
Wondershare Dr.Fone is a reliable software to bypass Itel FRP with a high success rate. Its easy-to-use feature makes it popular among users. We recommend it as your first choice.
safe & secure
2: Use Itel Emergency FRP Code
The Itel Emergency FRP Code is an alternative method to bypass FRP, relying on a unique code provided by the Itel P40 device manufacturer. After you do a factory reset on your Itel smartphone, don’t rush to set it up. If you set up your device, the FRP lock will appear on the screen. When you go to the language selection screen, tap on the emergency call option to open the dialer. That’s where you will be entering the Itel FRP bypass code. Follow these steps to remove the FRP lock from your smartphone.

- Step 1. Power on your Itel device after the factory reset.
- Step 2. Start the Itel P40 device set up and connect it to a Wi-Fi network.
- Step 3. After you enable the Wi-Fi connection, return to the welcome screen.
- Step 4. Tap on the “Emergency Call” option at the bottom left of the language selection page.
- Step 5. Type one of the FRP bypass codes (*#813# or *#812#) on the dialer and tap on the “Dial” button.
- Step 6. Next, don’t do anything and wait for the home screen of your Itel device to appear. You might see some alerts, but you don’t have to touch the screen.
- Step 7. Once you enter your phone, open “Settings” and go to “About phone”.
- Step 8. Enable Developer options by tapping on the android version between seven to ten times.
- Step 9. From the Developer Options, enable USB debugging.
- Step 10. Now, go back to “Settings” and reset your Itel device from the “Factory Data Reset” option.
- Step 11. Once the reset is complete, you can set up your device and enter it without FRP.
3: By Talkback Method to Bypass
For those seeking a manual approach, the Talkback Method involves leveraging the accessibility feature on the Itel P40 device. Before using the Talkback method, ensure that your phone has more than 50% battery backup and an internet connection. The Talkback method will not work on devices with the latest Android operating system. Here are the steps to bypass Itel FRP lock with the Talkback method.

- Step 1. Power on your Itel smartphone and hold the volume up + down buttons at the same time to enable the Talkback feature.
- Step 2. Select “Turn on” to open the Talkback shortcut. Once you enable this feature, you can long press the volume up + down buttons to enable it anytime.
- Step 3. Now, double tap on the close button on the screen twice.
- Step 4. Next, draw the letter “L” on the hello screen and double-tap on the “Talkback Settings”.
- Step 5. In the menu, swipe down with two fingers to navigate to the “Braille Keyboard”. Double-tap to select it and go to “keyboard settings”.
- Step 6. Now, open the “Talkback Braille Keyboard” and return to the add network screen. Also, turn off the Talkback feature by long pressing the volume down + up buttons together.
- Step 7. Click on the keyboard icon to open the “Talkback Braille Keyboard” again. Enable accessibility settings and swipe right to enter the “General” option.
- Step 8. Navigate to “Help & Feedback” from the accessibility menu.
- Step 9. Tap on the “Control Your Itel P40 Device with Switch Access” and tap on the “Play” icon. Next, tap on the three dots in the video corner.
- Step 10. elect the “Share” option and tap on the three dots next to the Twitter icon this time.
- Step 11. Go to “Settings” from the “Profile” icon and select “YouTube Terms and Services” from “History & Privacy”.
- Step 12. Next, tap on the “Accept and Continue” option. Select “Next” and tap on “No Thanks” on the next page.
Which Method is Best to Bypass Itel FRP Lock?
Choosing the right method to bypass Itel FRP depends on your preferences, technical proficiency, and urgency. Wondershare Dr.Fone - Screen Unlock (Android) offers a swift and user-friendly solution, the Itel Emergency FRP Code provides an official route, while the Talkback Method caters to those who prefer a manual approach. Consider the advantages and disadvantages outlined above to make an informed decision and regain access to your Itel device efficiently.
safe & secure
Part 3: FAQ for Bypassing Itel FRP (Factory Reset Protection)
Below you’ll find answers to some of the most common questions regarding bypassing Factory Reset Protection (FRP) on Itel devices.
1. What is the FRP skip code for Itel ?
Currently, there is no universally applicable “FRP skip code” for Itel devices. FRP is a security feature, designed to prevent unauthorized access to your device after a factory reset. If you are the legitimate owner and need to bypass FRP, you may need to contact Itel customer support or follow authorized methods for FRP bypass, which usually involve verifying your Google account credentials.
2. What is the emergency code for FRP bypass?
There is no official emergency code for bypassing FRP on Itel or other Android devices. FRP is a critical security feature implemented by device manufacturers to protect users’ data. To bypass FRP, you must follow the legitimate procedure provided by Itel or seek professional assistance.
3. How to remove screen lock in Itel mobile?
Unlocking your Itel mobile’s screen with Dr.Fone - Screen Unlock (Android) is a seamless solution. Unlike hard resetting, which often leads to FRP lock issues, Dr.Fone provides a faster and safer alternative. This Itel Unlock Tool swiftly bypasses the lock screen without requiring a password, ensuring a secure and efficient process.
safe & secure
4. How to remove an admin in Itel ?
To remove an admin, or a device administrator:
- Step 1. Go to ‘Settings’ on your Itel device.
- Step 2. Scroll down and tap on ‘Security’.
- Step 3. Then, select ‘Device Administrators’ or ‘Device Admin Apps’.
- Step 4. You will see a list of apps with administrator privileges. Find the admin you want to remove and toggle off its access.
- Step 5. Confirm by tapping ‘Deactivate’ when prompted.
5. How to disable Itel security?
Disabling security features like passwords, PINs, pattern locks, or biometric scans can be done through settings:
- Step 1. Open ‘Settings’ and go to ‘Security’.
- Step 2. Tap on ‘Passcode’, ‘Biometrics & Passcode’, or a similar option depending on your device model.
- Step 3. Choose the lock method currently in use and select ‘None’ or ‘Disable’.
Note: Disabling security features makes your device more vulnerable to unauthorized access.
Conclusion
Let’s conclude our guide on how to bypass the Itel FRP lock. You can remove the FRP lock from your Itel device with various methods. The fastest and easiest way is to use the Itel FRP code, which lets you bypass the FRP lock within seconds. You can also use the Talkback method if you have an older Itel device. In addition to the FRP lock, you can bypass the screen lock on any Itel device with Dr.Fone - Screen Unlock (Android) . Dr.Fone enables users to unlock any android device without a password. It is a one-stop solution with features like WhatsApp transfer, data backup and restore, data eraser, and system repair.
Also read:
- [New] Essential Tips for Live Video Features on Websites for 2024
- [New] The Quintessential Queries A Highlight of Reddit's Best Threads
- 5 Ways To Teach You To Transfer Files from Itel P40+ to Other Android Devices Easily | Dr.fone
- Digiarty: 신규 비디오 변환 소프트웨어 공사 기술이 제공하는 DVD 대화형 자산 전용 솔루션
- Explore the Latest in Smart Technology: Reviewing the Third Gen Amazon Echo Show 10 with Room-Aware Movements
- Hassle-Free Ways to Remove FRP Lock from Vivo Y78t Phones with/without a PC
- How to Bypass Google FRP Lock on Honor Play 8T Devices
- How To Bypass Tecno Camon 20 Pro 5G FRP In 3 Different Ways
- IMessage Signs of Being Blocked by Another User – What to Look For
- In 2024, 8 Best Apps for Screen Mirroring Realme 12 Pro+ 5G PC | Dr.fone
- In 2024, How Can We Bypass Vivo X Flip FRP?
- In 2024, Is GSM Flasher ADB Legit? Full Review To Bypass Your Vivo X100 ProFRP Lock
- In 2024, The Updated Method to Bypass Vivo S18 FRP
- Quick Logitech Earphone Firmware Upgrade!
- Understanding Magix's ACID Pro and Its Market Rivals
- Title: In 2024, Ultimate Guide from Itel P40 FRP Bypass
- Author: Lynn
- Created at : 2024-12-14 05:31:26
- Updated at : 2024-12-21 07:10:57
- Link: https://bypass-frp.techidaily.com/in-2024-ultimate-guide-from-itel-p40-frp-bypass-by-drfone-android/
- License: This work is licensed under CC BY-NC-SA 4.0.