
In 2024, The Updated Method to Bypass Vivo T2 Pro 5G FRP

The Updated Method to Bypass Vivo T2 Pro 5G FRP
Android smartphones have a security feature called FRP (Factory Reset Protection) that shields user data from theft or loss. Like other manufacturers, Vivo uses FRP as a security feature to make sure that, in the event of a factory reset, only the original owner with the Google account credentials linked with the Vivo T2 Pro 5G device would be able to access the Vivo T2 Pro 5G device. This aids in preventing the Vivo T2 Pro 5G device’s theft or unauthorized use.
FRP, however, can also be a problem if a user forgets their Google account login information or loses access to their device. Our step-by-step method will walk you through the most effective ways to bypass FRP on Vivo T2 Pro 5G devices in 2023, ensuring you can regain access to your device without any hassle. Say goodbye to FRP Xiaomi and Vivo T2 Pro 5G FRP challenges with our complete method.
We have included more than two ways to unlock your mobile without any hassle and complication. Just follow this guide, and you will regain access to your device in no time.
Part 1: Precautions To Take Before and After FRP Bypass?
Precautions are necessary for a safe and effective process when overcoming FRP (Factory Reset Protection) on your Vivo T2 Pro 5G device. In order to safeguard your data, guarantee device performance, and maintain device security, we’ll highlight the essential steps you should take before the Vivo FRP bypass.
Precautions:
- Backup Your Data: In order to prevent data loss during FRP bypass, be sure to back up all vital information from your smartphone, including contacts, pictures, videos, and documents, to a secure location.
- Charge the battery: To prevent any delays during the FRP bypass procedure, ensure your device has enough battery life or is connected to a charger.
- **Conduct Thorough Research:**To prevent any potential threats or damage to your device, conduct thorough research and follow instructions from reliable sources or respected guidelines.
Part 2: How to remove Vivo T2 Pro 5G FRP with the most reliable software - Dr.Fone?
Wondershare Dr.Fone - Screen Unlock (Android) is well-known for its ease to use and data-security. The Unlock Android Factory Reset Protection feature helps you enter home screen without effort. Dr.Fone not only supports Vivo FRP bypass, it also supports other device brands, such as Samsung , OPPO , etc.
Dr.Fone - Screen Unlock (Android)
Vivo T2 Pro 5G FRP Lock Removal Made Easy
- Pattern, PIN, password, fingerprints & face screen lock can all be unlocked.
- Bypass Android FRP lock without a PIN or Google account.

- Unlock mainstream Android brands like Samsung, Redmi, Xiaomi, etc.
- No tech knowledge required, Simple, click-through, process.
3,981,454 people have downloaded it
Check the following steps to see how to bypass Vivo FRP with Wondershare Dr.Fone.
Step 1: Launch Wondershare Dr.Fone first and choose Toolbox > Screen Unlock > Android.
Step 2: Select Remove Google FRP Lock.

Step 3: Choose Vivo among the Vivo T2 Pro 5G device brands.
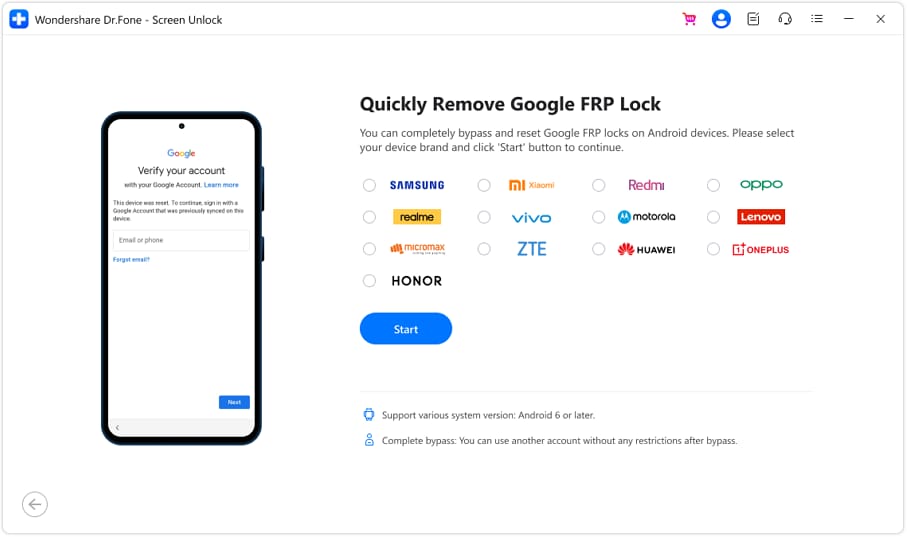
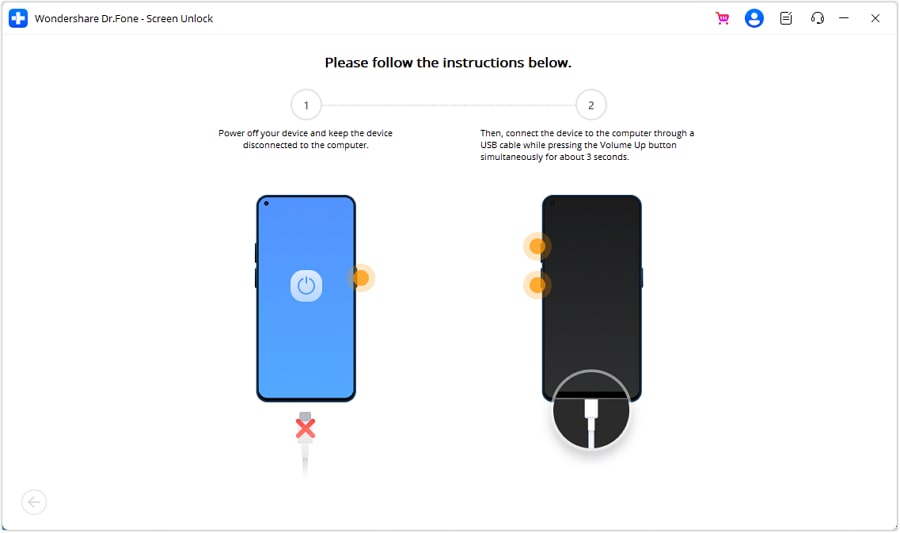
Step 4: Dr.Fone will start to download driver. And then turn off the Vivo T2 Pro 5G device and connect to the computer. During the connecting process, please keep pressing Volume Up and Down button simultaneously for around 3 seconds.
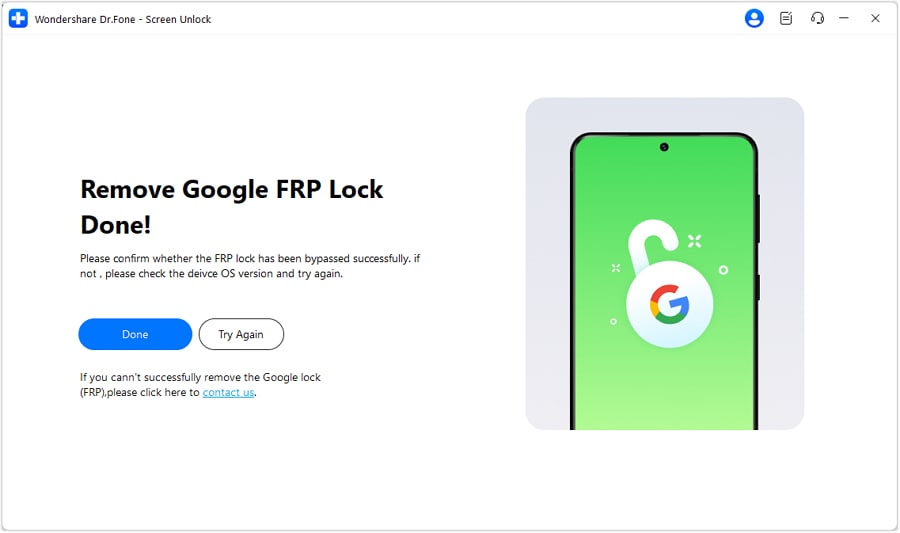
Step 5: Wait for a few minutes and when it’s done, click Done button.
Part 3: How To Bypass Vivo T2 Pro 5G FRP in Traditional Method
With each phone, operating system, and version of Android having its own technique, bypassing Vivo FRP on the most recent versions of Google’s operating system is becoming increasingly challenging. You can use the FRP bypass software that works with your device to employ the free FRP bypass approach.
- Click Add Network at the bottom of the screen in network settings.
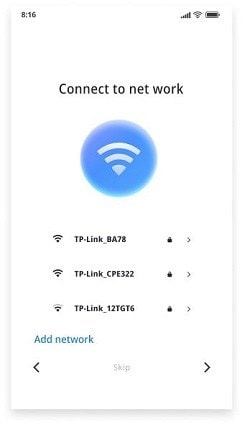
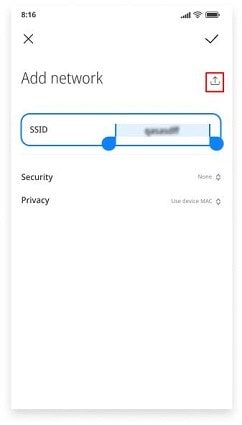
- In the SSID field, type any random text you like and long-press to pick it. To share it with Gmail, tap the share icon. Tap Notifications > Additional Settings on the App Info screen.
- Click the three dots in the top right corner and select “Help and Feedback.”

- Open the search bar and type “Delete and disable apps on Android.” Tap “Tap to go to Application Settings” on the following screen.

- Enable the Accessibility Menu Shortcut by selecting Settings > Additional Settings > Accessibility > Accessibility menu.

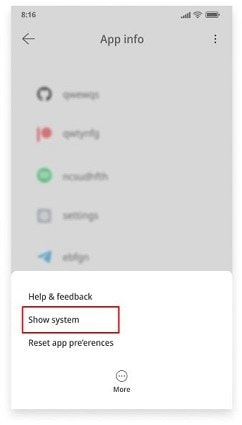
- Repeat the back button to go back to the App info screen. Click More, then select Show System.
- Tap Disable and Disable app after choosing Android setup, then tap Force stop and OK.
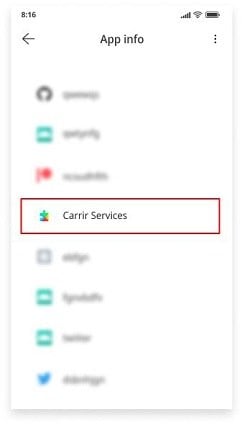
- Return to the App info screen and select Carrier Services. Then, select Disable and Disable app. Finally, select Force to stop and OK.
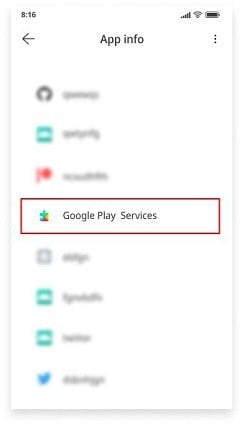
- Go back to the App info screen, choose Google Play Services, and then touch Disable to remove the app. Click OK after tapping Force Stop.
- To get back to the Connect to the Network screen, press the back button and the Next icon.
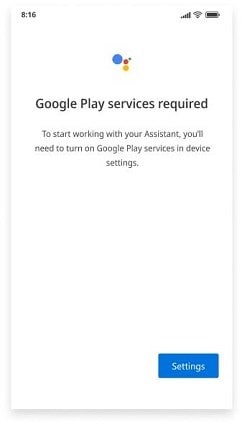
- Tap the person icon in the lower-right corner of the screen to access Google Assistant > Settings on the Checking for Updates page. To access the Google Play services App information page, repeat this process numerous times. To enable Google Play Services, select Enable.
- Wait until the procedure is finished before going back to the Checking for Updates page. When the procedure is finished, select More, then select Accept.
- You can finally disable Xiaomi’s Google account verification when the Setup Complete page appears.
Part 4: How To Bypass Vivo T2 Pro 5G FRP With ADB Command on a PC?
ADB and Fastboots, which stand for Android Debug Bridge and Android Debug Bridge, respectively, are two ways that a computer can communicate with an Android smartphone. The commands and actions delivered by the system are carried out on your Android device using this technique.
Depending on the OS version, the Google FRP lock can be removed using a variety of commands using the flexible ADB command-line tool and Fastboots. This software uses a client-server architecture and a client that transmits commands.
- Download the ADB installed setup file first, and then extract the toolkit files to a folder on your computer.
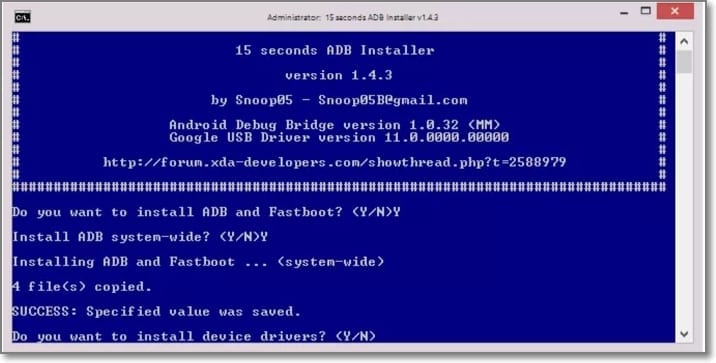
- Run adb.setup.exe next, and then press Y to accept the prompt to install the ADB drivers.
- When the drivers have been successfully installed, type Y once more, and the command window will close.
- Next, please turn on your Android device and connect it to your PC using a USB cord. Ensure your Android device’s USB debugging mode is also on here.
- Then, while holding down the Shift key, right-click somewhere that is empty in the ADB folder and select the Open command window here.
- Then, to delete the FRP, run the following lines one at a time at the command prompt, pressing enter after each line. Below is the code for CMD.

- Your Android device’s FRP lock will be removed following the execution of the commands.
Disabling FRP on Vivo T2 Pro 5G/Poco devices is relatively simple. Once you’ve removed the Google account from your device, the FRP lock will be disabled, and you’ll no longer need to bypass Vivo FRP.
- Go to “Settings” from the menu.
- Go down the page and click “Accounts & Sync.”
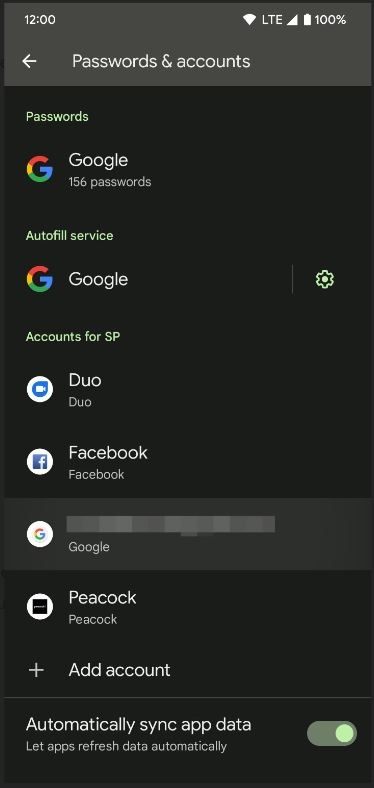
- To delete a Google account, tap on it.
- Confirm your selection of “Remove Account” by clicking.
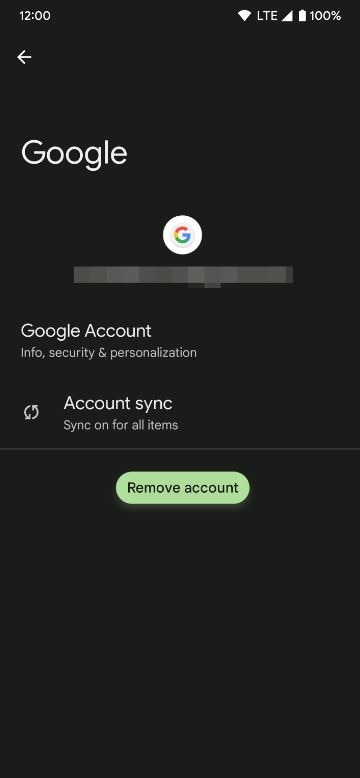
- You might be asked to enter your device password or PIN to finish the process.
Summary
In conclusion, unlocking Vivo T2 Pro 5G FRP can be difficult, but it can be done quickly with the correct tools. You can either use the traditional method, which may prove quite long. We would recommend using the Vivo FRP bypass tool. The top Vivo T2 Pro 5G Google FRP Unlock tools, such as Dr.Fone - Screen Unlock (Android) , have been covered in this article. Since Dr.Fone - Screen Unlock (Android) is an all-in-one solution for Samsung, Xiaomi, Redmi, Oppo, Realme, Vivo FRP unlocking, we advise readers to give it a try.
Best Vivo FRP Bypass Guide
Vivo devices have long proven their value in the mobile market by releasing new models with cutting-edge functionality. With the latest security update in its releases, the android operating system has made it more challenging to overcome Vivo c11 FRP bypass on handsets automatically. Due to Google’s recent Android Security updates, Vivo T2 Pro 5G FRP Bypass is now extremely tough. FRP is a novel security mechanism implemented in contemporary Android smartphones. To authenticate the valid owner, Android will prompt you to input the last Google account active on the phone before executing the hard reset.
So, this tutorial is for you if you’ve lost your existing Gmail account and your smartphone is stopped at the Google verification screen. This guide will show you the most recent technique for **Vivo T2 Pro 5G FRP Bypass-**Google Account Unlock. So attentively adhere to the simple method outlined below.
Am I able to bypass Vivo FRP?
What is FRP?
Factory Reset Protection (FRP) is a safety measure available on Android smartphones. When you establish a Google Account on your smartphone, FRP is felt most strongly. When FRP is enabled, it stops a device from being used after a factory data reset unless you log in with a Google identity.
How it works?
Factory Reset Protection is an enhanced security feature that is accessible on the bulk of Android smartphones. When you reset your Android phone, you’ll need your phone’s Login details to gain entry to it. But now, we’ll go through the free FRP tools that can bypass your Google FRP.
FRP will be triggered immediately after the Google accounts have been connected to the Android smartphone. If FRP is enabled, the Samsung smartphone cannot be used after a factory reset unless you connect using your Google login and username that you previously made on the Samsung device.
If you want to restore the factory reset on your Android phone, make sure you’re in the options, navigate to your Account Settings, head to your accounts and clouds, and remove the Gmail email account on your Android smartphone. This should activate the FRP feature on your Android device.
Requisite: Before attempting this method on your device, ensure that your cellphone has at least a 50-60% rechargeable battery to finish the upgrading process properly.
A simple list of solutions
To solve your problem, we have provided these three solutions you can have to unlock your android.
- Retrieve your Google account on another device
- Delete Google account from Settings
- Bypass Vivo FRP through PC by using a USB Cable
Solutions to Bypass Vivo FRP?
Retrieve your Google account on another device
The fundamental and most innovative way to do the Factory Reset is to recover a Google account. You can restore your Email ID or password from another device or computer before attempting FRP bypassing Vivo T2 Pro 5G .
You may also include an alternate email or phone number for the account you would like to restore. Google will email you a verification Vivo FRP bypass code, which you can use to create a new password for your Google account.
Once you change your password, it will require 24 to 72 hours for the reset password to synchronize with all gadgets connected to the account. After you’ve synced, you may do a factory data reset by entering your email address and a new password. You may factory reset your device by using this approach.
If you enter the incorrect password throughout this procedure, the time will be reset for the following 24-72 hours to synchronize. So, use caution while putting your email and password into the gadget. To finish the process, link your Vivo T2 Pro 5G to a connection and leave it on for the moment.
Delete Google account from Settings
Whenever we erase the Google account from the C11, we disable the FRP of the computer system Android 11, Realme. However, it is a prevention that ties the Vivo T2 Pro 5G to a Google account such that when it is restarted or prohibited due to loss or theft; it asks for the Google account login and password.
First step:
To remove your Google account, navigate to the settings icon on your Realme, which should be on the home screen or in the phone menu. You can reach the main menu by moving your fingertip from the bottom to the top of your screen.
Second step:
We browse through the C11 options and seek for the “Accounts” area, where you have to click to enable.
Third step:
All accounts associated with this Vivo T2 Pro 5G will be displayed, including Google accounts and other social media accounts such as Instagram, Facebook, TikTok, Twitter, etc. Choose the profile you wish to disconnect from this device.
Fourth step:
It will show the data associated with this Google account and the Vivo T2 Pro 5G . To proceed, click “Remove account.”
Fifth step:
To avoid accidentally disconnecting an account from the Vivo T2 Pro 5G , tap “Remove account” once more to verify. It will clear the Vivo T2 Pro 5G device of any data associated with this account.
Bypass Vivo FRP through PC by Using USB Cable
If you want to use your PC to bypass Vivo FRP, then here is another useful solution with the following steps:
Step 1:
The first step is to download and install a tool called “SideSync apk.” Once it is installed, run and connect your Vivo T2 Pro 5G with your PC by using a USB cable.
Step 2:
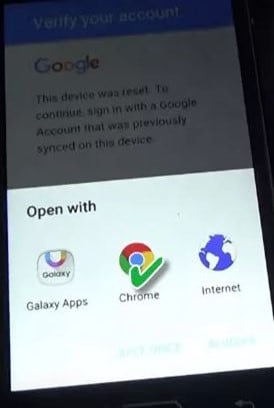
A pop-up screen will be shown asking you what Application you would like to use for opening the tool. Here you can select Chrome to open this too.
Step 3:
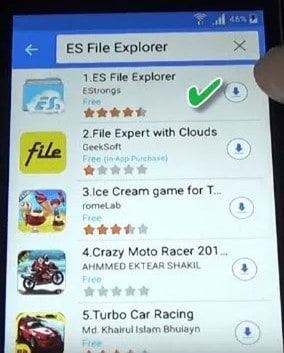
Your file will be downloaded through the Chrome browser. Then install ES File Explorer so that you can find and open the apk file.
Step 4:
Once the ES File Explorer is installed on your phone, find the APK file downloaded to your device, and install it. This will pop up in the settings menu, where you must choose the option of Backup and reset. Then select Factory data reset to rest your Vivo device. Here you go, you have bypassed the FRP of your device.
Conclusion
That’s it, guys. We hope this guide was helpful to you in order to bypass the Vivo T2 Pro 5G FRP. However, you can have the best option for the bypass as per your choice and convenience.
Easy Guide How To Bypass Vivo T2 Pro 5G FRP Android 10/11/12/13
Security measures have become increasingly robust nowadays to protect user data. One such security feature is Factory Reset Protection (FRP). This feature is designed to prevent unauthorized access to a device after a factory reset. FRP serves its purpose of safeguarding personal information. At times it can pose a challenge for users who find themselves locked out of their own devices.
This tutorial will guide you through a step-by-step Vivo FRP bypass Android 10, 11, 12, and 13 processes. By following these instructions carefully, you’ll regain access to your Vivo smartphone even if you’ve forgotten the associated Google account credentials.
Part 1: Basic Understanding of FRP
Before going after Vivo FRP bypassing Android 12, it is important to understand what FRP is. Knowing what it is and how it works will help you bypass this lock. Factory Reset Protection (FRP) is a powerful security feature developed and implemented by Google for all Android smartphone companies. It works on Android devices starting from Android 5.1 Lollipop and above.
Working of FRP
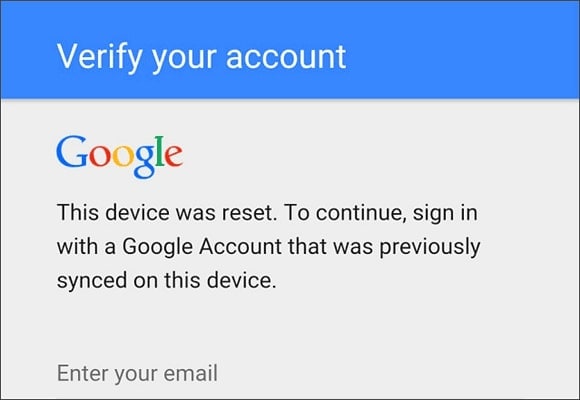
The primary purpose of FRP is to prevent unauthorized access to a device after it has been factory reset. It acts as a safeguard against theft or misuse of personal data. Moreover, FRP ensures only the original owner can access the Vivo T2 Pro 5G device data and applications. When FRP is enabled on an Android, it becomes tied to the Google account that was previously used on the Vivo T2 Pro 5G device.
After a factory reset, the Vivo T2 Pro 5G device will need the user to enter the Google account credentials. It is the same account associated with the Vivo T2 Pro 5G device. This prevents someone who doesn’t know the account details from gaining access to the Vivo T2 Pro 5G device.
Significance of FRP
FRP plays a crucial role in protecting personal data stored on Android devices. It acts as a strong deterrent against unauthorized access. This ensures that the data remains inaccessible even if a device falls into the wrong hands. This security measure is particularly important in cases of device theft or loss. It helps prevent sensitive information from being accessed by unauthorized individuals.
By implementing FRP, Google aims to enhance the overall security of Android devices. This also greatly helps in protecting user privacy. It adds an additional layer of protection for your device. FRP makes it more difficult for unauthorized users to bypass the Vivo T2 Pro 5G device’s security measures.
Part 2. Preparing for FRP Bypass
It is crucial to make sure you’re prepared before you go after the Vivo FRP bypass the Android 13. This section will guide you through the essential steps to ensure a successful bypass process. Following these measures will reduce the chances of encountering any obstacles. So, let’s get started by taking care of a few key aspects before proceeding with the FRP bypass.
Ensuring Device Compatibility
First, verify that your Vivo smartphone is running one of the supported Android versions, specifically Android 11, 12, or 13. This tutorial is specifically tailored to these versions. Attempting to bypass FRP on incompatible devices may lead to unexpected results. Confirming device compatibility will ensure that the provided instructions are relevant. It will also ensure the given instructions are applicable to your specific situation.
Backup Important Data
Backing up data can be possible even in this case; however, you should not have factory reset your Vivo before backing up your data. This is because the FRP lock gets enabled after factory resetting the Vivo T2 Pro 5G device. While using your Vivo with a Google account logged in, you will have to take the services of a third-party tool.
Wondershare Dr.Fone – Phone Backup turns out to be an assistance in this case. The service can be utilized to back up all necessary data before the FRP lock is removed from the Vivo.
Charging the Vivo T2 Pro 5G device Adequately
Ensure that your phone has enough charge to avoid any complications during the FRP bypass process. It is recommended to charge your Vivo device to at least 50%. The ideal way is to connect it to a power source during the procedure. This will prevent any unexpected shutdowns that could potentially disrupt the bypass process.
Connecting to Stable Internet
A stable and reliable internet connection is crucial for a successful FRP bypass. Ensure your phone is connected to a secure Wi-Fi network or stable cellular data connection. A strong internet connection is required to download necessary files or tools during the FRP bypass process. By ensuring a stable connection, you’ll avoid potential delays or complications.
Part 3. Method 1: Using Official Google Account
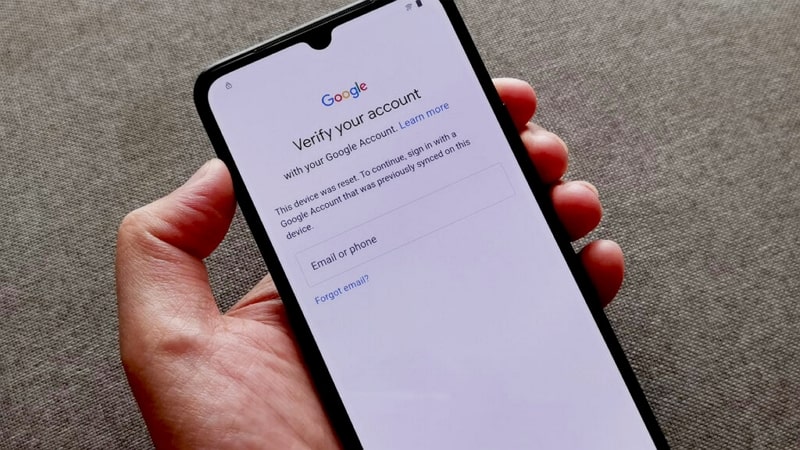
The FRP lock on your Vivo smartphone is directly linked to your Google account. The reason you find yourself in this situation is due to the inability to recall your Google account password. However, there is a solution — by recovering your Google account, you can successfully bypass the FRP lock.
This process will only work if you at least remember the Gmail ID. Follow the straightforward steps provided below to reset your Google account password:
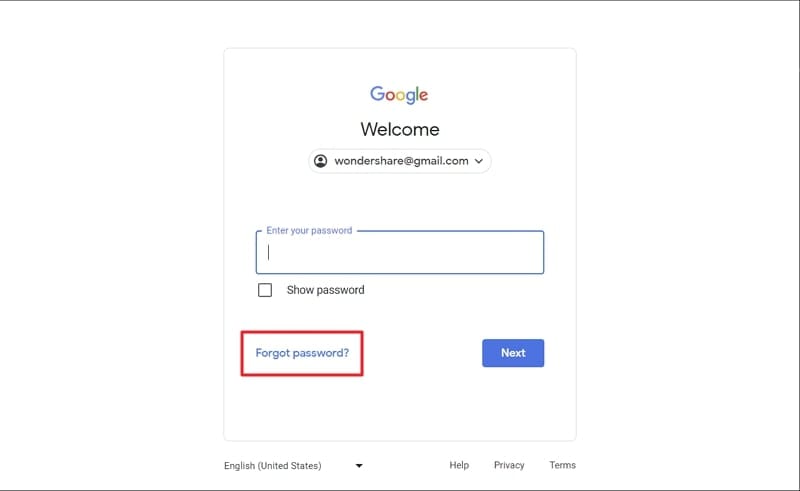
- Step 1: Access the Google Sign-in page on your computer using a web browser. Enter your Google account email address. When asked for the password to add, proceed with the “Forget Password” option.
- Step 2: To verify your identity, utilize the phone number or recovery email associated with your Google account. You will receive a verification code on the phone number or recovery email. Once received, enter the code provided.
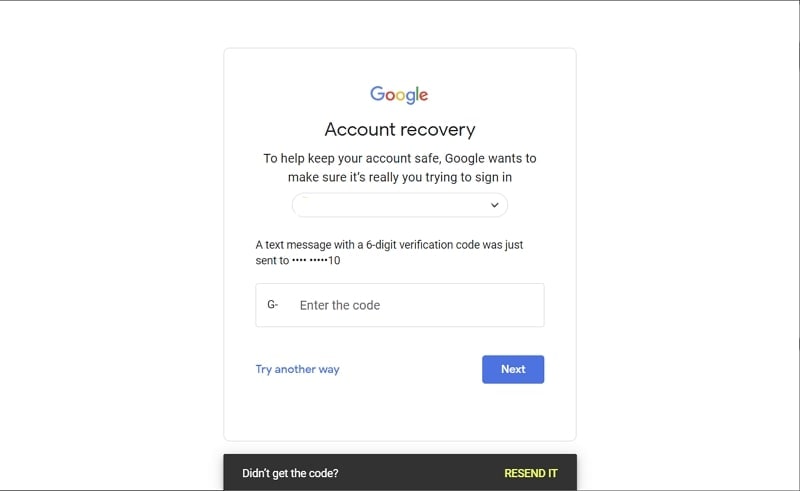
- Step 3: After completing the verification process, you can create a new password for your Google account. Take note that it may take approximately 24 hours for Google to synchronize the new password across all your devices. Once the new password has been synced, you can sign into your Google account on your Vivo smartphone, successfully bypassing the FRP lock.
Part 4. Method 2: Using FRP Bypass Tools
One way to Vivo Y20 FRP bypass Android 12 is to use a specialized FRP bypass tool. Among the various tools available, we highly recommend using Wondershare Dr.Fone . It is a reputable and reliable tool for FRP bypass on Android devices from all major brands. These include over 15 brands with 2000+ Android devices where Dr.Fone can do its magic.
Dr.Fone - Screen Unlock (Android)
Bypass Vivo Google FRP in a Flash
- Pattern, PIN, password, fingerprints & face screen lock can all be unlocked.
- Bypass Android FRP lock without a PIN or Google account.

- Unlock mainstream Android brands like Samsung, Vivo, Xiaomi, etc.
- No tech knowledge required, Simple, click-through, process.
3,981,454 people have downloaded it
Wondershare Dr.Fone is trusted by users worldwide for its effectiveness in bypassing FRP locks. With its intuitive interface and comprehensive features, Dr.Fone simplifies the bypassing process. Its compatibility with Android 10, 11, or 12 Vivo devices makes it an ideal choice. Following are the detailed steps to Vivo FRP bypass the Android 11 process:
- Step 1: Navigate To Remove Google FRP Lock in Wondershare Dr.Fone
Install the latest Wondershare Dr.Fone phone toolkit from the official website on your computer and launch it. Now move the “Toolbox” tab and go for “Screen Unlock”. As Vivo is an Android brand, on the next screen, click “Android”. Among the various available option for screen unlocking, choose “Remove Google FRP Lock”.

- Step 2: Choose Vivo As the Brand
The next step is to choose the targeted phone brand, which in this case is “Vivo”. After selecting the brand, click “Start”. It will begin the process of downloading the related driver for Vivo FRP bypassing.

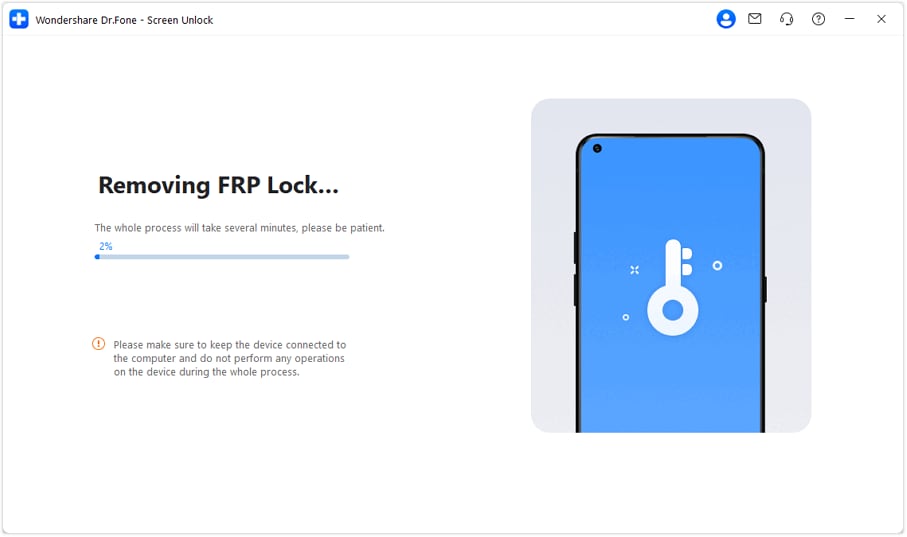
- Step 3: Complete the Vivo FRP Bypassing Process
After downloading the driver, move to your Vivo smartphone and turn it off. Connect the turned-off device to the computer while pressing both volume keys for at least 3 seconds. It will kickstart the Vivo FRP bypassing process , which will take a few minutes.

Part 5. Method 3: Contacting Vivo Support
In specific scenarios, all methods at hand can be unsuccessful in Vivo FRP bypassing Android 12. Here contacting Vivo Support can be a viable option to bypass FRP on your Vivo smartphone. This section will discuss when it is appropriate to consider contacting Vivo Support. Moreover, it will discuss the available support channels and the steps to follow when seeking their help.

You may consider contacting Vivo Support in the following situations:
- If you have exhausted all other methods and cannot bypass FRP on your Vivo device.
- If you need specialized help or guidance from Vivo’s technical team.
- If you encounter any difficulties or issues during the FRP bypass process. Now you need expert help to resolve them.
Available Options for Vivo Support Channels
Vivo offers various support channels to cater to the needs of its users. These channels typically include:
- Official Vivo Website: Visit the official Vivo website and navigate to the support section. Here, you can access resources such as FAQs, user manuals, and troubleshooting guides.
- Customer Support Hotline: Contact the Vivo customer support hotline to speak with a representative. They will be able to provide guidance and help over the phone.
- Email Support: Send an email to Vivo’s support team detailing your issue and request for help. They will respond to your inquiry accordingly.
- Live Chat: Vivo websites offer a live chat feature where you can interact with a support agent in real time.
Steps To Follow When Seeking Help From Vivo Support
When contacting Vivo Support for FRP bypass help, follow these general steps:
- Prepare Necessary Details: Before reaching out, gather essential information about your device. These include the model number, IMEI, and a brief description of the FRP bypass issue you are facing.
- Choose a Support Channel: Select the most convenient support channel based on your preferences. It can be the hotline, email, or live chat.
- Provide Accurate Information: Clearly describe your situation, including the steps you have already taken. You should also mention the methods you have attempted to bypass FRP.
- Follow the Instructions: Listen carefully to the guidance provided by the Vivo Support representative. Moreover, follow the instructions provided via email or live chat.
- Provide the Required Information or Documents: If requested by Vivo Support, provide any necessary information or documents. You will need such documents to prove your ownership of the Vivo T2 Pro 5G device.
You might also interest:
_ The Complete Guide to Unlock Mi Account Without Password _
_ Ultimate Guide to Bypass FRP with PC _
_ Complete Method: How to bypass Xiaomi FRP _
Part 6. Troubleshooting and Tips
You may encounter certain issues or errors during the FRP bypass process on your Vivo device. This section will address some common problems that users may face and provide ways to help you resolve them:
Common Issues and Their Solutions
Before we lead into an assessment of the tips that one can follow to avoid issues with their Vivo FRP bypass process, it is necessary to guide users with the problems involving the process. However, along with the issues, all the required solutions are associated with them.
1. Faulty USB Connection
During the bypass process, your computer may fail to detect your Vivo device when connected via USB.
Solution: Ensure your Vivo device is properly connected to your computer via a USB cable. Moreover, try using a different laptop port or USB cable but confirm it is original to fix any connection-related issues.
2. Device Compatibility Issue
The FRP bypass tool you are using may not be compatible with your specific Vivo device model or Android version.
Solution: Confirm that the FRP bypass tool you are using supports your Vivo device model and the specific Android version installed on your device. Consider trying an alternative tool if compatibility issues persist.
3. Retry Bypass Methods
The bypass method you have chosen may not be successful in bypassing FRP on your device.
Solution: Attempt the process again by following the instructions meticulously. Double-check that you have entered the correct information and followed each step accurately.
4. Network Connectivity Problems
Instability in your internet can cause issues with the downloading or verification process. As a result, your attempt to bypass FRP fails.
Solution: Ensure you have a stable and high-speed internet connection to avoid interruptions during the FRP bypass. If not, try switching to a different network, such as taking a mobile hotspot from your family member or friend. You can also reset your network settings if connectivity issues persist.
General Tips for a Successful FRP Bypass Process
To increase the likelihood of a successful FRP bypass on your Vivo device, consider the following general tips:
1. Research and Understand the Method
Familiarize yourself with the Viva Y20 FRP bypass Android 12 method you intend to use. Read tutorials, watch videos, and gather information. Ensure that you have a clear understanding of the instructions involved for your selected methods to perform successfully.
2. Ensure Device Compatibility
Verify that the FRP bypass method or tool you plan to use is compatible with your specific Vivo device. It should be compatible with the model and the Android version it is running. Using incompatible methods can lead to errors and unsuccessful bypass attempts.
3. Follow the Instructions Carefully
Pay close attention to each step of the Vivo FRP bypass Android 13 process. Follow the instructions precisely. At times even a minor mistake can hinder the success of the bypass.
4. Stable Internet Connection
Ensure that you have a stable internet connection throughout the FRP bypass process. A stable connection is necessary for downloading required files or using online FRP bypass tools.
5. Seek Professional Help If Needed
If you encounter difficulties during the FRP bypass process, consider seeking professional help. You can seek help from authorized service centers or contact Vivo Support. They can provide guidance and help troubleshoot any issues you may face.
Conclusion
To conclude, we have explored various methods and tools to assist you in Vivo FRP bypassing Android 12. Throughout the journey, one tool has stood out as a reliable solution: Wondershare Dr.Fone. Regarding FRP bypass, Dr.Fone - Screen Unlock (Android) has proven to be a top choice for Vivo devices. It is compatible with a range of Vivo models and Android versions.
This makes Dr.Fone an excellent option for a hassle-free bypass experience. Dr.Fone provides step-by-step instructions for the FRP bypass process. It ensures that you are guided through each stage of the bypass procedure.
- Title: In 2024, The Updated Method to Bypass Vivo T2 Pro 5G FRP
- Author: Lynn
- Created at : 2024-07-15 09:21:41
- Updated at : 2024-07-16 09:21:41
- Link: https://bypass-frp.techidaily.com/in-2024-the-updated-method-to-bypass-vivo-t2-pro-5g-frp-by-drfone-android/
- License: This work is licensed under CC BY-NC-SA 4.0.


