
In 2024, Hassle-Free Ways to Remove FRP Lock on Itel P40 Phones with/without a PC

Hassle-Free Ways to Remove FRP Lock on Itel P40 Phones with/without a PC
“I just bought a used Itel device from the mobile market without checking the already signed in Google account, and I don’t even know what Gmail ID is added to this device, so I’m looking for FRP Itel bypass tools. Please help.” A user says so on Quora.
In all such and similar situations when you have authorized access to your Itel or any other Android device, but not the right Google credentials, the need for a tool that can bypass the lock arises. The content below will take you through these FRP bypass Itel tools.
Part 1. Can I Bypass Google Lock on Itel ?
Yes, the Google Lock on Itel can be bypassed using an FRP bypass tool. Although in case of theft and loss, the FRP lock is a great feature, but on the flip side, in a situation where you forget your Google credentials, the function can be more of a problem than of use. Additionally, if you have got a hand on a second-hand device having an FRP lock, then also you would be in trouble accessing the phone.
You can choose between tools without a computer as well as PC-based programs to bypass and remove the Google Account. Once the account is removed using the tools, the following will be the benefits.
- You will have complete access to your Itel device and its features.
- Once the lock is removed, it will completely de-link from the previous Google account and hence cannot be blocked or traced by the previous owner.
- You can permanently delete the Google account.
Part 2. How to Bypass Google Lock on Itel Without Computer? (30 Min & Free)
To remove the Itel FRP bypass without using a system, the EMERGENCY CALL method can be used. Though this method is free, it is lengthy and complicated.
Steps for Itel FRP bypass without computer
- Step 1. Connect your Itel phone to a Wi-Fi and then switch it on for the HELLO screen to appear. Next, select the Emergency Call option and then click on Emergency Information two times.
- Step 2. On the Emergency Information page, tap on the Pencil icon and Name. Next, click o the profile icon and select the option of changing an image.
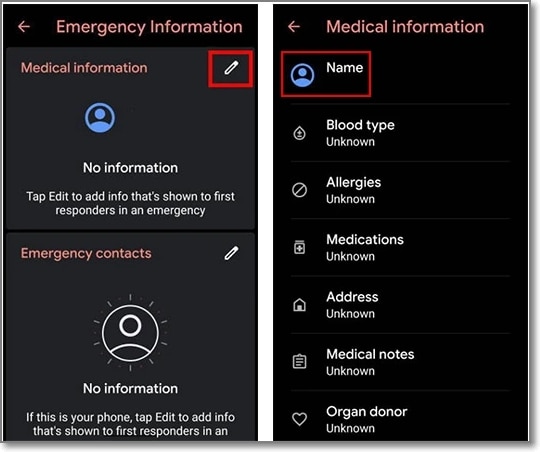
- Step 3. Next click on Menu > Photos > Permissions. Click on the Contacts options and select See All apps with this permission.
- Step 4. Click on the Search > Settings> Settings App Info > Open. With this, you will enter the Settings section of the Itel P40 device, after which select Accessibility > Accessibility Menu and turn in On.
- Step 5. Go back to the settings and choose Apps & Notifications > App Info. The list of the app will appear, and now you will have to disable some apps for the FRP process.
- Step 6. Choose 3 dots > Show System Apps and then click on Android Setup > Force Stop > OK.
- Step 7. Using the Storage & Cache option, wipe off the Storage and the Cache. Click Disable > Disable App.
- Step 8. Next, click on the blue settings icon of Android Setup and click on Force Stop.
- Step 9. From the Android Setup, remove all the storage and the cache data. Next click on Google Play Services > Disable > Disable App.
- Step 10. Now you need to go to the main Hello homepage by clicking on the back arrow multiple times. Select the Start option and the Itel P40 device screen will start loading.
- Step 11. When the updates are being checked by the screen, go back to the Wi-Fi connection page.
- Step 12. Open the Shortcut Menu by swiping up from the bottom to the top using 2 fingers.
- Step 13. Click Assistant > Settings > Enable Google Play Services. Move back and select Skip > Continue.
- Step 14. Click on More > Accept.
- Step 15. At the Set Screen Lock, click Skip > Skip > OK > Accept & Continue and then go to the home screen.
- Step 16. Finally, to bypass google lock on Itel without pc, go to Settings > System > Advanced > Reset Option and here choose to Erase All Data options 3 times.
Part 3. How to Bypass Google Lock on Itel with Computer? (15 Min but Paid)
If you have access to a computer, Motoreaper is a decent Itel FRP tool for Itel FRP bypass with computer. Developed by the Phonlab team, Motoreaper is a Windows-based tool that works on the majority of Itel devices including Moto E, Moto X, Moto G, Droid Turbo, Droid Maxx2, and others.
Steps for Itel FRP bypass using Motoreaper
- Step 1. Download and install the Motoreaper software on your system and launch the same.
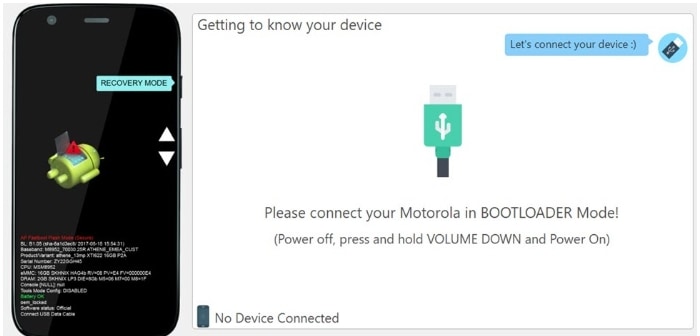
- Step 2. Now you need to get your Itel phone into bootloader mode and for this, you need to power off your device and then turn it on by pressing and holding the power and volume down buttons together for a few seconds.
- Step 3. Next, connect your phone to your PC using a USB cable and the software will successfully show the connected device.
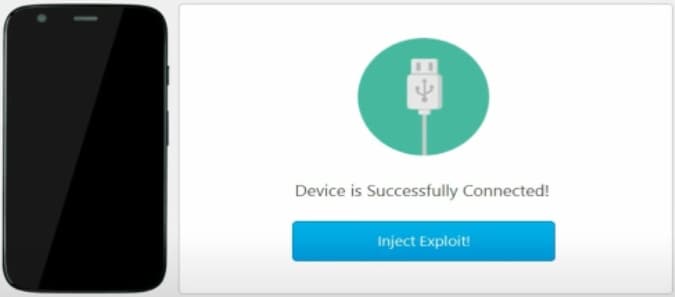
- Step 4. Next, unplug your Itel phone and boot it into the factory model using the bootloader mode by pressing the power and volume down button. When the factory mode appears, use the power button to select it.
- Step 5. Now connect your phone again to your system and let it boot up completely. Next, click on the I have Done option.
- Step 6. Now your device is on the factory mode where you need to click on, the I Confirm option.
- Step 7. Next for Itel Google bypass, use debugging in your device and then tap on I confirm at Moto Rapersoftware.
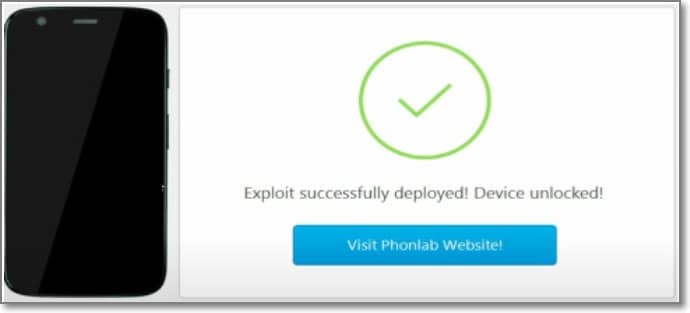
- Step 8. The Unlock No button will appear in the Moto Reaper software which you have to click after which the Google bypass Itel process will be complete and the FRP lock will be removed.
Part 4. How to Unlock Itel Phone Passcode? (5 Min)
Besides FRP lock, the screen lock of your Android phones including Itel is one of the most common situations. So, if to have forgotten your screen lock code or have a device with a locked screen, the best tool we reconned is Dr.Fone - Screen Unlock (Android) . This simple system-based software will let you remove all types of screen locks – PIN, password, pattern, as well as a fingerprint in a few simple and quick steps. The software is reliable and safe without causing any harm to your device.

Dr.Fone - Screen Unlock (Android)
Get into Locked Itel within Minutes
- 5 screen lock types are available: pattern, PIN, password, fingerprints & Face ID.
- Easily remove the lock screen; No need to root your device.
- Everybody can handle it without any technical background.
- Provide specific removal solutions to promise good success rate
4,008,671 people have downloaded it
Step 1. Launch the installed software on your system and from the main page, choose the Screen Unlock option.
Step 2. Using a USB cable, connect your phone to your system and then select Unlock Android Screen option on the software interface.

- Step 3. From the supported list on the software interface, select Itel .

- Step 4. Your Itel phone will enter into a dedicated mode. Once in this mode, Dr.Fone will initiate the Itel screen unlock process.
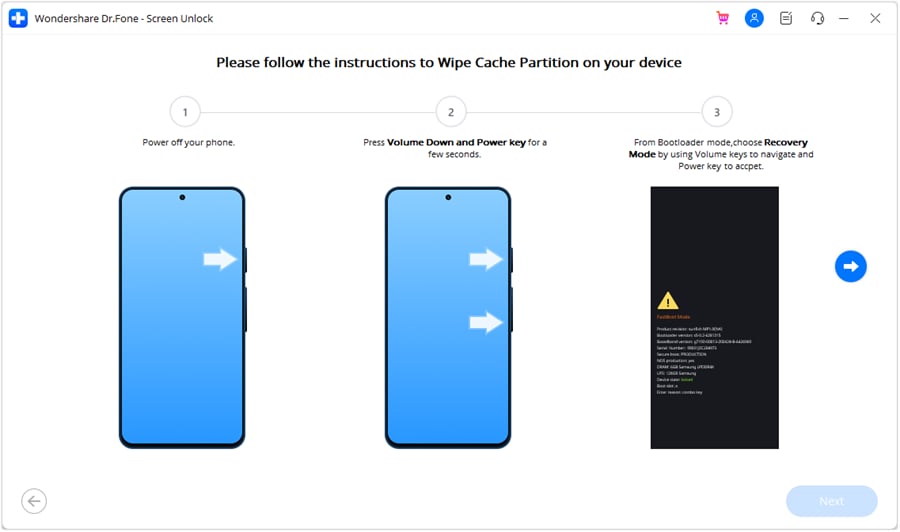
- Step 5. When the process is complete, you can access your Itel device without any need for a password.


Conclusion
Itel FRP lock can be removed using the Emergency Call option or the above-mentioned Motoreaper tool. For removing any type of screen lock without password on your Android devices, Dr.Fone – Screen Unlock (Android) works as the best option.
Best Itel FRP Bypass Guide
Itel devices have long proven their value in the mobile market by releasing new models with cutting-edge functionality. With the latest security update in its releases, the android operating system has made it more challenging to overcome Itel c11 FRP bypass on handsets automatically. Due to Google’s recent Android Security updates, Itel P40 FRP Bypass is now extremely tough. FRP is a novel security mechanism implemented in contemporary Android smartphones. To authenticate the valid owner, Android will prompt you to input the last Google account active on the phone before executing the hard reset.
So, this tutorial is for you if you’ve lost your existing Gmail account and your smartphone is stopped at the Google verification screen. This guide will show you the most recent technique for **Itel P40 FRP Bypass-**Google Account Unlock. So attentively adhere to the simple method outlined below.
Am I able to bypass Itel FRP?
What is FRP?
Factory Reset Protection (FRP) is a safety measure available on Android smartphones. When you establish a Google Account on your smartphone, FRP is felt most strongly. When FRP is enabled, it stops a device from being used after a factory data reset unless you log in with a Google identity.
How it works?
Factory Reset Protection is an enhanced security feature that is accessible on the bulk of Android smartphones. When you reset your Android phone, you’ll need your phone’s Login details to gain entry to it. But now, we’ll go through the free FRP tools that can bypass your Google FRP.
FRP will be triggered immediately after the Google accounts have been connected to the Android smartphone. If FRP is enabled, the Samsung smartphone cannot be used after a factory reset unless you connect using your Google login and username that you previously made on the Samsung device.
If you want to restore the factory reset on your Android phone, make sure you’re in the options, navigate to your Account Settings, head to your accounts and clouds, and remove the Gmail email account on your Android smartphone. This should activate the FRP feature on your Android device.
Requisite: Before attempting this method on your device, ensure that your cellphone has at least a 50-60% rechargeable battery to finish the upgrading process properly.
A simple list of solutions
To solve your problem, we have provided these three solutions you can have to unlock your android.
- Retrieve your Google account on another device
- Delete Google account from Settings
- Bypass Itel FRP through PC by using a USB Cable
Solutions to Bypass Itel FRP?
Retrieve your Google account on another device
The fundamental and most innovative way to do the Factory Reset is to recover a Google account. You can restore your Email ID or password from another device or computer before attempting FRP bypassing Itel P40 .
You may also include an alternate email or phone number for the account you would like to restore. Google will email you a verification Itel FRP bypass code, which you can use to create a new password for your Google account.
Once you change your password, it will require 24 to 72 hours for the reset password to synchronize with all gadgets connected to the account. After you’ve synced, you may do a factory data reset by entering your email address and a new password. You may factory reset your device by using this approach.
If you enter the incorrect password throughout this procedure, the time will be reset for the following 24-72 hours to synchronize. So, use caution while putting your email and password into the gadget. To finish the process, link your Itel P40 to a connection and leave it on for the moment.
Delete Google account from Settings
Whenever we erase the Google account from the C11, we disable the FRP of the computer system Android 11, Realme. However, it is a prevention that ties the Itel P40 to a Google account such that when it is restarted or prohibited due to loss or theft; it asks for the Google account login and password.
First step:
To remove your Google account, navigate to the settings icon on your Realme, which should be on the home screen or in the phone menu. You can reach the main menu by moving your fingertip from the bottom to the top of your screen.
Second step:
We browse through the C11 options and seek for the “Accounts” area, where you have to click to enable.
Third step:
All accounts associated with this Itel P40 will be displayed, including Google accounts and other social media accounts such as Instagram, Facebook, TikTok, Twitter, etc. Choose the profile you wish to disconnect from this device.
Fourth step:
It will show the data associated with this Google account and the Itel P40 . To proceed, click “Remove account.”
Fifth step:
To avoid accidentally disconnecting an account from the Itel P40 , tap “Remove account” once more to verify. It will clear the Itel P40 device of any data associated with this account.
Bypass Itel FRP through PC by Using USB Cable
If you want to use your PC to bypass Itel FRP, then here is another useful solution with the following steps:
Step 1:
The first step is to download and install a tool called “SideSync apk.” Once it is installed, run and connect your Itel P40 with your PC by using a USB cable.
Step 2:
A pop-up screen will be shown asking you what Application you would like to use for opening the tool. Here you can select Chrome to open this too.
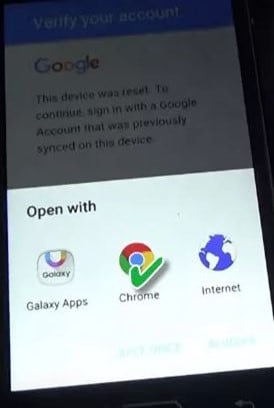
Step 3:
Your file will be downloaded through the Chrome browser. Then install ES File Explorer so that you can find and open the apk file.
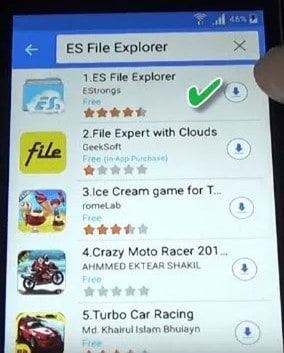
Step 4:
Once the ES File Explorer is installed on your phone, find the APK file downloaded to your device, and install it. This will pop up in the settings menu, where you must choose the option of Backup and reset. Then select Factory data reset to rest your Itel device. Here you go, you have bypassed the FRP of your device.
Conclusion
That’s it, guys. We hope this guide was helpful to you in order to bypass the Itel P40 FRP. However, you can have the best option for the bypass as per your choice and convenience.
How To Bypass Itel P40 FRP In 3 Different Ways
Are you having trouble bypassing Itel P40 FRP? If so, you’re not alone. A lot of people are struggling with this particular task. But don’t worry - We are here to help.
Since many Itel P40 users do not need to log in more than once, they commonly forget their Google email and password.
If you have used this device for an extended period, you might have forgotten the password. A factory reset requires you to log in to your Itel P40 device and use the same Gmail account.
To unlock the Itel P40 smart 5 FRP, you must use any bypassing tool or method. In this blog post, I’ll walk you through the process of bypassing Itel P40 FRP. So read on for instructions on how to get the job done.
Let’s get started!
Part 1: Some Common Reasons To Bypass Itel P40 FRP
Itel P40 devices are often bypassed for the following reasons:
1. Forgotten Google Account Credentials
One of the most common reasons for needing to bypass FRP is that you simply forgot your Google account login credentials. Whether you have a new phone and are setting it up for the first time, or you’ve had the same phone for a while and are just now adding a Google account, there’s always a chance that you might forget your password.
2. A Second-Hand Phone
Another common reason for wanting to bypass FRP is if you’ve purchased a second-hand phone. If the previous owner of the phone didn’t correctly remove their Google account from the Itel P40 device before selling it to you, then you’ll be stuck with their account on the phone and won’t be able to use it yourself until you bypass FRP.
3. Factory Reset In An Untrusted Environment
If you’ve performed a factory reset on your phone to try and fix an issue or start fresh, you’ll need to bypass FRP to use the Itel P40 device again. It is because a factory reset will also remove your Google account from the phone, leaving you locked out unless you can remember the login credentials.
Part 2: Bypass Itel P40 FRP With 3 Easy Methods
Bypassing FRP can be a bit tricky, but it’s possible to do it if you have the right tools and know-how. If you’re looking for a quick and easy way to bypass FRP on your Itel P40 device, below are the methods you can use to Itel P40 Hot 10 FRP bypass.
Method #1: Recover the Google Account Of Your Device
Performing a Factory Reset requires restoring a Google account. It is advisable to recover your email ID or password from another device before attempting Itel P40 Hot 8 FRP bypass.
You can solve the problem if you have an alternate email address or phone number associated with the account you want to recover. By inserting a verification code, you can easily change the password for your Google account.
After resetting your password, it will take 24 to 72 hours to sync the new password with all devices registered to the account.
Once synced, you can perform a factory data reset by providing an email and a new password. Following this method, you can factory reset your Itel P40 Hot S without bypassing FRP.
However, if you provide the wrong password in this process, the time will restart for the next 24-72 hours to sync.
So, be careful when entering your email and password on the Itel P40 device.
Method #2: Bypass Itel P40 FRP With FRP Bypass APK
Itel P40 Hot 8 FRP bypass is done using FRP Bypass APK, an Android application. FRP Bypass APK will prove helpful if you cannot retrieve your Google account, which is logged into your Itel P40 smart 5 FRP bypass.
The APK lets you remove the Google account verification process without a password. You can use this method for free, safely, and quickly.
If you use FRP Bypass APK, you can bypass FRP lock on Itel P40 Hot 10 FRP bypass and any Android phone running version 5.1 or higher.
Using FRP Bypass APK, you can unlock Google lock on the Itel P40 Hot 8 FRP bypass:
Step 1: Download the latest FRP Bypass, Following the official website.
Step 2: Copy the APK file to a USB drive.
Step 3: Use an OTG cable to connect the flash drive and Itel P40 Hot 10 FRP bypass, pulling up a file explorer.
Step 4: After downloading the app, you must install it on your smartphone. You must enable unknown sources before installing.
Step 5: Select the settings menu in the app after completing the installation process.
Step 6: Click on the “Backup and Reset” option.
Step 7: Click the Factory Data Reset button, then select Confirm.
Step 8: The Google account verification will be removed without a password within a few seconds.
Step 9: Restart your device after completing all the procedures.
Step 10: Create a new Google account or skip the option to do so later.
Itel P40 Hot 8 FRP bypass using FRP Bypass APK is a simple method that a beginner can utilize.
Method #3: Bypass Itel P40 FRP Without PC Via Settings Menu
Do you want to bypass the Google account verification FRP on the Itel P40 Smart 5 phone? Using this method, you can bypass the FRP on Itel P40 Smart 5.
Wait until the Itel P40 Hot 8 reboots and prompts you to select a language before performing a factory reset.
You can follow the steps below after selecting:
Step 1: Set up Wi-Fi on the Itel P40 Smart 5.
Step 2: A Google account request page will appear.
Step 3: After tapping the text box, the keyboard will appear.
Step 4: As soon as you click the “@” button, the settings menu will appear.
Step 5: Choose Google keyboard layout from the list. Check it and ensure that the Google keyboard layout is correct.
Step 6: Click on the three dots in the upper right corner of the screen.
Step 7: Select “Help & Feedback” after opening a new page.
Step 8: Click on the search button and send the result from the keyboard once the new dialog box has been opened.
Step 9: Then ignore the guide; it will show you how to do it.
Step 10: Click and hold any word on your screen to highlight it in blue.
Step 11: Click the “Web Search” button on the right-hand side of the screen.
Step 12: A new page guides you through the next step. You can see the web results for the word you just Googled using the Google App.
Step 13: Find the search box in the upper center of the page. Click the search button after typing “setting” in the search bar.
Step 14: You will now see a system settings icon on your home screen. You can reset the factory data by clicking on the following steps: system setting icon > Backup & Reset > Factory Data Reset.
Step 15: Reset the Itel P40 device to factory settings. After completing the reset, you will see the Itel P40 Smart 5 welcome page.
Step 16: Reconnect your Itel P40 to your Wi-Fi network. The phone will instead ask you to add a new Google account if you can do it successfully.
Step 17: Sign up for a Google account, and then the Itel P40 Smart 5 is ready to use.
Bypassing the FRP on your Itel P40 Smart 5 is as simple as following these steps.
Conclusion
It is not illegal to bypass Google verification when you are doing a factory reset in case you forget your password or don’t remember your Google account. The Itel P40 Smart 5 FRP bypass becomes useless if you don’t bypass the FRP lock, so FRP bypass Itel P40 Hot S matters.
You can bypass the Itel P40 Hot 8 FRP by using a few practical methods listed above. You can try another whenever one of the above procedures does not work accurately.
Also read:
- [New] Masterclass in Logo-Making Best of 9 Free Software for YouTubers for 2024
- [Updated] Optimizing Zoom HD Quality Clear Methods
- [Updated] Orchestrate Instagram Reel Magic with Music & Voiceovers
- 2024 Approved Free Fire's Sound Alteration Tactics
- A Quick Guide to Vivo Y200e 5G FRP Bypass Instantly
- About Samsung Galaxy F15 5G FRP Bypass
- Best Low-End Screen Recorder Options Summarized
- How To Delete iCloud Account Remove Your Apple ID Permanently From Apple iPhone SE
- In 2024, Hassle-Free Ways to Remove FRP Lock on Xiaomi Redmi Note 12 5Gwith/without a PC
- In 2024, How to Bypass Google FRP Lock from Vivo T2 Pro 5G Devices
- In 2024, How To Bypass Vivo Y100i Power 5G FRP In 3 Different Ways
- In 2024, Step-by-Step Tutorial How To Bypass Vivo Y78t FRP
- In 2024, Subconversions at Peak - Discover the Top 8 Tools for Converting SBT to SRT
- Navigating the Best Parental Control Routers Available This Year
- No Money Down? Best Free Video Chat Platforms!
- Ultimate Guide on ZTE Nubia Z60 Ultra FRP Bypass
- Title: In 2024, Hassle-Free Ways to Remove FRP Lock on Itel P40 Phones with/without a PC
- Author: Lynn
- Created at : 2024-12-15 17:09:58
- Updated at : 2024-12-22 00:07:11
- Link: https://bypass-frp.techidaily.com/in-2024-hassle-free-ways-to-remove-frp-lock-on-itel-p40-phones-withwithout-a-pc-by-drfone-android/
- License: This work is licensed under CC BY-NC-SA 4.0.