
In 2024, Easy Guide to Itel P40 FRP Bypass With Best Methods
Easy Guide to Itel P40 FRP Bypass With Best Methods
The Google Factory Reset Protection (FRP) lock is a security measure in Android smartphones. By default, FRP Lock is active on all Android devices after the Android 5.1 release and triggers upon the execution of a hard reset. Despite its undeniable importance as a security feature, there are two specific instances when dealing with FRP lock can be difficult.
The first one is forgetting your Google ID details. The other situation is buying a second-hand device locked with the previous owner’s Google ID. This article deals with Itel P40 FRP bypass Android 11. It provides three methods to bypass FRP, allowing you to access your Itel P40 again.

Part 1: [Direct Solution] Itel P40 FRP Bypass Android 11 With Wondershare Dr.Fone
For the first and foremost remedy of Itel P40 LTE FRP bypass, you can use effective software. While other methods are not as versatile and simple, you can take a few steps to unlock your device. The best software solution to bypass FRP on Itel devices currently available is Wondershare Dr.Fone. It is a comprehensive solution that offers functions ranging from bypassing screen locks to FRP locks.
Dr.Fone – Screen Unlock (Android) goes beyond Itel, extending its capability to bypass FRP locks on devices from diverse brands like MI, Samsung, OPPO, and more. Additionally, it streamlines the unlocking process for various screen locks, covering passwords, PINs, fingerprints, and facial recognition. Dr.Fone is designed with a user-centric approach, ensuring accessibility for users of all types to unlock their devices effectively.
Key Features of Wondershare Dr.Fone
- If your locked device is Samsung or LG brand, you can remove the screen lock without any data loss.
- Wondershare Dr.Fone supports over 2000 Android devices for over 18 Android brands, making it a diversely compatible tool.
- With the help of this Itel P40 FRP unlock tool, you can recover your data from a broken Samsung Device.
Steps for Itel P40 FRP Bypass Android 11 With Wondershare Dr.Fone
By eliminating the FRP lock, Dr.Fone facilitates the option of having complete access to your device. Below are the steps required to Itel P40 FRP bypass using Dr.Fone – Screen Unlock (Android):
- Step 1. Access Remove Google FRP Lock in Dr.Fone
You can begin with installing and launching Wondershare Dr.Fone. Go to the “Toolbox” tab and press “Screen Unlock.” On the following screen, choose “Android” as the Itel P40 device type and click “Remove Google FRP Lock.” Now, you will be asked to choose the Itel P40 device brand, after which you need to continue by clicking “Start.”

- Step 2. Successfully Bypass Itel P40 FRP Lock
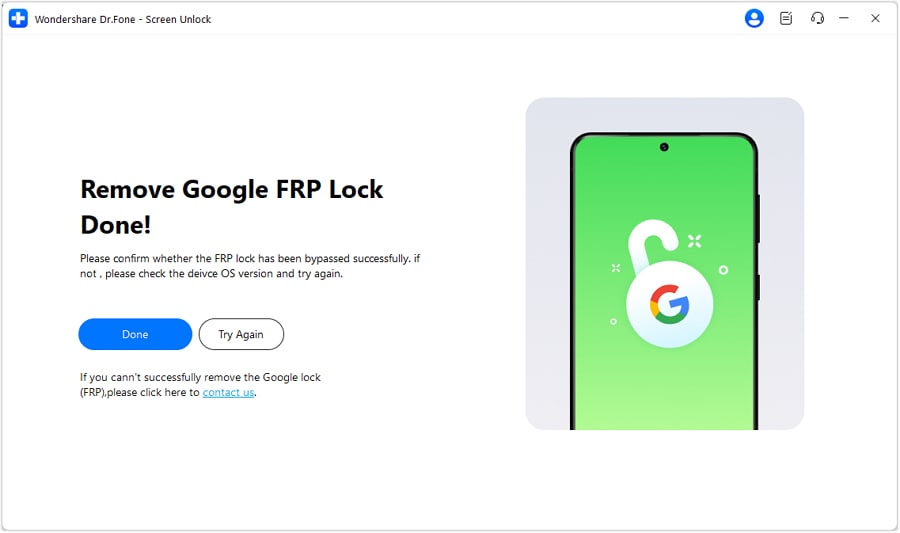
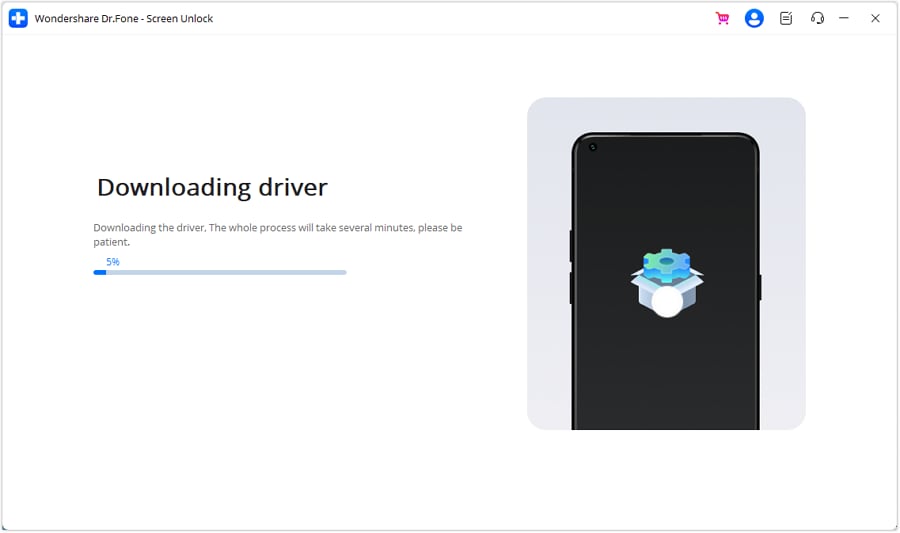
It will lead to the downloading of the required driver for your Android. Upon downloading, turn off your device and establish a connection with the computer. While connecting, press and hold both “Volume” buttons for 3 seconds. This action will commence the FRP bypassing process, requiring a brief moment for completion.
Part 2: Itel P40 FRP Bypass Without PC Using SIM Card Method
While the software solution is the best option for Itel P40 Pro FRP bypass, other options can also feature an unlocking service. These conventional methods are complex; however, they offer a solution to unlocking FRP.
The SIM card method is a favored FRP lock bypass approach among Itel P40 users. Here is a comprehensive guide on employing this method to bypass the FRP lock on Itel P40:
- Step 1. To start, turn on your Itel P40 and confirm it is FRP-locked by going up to the screen where it demands Google ID. Afterward, return to the language screen and enter a PIN-locked SIM card into the Itel P40 device.

- Step 2. Before inserting the SIM card, ensure at least one contact is saved on the card. It could be any random number, and you can do it by inserting the SIM card into another device. After inserting the SIM card, tap “Emergency,” where the Itel P40 device asks you for the PIN of the SIM card.

- Step 3. After pressing “Emergency,” tap “Emergency Information” on the next screen. On the “Owner” screen, tap the icon at the top right corner, enter the SIM PIN code, and when asked, choose “Add contact.”

- Step 4. Add the contact you saved as the owner’s contact and make a call. During the call, tap “Contacts” to access your saved contacts, and select the one you saved. On tapping the three dots on the top, select “Share” and choose “Share as text.”

- Step 5. Choose “XShare Mini” as the sharing option, grant the necessary permissions, and leave the Itel P40 device on the “QR Code.” Move to another device and access a web browser. Go to mobileteamofficials.com and download two apps: “Google Account Manager” and “Account Login/ FRP Bypass.”

- Step 6. On the other device you’re using, download the two apps from the Google Play Store: “Activity Launcher” and “XShare.” Now open the XShare app and grant all the required permissions. Tap “Receive” and scan the QR code from the Itel device to complete the contact transfer process.

- Step 7. Now, select three apps: “Google Account Manager,” “Account Login/ FRP Bypass,” and “Activity Launcher” within XShare on the second device. On the Itel device, tap “Receive” and scan the QR code to complete the process.

- Step 8. Once received, install all three apps on the Itel device. Now, first open “Account Login/ FRP Bypass” and tap “three dots” from the top right corner to select “Browser Sign In.” When it takes you to the Google sign-in page, log in using any Google ID.

- Step 9. After signing in, return to the apps and open the Activity Launcher app. Within the app, tap “Android Setup” on the following screen and scroll down to press the “Android Setup” entry. This will perform the Itel P40 Lite FRP bypass successfully.

Here is a video for you to learn how to bypass FRP:
Part 3: Itel P40 FRP Bypass With APK
While you consider other FRP bypassing methods instead of Wondershare Dr.Fone, there is another option that you can go with. If you prefer a method that doesn’t involve a PC or SIM card, Itel P40 Pro FRP bypass using an APK is a viable option. You can follow the steps given below to complete this Itel P40 Lite FRP unlock tool process:
- Step 1. To begin, turn on your Itel Android 11 Phone. Press “START” and link your phone to a Wi-Fi connection. Return to the Welcome Screen, then press “Start” and choose the option to “Add a New Network.”

- Step 2. Touch the “Microphone” icon and choose “Deny” across the pop-up. Go for the “Microphone” icon again, and opt for “Deny.” Lastly, touch the same icon again and opt for “Allow.” This will take you to the Gboard App information screen.

- Step 3. Choose “Permissions” and tap the “Search” icon at the top-right corner of the follow-up screen. Search for “Settings” and pick the respective app from the results list. Tap “Open” to access the Settings application. This action will direct you to the “Settings” interface.

- Step 4. Navigate to “App management” and select “App settings.” Access the XShare APK, launch it, and ensure you have a secondary Android device available. Open the Play Store on the second device, and download and install the XShare App for further processing.

- Step 5. Next, open the Chrome Browser on the second device. Enter one of the following URLs in the browser and download “FRP Bypass APK” and “Google Account Manager 9.0 APK”:
https://tiny.cc/frptools or https://bit.ly/2NkxXYs

- Step 6. Open the XShare APK on your second Android device. Navigate to the downloaded apps and tap “Send.” Return to the FRP phone and select “Receive” on it. Scan the QR code to establish a connection between the Itel P40 devices. Verify on your FRP phone that both FRP APK files have been received and proceed with the installation.

- Step 7. Close and exit the XShare APK on the FRP phone to return to the “App settings” screen. Launch the FRP Bypass APK, tap the “three dots” upon opening, and choose “Browser Sign-In.” Sign in with your Google Account ID and password.

- Step 8. Return to the “App settings” Screen and uninstall the Google Account Manager APK. Proceed to the initial “Welcome” screen by tapping the back key repeatedly. Initiate the Itel P40 device setup procedure by tapping “Start.” You should now observe “Account Added,” indicating successful FRP bypass on your Itel P40 FRP bypass Android 11.

Conclusion
In conclusion, the Itel P40 LTE FRP unlock tool demands varied approaches catering to user preferences. While methods like SIM cards and APK offer alternatives, Wondershare Dr.Fone - Screen Unlock (Android) is the optimal solution. Dr.Fone simplifies the Itel P40 LTE FRP process with its user-friendly interface and security assurance.
Tips: Are you searching for a powerful FRP bypass tool? No worries as Dr.Fone is here to help you. Download it and start a seamless unlock experience!
A Quick Guide to Itel P40 FRP Bypass Instantly
FRP locks are a security feature that prevents unauthorized access after a factory reset. While these locks protect user data, they can become a hindrance when trying to regain access to the Itel P40 device. Likewise, bypassing FRP locks provides users with the flexibility to overcome these restrictions.
In this article, we’ll learn about the Itel P40 FRP bypass process. We will also list out the things that you must keep in mind before trying this process. Read this guide till the end to find the best Itel P40 FRP unlock tool.

Part 1. Things To Keep in Mind Before Bypassing Itel P40
Bypassing the security measures on a Itel P40 should be approached with caution. There are many considerations that users should keep in mind before the Itel P40 FRP bypass. Below, we have listed some considerations to help users avoid any hassle:
1. Legal Implications
Bypassing device security could potentially breach the terms of service and warranty agreements. Moreover, it may even be illegal in certain jurisdictions. It is recommended to avoid bypassing unless users are certain it is legally permissible in their region.
2. Data Loss
When resetting the Itel P40 device, bypassing security measures often comes into play. This sometimes results in the loss of stored data. Prioritize data backup before attempting Itel P40 FRP bypass. If data preservation is a top priority, exploring alternative solutions is preferable.
3. Security Risks
Your device might be exposed to potential vulnerabilities due to security FRP bypass. This makes it more susceptible to unauthorized access. Users should prioritize safeguarding their data and personal information.
4. Manufacturer Support
Itel P40 FRP bypass can void the manufacturer’s warranty and limit future support options. You should know that bypassing security could result in losing access to updates. It is advisable to explore other solutions before considering bypassing.
5. Technical Skill Requirements
Technical knowledge and skills are highly demanded when bypassing FRP locks. Only users possessing advanced technical skills should attempt a bypass. For those lacking expertise, seeking professional assistance is advisable to avoid consequences.
6. Device Functionality
Bypassing security measures may impact the Itel P40 device’s normal functionality. Users should be prepared for potential device performance or functionality issues post-bypass.
Part 2. Bypass FRP Lock Itel P40 Using SIM Card Method
Using the SIM card process for Itel P40 FRP bypass is a viable option for many users. Still, proceeding with caution and adhering to the specific instructions is necessary. Users only need to insert a PUK-enabled SIM card and set up their device. Consider using the steps guided below to carefully bypass your Itel P40 without any risks:
- Step 1. Power on your Itel P40 device, set it up, and connect it to the Wi-Fi network. Agree to any terms or policies and wait until your phone gets ready. When you reach the verification screen, tap the “Use my Google Account Instead” option.

- Step 2. Once you are required to sign in to your Google account, return to the screen where you have to select the language. Then, insert the SIM card into your phone and ensure you have saved a contact. To enter the SIM PIN, tap on the “Emergency” option. Next, tap “Emergency Information” and click the “Edit” icon at the top-right corner.

- Step 3. Enter the PIN for the SIM card to proceed further. Under the “Emergency Information” section, tap on the “Add Contact” option and access it. Dial the call to that number, and once the call timer appears, choose the “Contacts” option on the dialer screen.

- Step 4. Tap on “three-dots” at the top-right corner and select the “Share” option followed by “Send as text.” On the following screen, send via XShare MI and allow the necessary permission. Download Google Account Manager and Account Login/FRP Bypass APKs on your other device. Also, download the Activity Launcher app from the Play Store.

- Step 5. Set up XShare on another device and allow all the permissions. Choose the “Receive” option to receive the contact from your Itel P40 device via a QR code scan. Afterward, disconnect and exit the current connection. On the main screen, tap the “Receive” option on your Itel P40 and scan the QR code using the Itel P40 device. You are required to share all three of the apps that you just downloaded.

- Step 6. As soon as the apps are received, install them and “Open” the Account Login/FRP Bypass tool. When it requires a password for sign-in, hit the “three-dots” and choose the “Browse Sign-In” option. Provide your Email and Password to sign in to your Google account.

- Step 7. After Google signs in, “Open” the Activity Launcher app and wait until the package is loaded. From the appearing menu, select “Android Setup” and then choose the following option:
Android Setup (com.google.android.setupwizard/.predeferred.PreDeferredSetupWizardActivity)
Once setup ends, the Itel P40 FRP bypass Android 11 process will be completed successfully.

Part 3. How to Easy Itel P40 FRP Bypass With Wondershare Dr.Fone
Facing FRP lock on your Itel P40 can be daunting, especially when you need to access your phone urgently. In this case, using the above-discussed SIM card method can be time-consuming. Users looking for an alternative and quick option can use Wondershare Dr.Fone – Screen Unlock (Android). This tool can help bypass FRP lock on your Android without requiring any PIN or Google account.
Moreover, users don’t need technical knowledge as this tool offers one-click removal. Dr.Fone also adopts a user-friendly interface, ensuring accessibility for every user. Apart from Itel P40 FRP bypass Android 11, this tool also unlocks Samsung and LG devices without data loss.
Salient Features of Wondershare Dr.Fone
- Fone supports over 2000 Android devices across 18+ brands for screen unlock.
- This tool extends the opportunity to recover data from Android devices with broken screens.
- When it comes to recovering device data, Dr.Fone offers a dedicated Data Recovery tool to recover all important lost files.
Steps To Perform Itel P40 FRP Bypass Using Wondershare Dr.Fone
By bypassing the FRP lock, Dr.Fone allows users to gain access to their devices promptly. To start learning about using this tool, follow the steps below for Itel P40 FRP bypass:
Here is a video for you to learn how to bypass FRP:
- Step 1. Connect the Itel P40 device and Navigate to the Toolbox
Connect your Itel device to your computer and launch Wondershare Dr.Fone. Within the toolkit window, navigate to “Toolbox” and select “Screen Unlock.” This will open a new window; choose the “Android” option to access the FRP Lock function.

- Step 2. Choose the Required Device and Android Version
Afterward, click “Remove Google FRP Lock” and select your appropriate device brand from the options. This will trigger Dr.Fone to download the relevant driver for the selected brand.
- Step 3. Access Emergency Call and Enable USB Debugging
After downloading the necessary drivers, power off your smartphone and connect it to the computer. Press the “Volume Up” and “Volume Down” buttons simultaneously for almost 3 seconds as it connects. This initiates the FRP unlocking process. If everything went smoothly with the unlocking, click “Done.”
Read More About Tecno:
Itel Master Reset Code: The Ultimate Guide to Restoring Factory Settings
Ultimate Guide on Itel Spark FRP Bypass
How can I Unlock Itel Network by Myself?
Conclusion
We can conclude that bypassing the FRP lock can be difficult if one does not follow the proper steps. This guide has provided users with two of the best Itel P40 FRP bypass methods. Overall, Wondershare Dr.Fone offers the most advanced methods to let users bypass FRP locks easily. Its ability to support a wide range of Android devices makes it more recommended.
Tips: Are you searching for a powerful FRP Bypass tool? No worries as Dr.Fone is here to help you. Download it and start a seamless unlock experience!
How to Bypass Google FRP Lock on Itel P40 Devices
Technological advancements in the IT and telecommunication industry simplify your tasks and provide security against cyber malpractices. The advantages are numerous and appealing, but there are downsides too. One such inconvenience is caused by Google FRP lock in Itel P40 smartphones. The facility keeps your device information safe against unauthorized access. However, users often report issues like lockouts not being removed due to several causes. Such scenarios raise the demand for Itel P40 Nord FRP bypass solutions for seamless device access.
Part 1. What Is Google FRP and How Does It Work?
Google Factory Reset Protection (FRP) is an in-built security function in Android 5.1 and later versions. The feature protects these devices against intentional data loss on unauthorized access. The utility does not allow a factory reset of your device in case it is lost or stolen. Your data is hence, safe from unwanted mishandling. The feature also protects the Itel P40 device’s data encryptions and screen locks. The functionality gets enabled when you register a Google account on your Android device. As is obvious, the feature gets disabled when the Google account is removed before beginning the Factory Data Reset process.
If your device is under untrusted access and the FRP lock is enabled, the latter will prevent the factory reset of your phone. It is because; the active FRP lock requires entering the Google account credentials registered with the Itel P40 device. Therefore, unwanted users will not be possible to factory reset the Itel P40 phone. However, there may be instances when you need to factory reset your FRP-enabled device to its default settings. Ensure that the registered Google account credentials are available to you under such circumstances.
Part 2. How to Remove Google FRP Lock on Any Itel P40 Phone?
To remove the Google FRP lock on your Itel P40 device, you can follow any of the methods discussed below:
1. Bypass Google FRP Lock on Your Itel P40 Phone
- Switch on the Wi-Fi network of the Itel P40 phone and head to the ‘Hello’ screen.
- Take the following path:
Emergency Call> Emergency Rescue> Add Contact

- When the permission prompt pops up, click on ‘Deny’ and tap “Go to Settings”.
- Hit the ‘Permission’ tab and tap the ‘Search’ button.
- Enter ‘Settings’ in the search field, choose the ‘Settings App Info’ option, and tap the ‘Open’ button.
- Take the path given below to enable the system shortcuts:
System> Accessibility> Accessibility Menu> Toggle the Button to Turn it On> Allow> Got it
- Head to the “Settings” app and tap “Apps and Notifications”. Next, click on “See All Apps”.
- Find and disable the ‘Android Setup’ and ‘Google Play Service’ within the application list.

- Navigate back to the ‘Hello’ screen to completely disable the setup by taking the following path:
Start> Agree> Agree> Skip> Don’t Copy> Ok> Agree
- Skip the ‘Set Screen Lock’ task for completing the setup.
2. Using FRP Bypass APK
This is a quick and smart way to address the FRP lock removal issue within several minutes. Here’s what you need to do:
- Download the FRP Bypass APK to a PC or some other smartphone from the latter’s official website, followed by copying it into a pen drive.
- Use an OTG to connect the pen drive to the FRP-locked device.
- Head to the destination folder of the downloaded APK in the “File Manager” application.
- Install the APK in the FRP-locked phone by allowing the app permissions.
- Navigate to ‘Settings’ and enable the ‘Install from Unknown Source’ option.
- Reinstall and open the APK.
- The ‘Settings’ menu will pop up. Head to the “Backup and Reset” option.
- Click on ‘Factory Data Reset’, followed by “Erase Everything”.
- Tap ‘Confirm’ to erase all the Itel P40 device data.
- Register with a new Google account to use the phone.

3. Deactivate FRP in Your Itel P40 Phone
Removing the Google FRP lock using a computer is impossible in some instances. Deleting your registered Gmail account from the Itel P40 device can help you in these circumstances. The downside of this method is that your device’s data will lose protection from Google. Here’s how you can delete your Gmail account from the FRP-locked phone:
- Launch the “Settings” app on your Itel P40 device.

- In the app’s opening interface, click on the ‘Accounts’ tab to open the section.

- A list of all the accounts linked to your Itel P40 device will be displayed. Tap on the desired Gmail account to unlink it from your phone.

- The device data linked with the selected account will appear on the screen. Click on ‘Remove Account’ to proceed further.

- A confirmation prompt will pop up to ensure a willful deletion of the account from the Itel P40 device. Tap on ‘Remove Account’ to confirm the action. This will cause all data linked with the account to get deleted from the phone.

FAQs about Google Lock Bypass
1. Does Factory Reset Remove Google Account?
There may be instances when you require wiping out smartphone data to keep it safe against unauthorized access. Maybe you wish to pass on your device to another user or migrate to a different device. It is important to make sure that all accounts linked to the phone are deleted from the Itel P40 device. It should be understood here that a factory reset will not remove Google or other accounts from the Itel P40 device. The process restores the default factory settings of the phone that you got at the first purchase.
2. How to Enable Factory Reset Protection?
Enabling the Factory Reset protection feature is a smart way to protect the important data on your phone. However, issues of unethical access in cases of theft or loss are quite prominent. You can enable the FRP functionality by taking the following steps:
- When using a new device, sign in to the phone with your Google account. You can use an existing account or create a new one.
- Set a pattern or password screen lock on your device. It is not advisable to use swipe unlock or leave the phone unlocked at all. If you forget the pattern or password, Google credentials can be used to unlock the Itel P40 device.
These steps will cause the automatic configuration of the Factory Reset Protection feature. The invader will be prompted to enter the registered Google account credentials on every attempt to access the phone.
Conclusion
Developments in electronic technology have brought a series of benefits, covering easy access, security, and everything in between. One such feature is the Google Factory Reset Protection to protect your device data against untrusted access. The feature is undoubtedly credible, but there may be situations that require bypassing the FRP lock. For affordable solutions to address the concern on Itel P40 phones, pick the one that corresponds to your specific situation.
Dr.Fone - Screen Unlock (Android)
Unlock Your Itel P40 Phone in a Flash
- Remove 5 screen lock types: pattern, PIN, password, ingerprints & Face ID.
- Bypass Android FRP lock without a PIN or Google account.

- Unlock mainstream Android brands like Samsung, Huawei, LG, Xiaomi, etc.
- No tech knowledge required, Simple, click-through, process.

3,981,454 people have downloaded it
Also read:
- [New] A Closer Look at Earnings Comparing Dailymotion and YouTube Revenues
- [Updated] 2024 Approved Instagram Feed Adding Videos
- 2024 Approved Techniques for Transforming Twitter Vids to MP3 Audios
- All You Need To Know About Mega Greninja For Apple iPhone 13 mini | Dr.fone
- Expert Techniques for Fixing the Critical Blue Screen on Your Computer
- FRP Hijacker by Hagard Download and Bypass your Samsung Galaxy A15 5G FRP Locks
- How to Bypass FRP on Vivo S17e?
- How to Bypass Google FRP Lock on Vivo X100 Devices
- How To Bypass Infinix Note 30i FRP In 3 Different Ways
- How to Retrieve deleted photos on Realme 11 5G
- In 2024, About Itel P40 FRP Bypass
- In 2024, Forgot Locked Apple iPhone 6s Password? Learn the Best Methods To Unlock | Dr.fone
- In 2024, FRP Hijacker by Hagard Download and Bypass your Infinix Hot 30i FRP Locks
- In 2024, How to Bypass Google FRP Lock from Google Pixel 7a Devices
- In 2024, How to Bypass Google FRP Lock from Vivo T2x 5G Devices
- In 2024, Is GSM Flasher ADB Legit? Full Review To Bypass Your Infinix Smart 8 ProFRP Lock
- In 2024, Ultimate Guide to Catch the Regional-Located Pokemon For Vivo Y36i | Dr.fone
- Mastering the Art of iOS 16: A Guide to Using iPhone's New Photo Cutouts
- Tailoring Your Profile: A Comprehensive Guide
- Title: In 2024, Easy Guide to Itel P40 FRP Bypass With Best Methods
- Author: Lynn
- Created at : 2024-12-14 23:18:45
- Updated at : 2024-12-22 01:43:57
- Link: https://bypass-frp.techidaily.com/in-2024-easy-guide-to-itel-p40-frp-bypass-with-best-methods-by-drfone-android/
- License: This work is licensed under CC BY-NC-SA 4.0.