In 2024, A Quick Guide to Itel P40 FRP Bypass Instantly
A Quick Guide to Itel P40 FRP Bypass Instantly
FRP locks are a security feature that prevents unauthorized access after a factory reset. While these locks protect user data, they can become a hindrance when trying to regain access to the Itel P40 device. Likewise, bypassing FRP locks provides users with the flexibility to overcome these restrictions.
In this article, we’ll learn about the Itel P40 FRP bypass process. We will also list out the things that you must keep in mind before trying this process. Read this guide till the end to find the best Itel P40 FRP unlock tool.

Part 1. Things To Keep in Mind Before Bypassing Itel P40
Bypassing the security measures on a Itel P40 should be approached with caution. There are many considerations that users should keep in mind before the Itel P40 FRP bypass. Below, we have listed some considerations to help users avoid any hassle:
1. Legal Implications
Bypassing device security could potentially breach the terms of service and warranty agreements. Moreover, it may even be illegal in certain jurisdictions. It is recommended to avoid bypassing unless users are certain it is legally permissible in their region.
2. Data Loss
When resetting the Itel P40 device, bypassing security measures often comes into play. This sometimes results in the loss of stored data. Prioritize data backup before attempting Itel P40 FRP bypass. If data preservation is a top priority, exploring alternative solutions is preferable.
3. Security Risks
Your device might be exposed to potential vulnerabilities due to security FRP bypass. This makes it more susceptible to unauthorized access. Users should prioritize safeguarding their data and personal information.
4. Manufacturer Support
Itel P40 FRP bypass can void the manufacturer’s warranty and limit future support options. You should know that bypassing security could result in losing access to updates. It is advisable to explore other solutions before considering bypassing.
5. Technical Skill Requirements
Technical knowledge and skills are highly demanded when bypassing FRP locks. Only users possessing advanced technical skills should attempt a bypass. For those lacking expertise, seeking professional assistance is advisable to avoid consequences.
6. Device Functionality
Bypassing security measures may impact the Itel P40 device’s normal functionality. Users should be prepared for potential device performance or functionality issues post-bypass.
Part 2. Bypass FRP Lock Itel P40 Using SIM Card Method
Using the SIM card process for Itel P40 FRP bypass is a viable option for many users. Still, proceeding with caution and adhering to the specific instructions is necessary. Users only need to insert a PUK-enabled SIM card and set up their device. Consider using the steps guided below to carefully bypass your Itel P40 without any risks:
- Step 1. Power on your Itel P40 device, set it up, and connect it to the Wi-Fi network. Agree to any terms or policies and wait until your phone gets ready. When you reach the verification screen, tap the “Use my Google Account Instead” option.

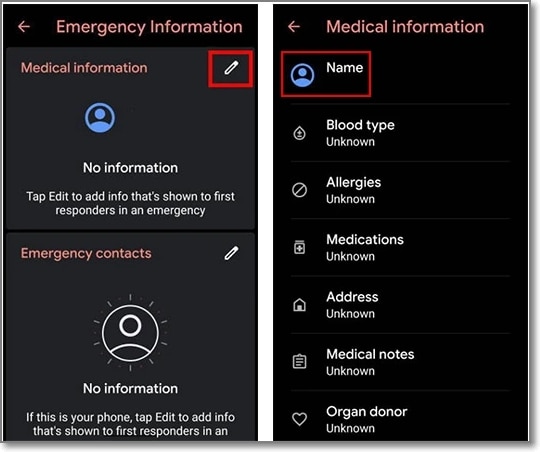
- Step 2. Once you are required to sign in to your Google account, return to the screen where you have to select the language. Then, insert the SIM card into your phone and ensure you have saved a contact. To enter the SIM PIN, tap on the “Emergency” option. Next, tap “Emergency Information” and click the “Edit” icon at the top-right corner.

- Step 3. Enter the PIN for the SIM card to proceed further. Under the “Emergency Information” section, tap on the “Add Contact” option and access it. Dial the call to that number, and once the call timer appears, choose the “Contacts” option on the dialer screen.

- Step 4. Tap on “three-dots” at the top-right corner and select the “Share” option followed by “Send as text.” On the following screen, send via XShare MI and allow the necessary permission. Download Google Account Manager and Account Login/FRP Bypass APKs on your other device. Also, download the Activity Launcher app from the Play Store.

- Step 5. Set up XShare on another device and allow all the permissions. Choose the “Receive” option to receive the contact from your Itel P40 device via a QR code scan. Afterward, disconnect and exit the current connection. On the main screen, tap the “Receive” option on your Itel P40 and scan the QR code using the Itel P40 device. You are required to share all three of the apps that you just downloaded.

- Step 6. As soon as the apps are received, install them and “Open” the Account Login/FRP Bypass tool. When it requires a password for sign-in, hit the “three-dots” and choose the “Browse Sign-In” option. Provide your Email and Password to sign in to your Google account.

- Step 7. After Google signs in, “Open” the Activity Launcher app and wait until the package is loaded. From the appearing menu, select “Android Setup” and then choose the following option:
Android Setup (com.google.android.setupwizard/.predeferred.PreDeferredSetupWizardActivity)
Once setup ends, the Itel P40 FRP bypass Android 11 process will be completed successfully.

Part 3. How to Easy Itel P40 FRP Bypass With Wondershare Dr.Fone
Facing FRP lock on your Itel P40 can be daunting, especially when you need to access your phone urgently. In this case, using the above-discussed SIM card method can be time-consuming. Users looking for an alternative and quick option can use Wondershare Dr.Fone – Screen Unlock (Android). This tool can help bypass FRP lock on your Android without requiring any PIN or Google account.
Moreover, users don’t need technical knowledge as this tool offers one-click removal. Dr.Fone also adopts a user-friendly interface, ensuring accessibility for every user. Apart from Itel P40 FRP bypass Android 11, this tool also unlocks Samsung and LG devices without data loss.
Salient Features of Wondershare Dr.Fone
- Fone supports over 2000 Android devices across 18+ brands for screen unlock.
- This tool extends the opportunity to recover data from Android devices with broken screens.
- When it comes to recovering device data, Dr.Fone offers a dedicated Data Recovery tool to recover all important lost files.
Steps To Perform Itel P40 FRP Bypass Using Wondershare Dr.Fone
By bypassing the FRP lock, Dr.Fone allows users to gain access to their devices promptly. To start learning about using this tool, follow the steps below for Itel P40 FRP bypass:
Here is a video for you to learn how to bypass FRP:
- Step 1. Connect the Itel P40 device and Navigate to the Toolbox
Connect your Itel device to your computer and launch Wondershare Dr.Fone. Within the toolkit window, navigate to “Toolbox” and select “Screen Unlock.” This will open a new window; choose the “Android” option to access the FRP Lock function.

- Step 2. Choose the Required Device and Android Version
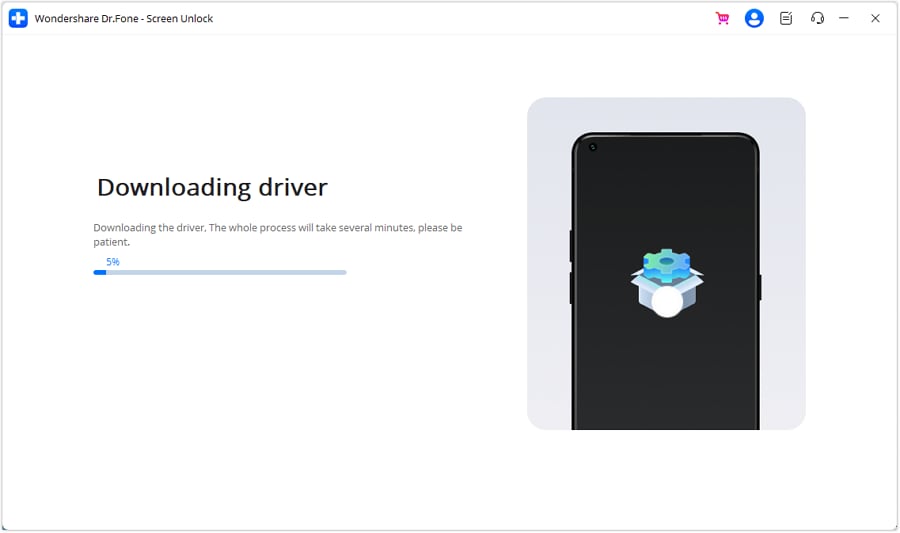
Afterward, click “Remove Google FRP Lock” and select your appropriate device brand from the options. This will trigger Dr.Fone to download the relevant driver for the selected brand.
- Step 3. Access Emergency Call and Enable USB Debugging
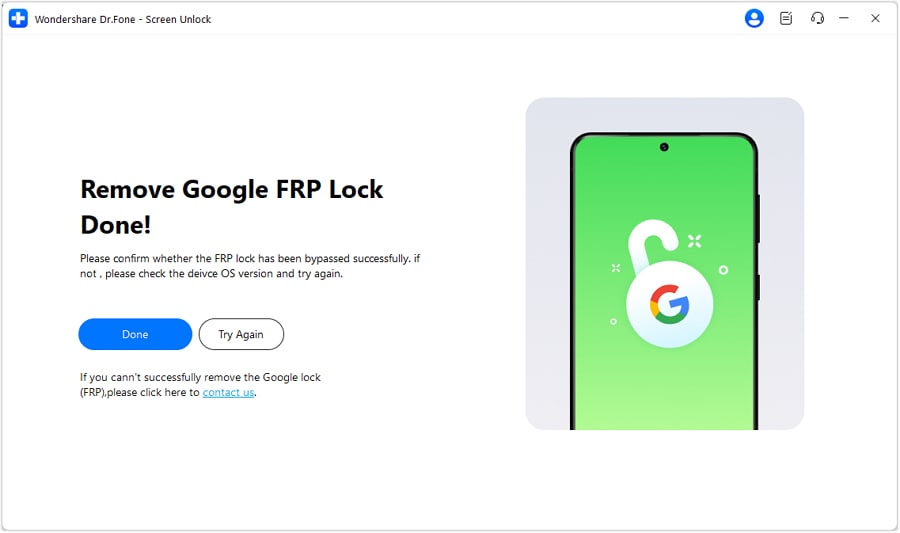
After downloading the necessary drivers, power off your smartphone and connect it to the computer. Press the “Volume Up” and “Volume Down” buttons simultaneously for almost 3 seconds as it connects. This initiates the FRP unlocking process. If everything went smoothly with the unlocking, click “Done.”
Read More About Tecno:
Itel Master Reset Code: The Ultimate Guide to Restoring Factory Settings
Ultimate Guide on Itel Spark FRP Bypass
How can I Unlock Itel Network by Myself?
Conclusion
We can conclude that bypassing the FRP lock can be difficult if one does not follow the proper steps. This guide has provided users with two of the best Itel P40 FRP bypass methods. Overall, Wondershare Dr.Fone offers the most advanced methods to let users bypass FRP locks easily. Its ability to support a wide range of Android devices makes it more recommended.
Tips: Are you searching for a powerful FRP Bypass tool? No worries as Dr.Fone is here to help you. Download it and start a seamless unlock experience!
Hassle-Free Ways to Remove FRP Lock on Itel P40 Phones with/without a PC
“I just bought a used Itel device from the mobile market without checking the already signed in Google account, and I don’t even know what Gmail ID is added to this device, so I’m looking for FRP Itel bypass tools. Please help.” A user says so on Quora.
In all such and similar situations when you have authorized access to your Itel or any other Android device, but not the right Google credentials, the need for a tool that can bypass the lock arises. The content below will take you through these FRP bypass Itel tools.
Part 1. Can I Bypass Google Lock on Itel ?
Yes, the Google Lock on Itel can be bypassed using an FRP bypass tool. Although in case of theft and loss, the FRP lock is a great feature, but on the flip side, in a situation where you forget your Google credentials, the function can be more of a problem than of use. Additionally, if you have got a hand on a second-hand device having an FRP lock, then also you would be in trouble accessing the phone.
You can choose between tools without a computer as well as PC-based programs to bypass and remove the Google Account. Once the account is removed using the tools, the following will be the benefits.
- You will have complete access to your Itel device and its features.
- Once the lock is removed, it will completely de-link from the previous Google account and hence cannot be blocked or traced by the previous owner.
- You can permanently delete the Google account.
Part 2. How to Bypass Google Lock on Itel Without Computer? (30 Min & Free)
To remove the Itel FRP bypass without using a system, the EMERGENCY CALL method can be used. Though this method is free, it is lengthy and complicated.
Steps for Itel FRP bypass without computer
- Step 1. Connect your Itel phone to a Wi-Fi and then switch it on for the HELLO screen to appear. Next, select the Emergency Call option and then click on Emergency Information two times.
- Step 2. On the Emergency Information page, tap on the Pencil icon and Name. Next, click o the profile icon and select the option of changing an image.
- Step 3. Next click on Menu > Photos > Permissions. Click on the Contacts options and select See All apps with this permission.
- Step 4. Click on the Search > Settings> Settings App Info > Open. With this, you will enter the Settings section of the Itel P40 device, after which select Accessibility > Accessibility Menu and turn in On.
- Step 5. Go back to the settings and choose Apps & Notifications > App Info. The list of the app will appear, and now you will have to disable some apps for the FRP process.
- Step 6. Choose 3 dots > Show System Apps and then click on Android Setup > Force Stop > OK.
- Step 7. Using the Storage & Cache option, wipe off the Storage and the Cache. Click Disable > Disable App.
- Step 8. Next, click on the blue settings icon of Android Setup and click on Force Stop.
- Step 9. From the Android Setup, remove all the storage and the cache data. Next click on Google Play Services > Disable > Disable App.
- Step 10. Now you need to go to the main Hello homepage by clicking on the back arrow multiple times. Select the Start option and the Itel P40 device screen will start loading.
- Step 11. When the updates are being checked by the screen, go back to the Wi-Fi connection page.
- Step 12. Open the Shortcut Menu by swiping up from the bottom to the top using 2 fingers.
- Step 13. Click Assistant > Settings > Enable Google Play Services. Move back and select Skip > Continue.
- Step 14. Click on More > Accept.
- Step 15. At the Set Screen Lock, click Skip > Skip > OK > Accept & Continue and then go to the home screen.
- Step 16. Finally, to bypass google lock on Itel without pc, go to Settings > System > Advanced > Reset Option and here choose to Erase All Data options 3 times.
Part 3. How to Bypass Google Lock on Itel with Computer? (15 Min but Paid)
If you have access to a computer, Motoreaper is a decent Itel FRP tool for Itel FRP bypass with computer. Developed by the Phonlab team, Motoreaper is a Windows-based tool that works on the majority of Itel devices including Moto E, Moto X, Moto G, Droid Turbo, Droid Maxx2, and others.
Steps for Itel FRP bypass using Motoreaper
- Step 1. Download and install the Motoreaper software on your system and launch the same.
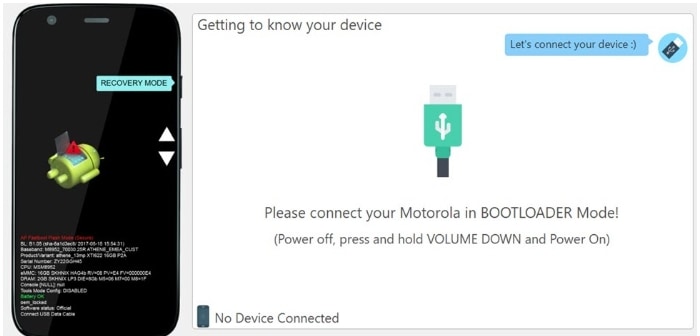
- Step 2. Now you need to get your Itel phone into bootloader mode and for this, you need to power off your device and then turn it on by pressing and holding the power and volume down buttons together for a few seconds.
- Step 3. Next, connect your phone to your PC using a USB cable and the software will successfully show the connected device.
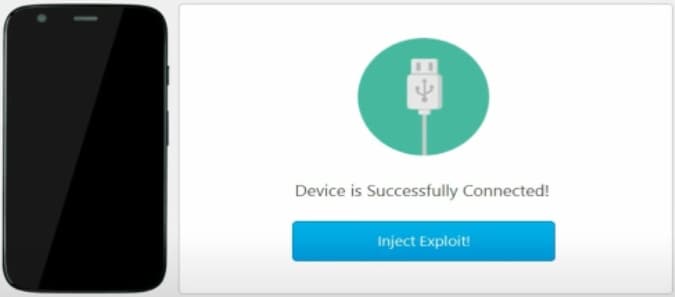
- Step 4. Next, unplug your Itel phone and boot it into the factory model using the bootloader mode by pressing the power and volume down button. When the factory mode appears, use the power button to select it.
- Step 5. Now connect your phone again to your system and let it boot up completely. Next, click on the I have Done option.
- Step 6. Now your device is on the factory mode where you need to click on, the I Confirm option.
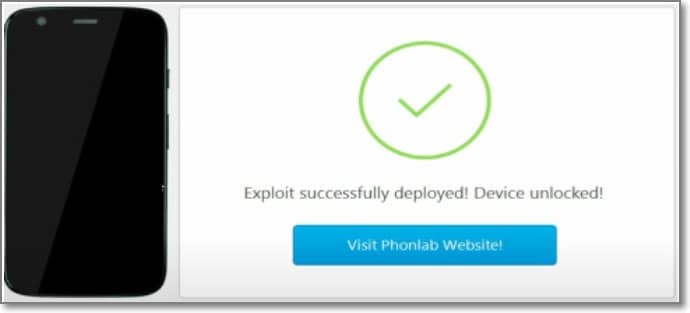
- Step 7. Next for Itel Google bypass, use debugging in your device and then tap on I confirm at Moto Rapersoftware.
- Step 8. The Unlock No button will appear in the Moto Reaper software which you have to click after which the Google bypass Itel process will be complete and the FRP lock will be removed.
Part 4. How to Unlock Itel Phone Passcode? (5 Min)
Besides FRP lock, the screen lock of your Android phones including Itel is one of the most common situations. So, if to have forgotten your screen lock code or have a device with a locked screen, the best tool we reconned is Dr.Fone - Screen Unlock (Android) . This simple system-based software will let you remove all types of screen locks – PIN, password, pattern, as well as a fingerprint in a few simple and quick steps. The software is reliable and safe without causing any harm to your device.
![]()
Dr.Fone - Screen Unlock (Android)
Get into Locked Itel within Minutes
- 5 screen lock types are available: pattern, PIN, password, fingerprints & Face ID.
- Easily remove the lock screen; No need to root your device.
- Everybody can handle it without any technical background.
- Provide specific removal solutions to promise good success rate
4,008,671 people have downloaded it
Step 1. Launch the installed software on your system and from the main page, choose the Screen Unlock option.
Step 2. Using a USB cable, connect your phone to your system and then select Unlock Android Screen option on the software interface.

- Step 3. From the supported list on the software interface, select Itel .

- Step 4. Your Itel phone will enter into a dedicated mode. Once in this mode, Dr.Fone will initiate the Itel screen unlock process.
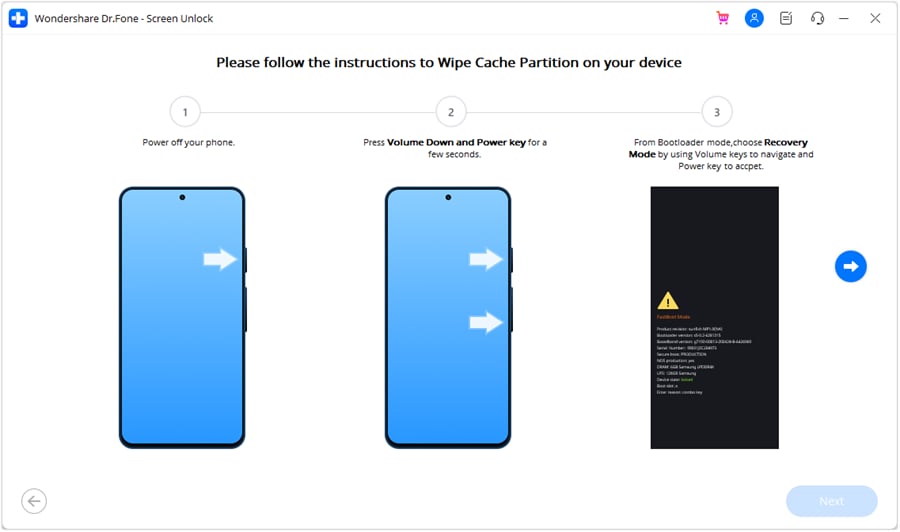
- Step 5. When the process is complete, you can access your Itel device without any need for a password.

 safe & secure
Conclusion
Itel FRP lock can be removed using the Emergency Call option or the above-mentioned Motoreaper tool. For removing any type of screen lock without password on your Android devices, Dr.Fone – Screen Unlock (Android) works as the best option.
Easy Guide to Itel P40 FRP Bypass With Best Methods
The Google Factory Reset Protection (FRP) lock is a security measure in Android smartphones. By default, FRP Lock is active on all Android devices after the Android 5.1 release and triggers upon the execution of a hard reset. Despite its undeniable importance as a security feature, there are two specific instances when dealing with FRP lock can be difficult.
The first one is forgetting your Google ID details. The other situation is buying a second-hand device locked with the previous owner’s Google ID. This article deals with Itel P40 FRP bypass Android 11. It provides three methods to bypass FRP, allowing you to access your Itel P40 again.

Part 1: [Direct Solution] Itel P40 FRP Bypass Android 11 With Wondershare Dr.Fone
For the first and foremost remedy of Itel P40 LTE FRP bypass, you can use effective software. While other methods are not as versatile and simple, you can take a few steps to unlock your device. The best software solution to bypass FRP on Itel devices currently available is Wondershare Dr.Fone. It is a comprehensive solution that offers functions ranging from bypassing screen locks to FRP locks.
Dr.Fone – Screen Unlock (Android) goes beyond Itel, extending its capability to bypass FRP locks on devices from diverse brands like MI, Samsung, OPPO, and more. Additionally, it streamlines the unlocking process for various screen locks, covering passwords, PINs, fingerprints, and facial recognition. Dr.Fone is designed with a user-centric approach, ensuring accessibility for users of all types to unlock their devices effectively.
Key Features of Wondershare Dr.Fone
- If your locked device is Samsung or LG brand, you can remove the screen lock without any data loss.
- Wondershare Dr.Fone supports over 2000 Android devices for over 18 Android brands, making it a diversely compatible tool.
- With the help of this Itel P40 FRP unlock tool, you can recover your data from a broken Samsung Device.
Steps for Itel P40 FRP Bypass Android 11 With Wondershare Dr.Fone
By eliminating the FRP lock, Dr.Fone facilitates the option of having complete access to your device. Below are the steps required to Itel P40 FRP bypass using Dr.Fone – Screen Unlock (Android):
- Step 1. Access Remove Google FRP Lock in Dr.Fone
You can begin with installing and launching Wondershare Dr.Fone. Go to the “Toolbox” tab and press “Screen Unlock.” On the following screen, choose “Android” as the Itel P40 device type and click “Remove Google FRP Lock.” Now, you will be asked to choose the Itel P40 device brand, after which you need to continue by clicking “Start.”

- Step 2. Successfully Bypass Itel P40 FRP Lock
It will lead to the downloading of the required driver for your Android. Upon downloading, turn off your device and establish a connection with the computer. While connecting, press and hold both “Volume” buttons for 3 seconds. This action will commence the FRP bypassing process, requiring a brief moment for completion.
Part 2: Itel P40 FRP Bypass Without PC Using SIM Card Method
While the software solution is the best option for Itel P40 Pro FRP bypass, other options can also feature an unlocking service. These conventional methods are complex; however, they offer a solution to unlocking FRP.
The SIM card method is a favored FRP lock bypass approach among Itel P40 users. Here is a comprehensive guide on employing this method to bypass the FRP lock on Itel P40:
- Step 1. To start, turn on your Itel P40 and confirm it is FRP-locked by going up to the screen where it demands Google ID. Afterward, return to the language screen and enter a PIN-locked SIM card into the Itel P40 device.

- Step 2. Before inserting the SIM card, ensure at least one contact is saved on the card. It could be any random number, and you can do it by inserting the SIM card into another device. After inserting the SIM card, tap “Emergency,” where the Itel P40 device asks you for the PIN of the SIM card.

- Step 3. After pressing “Emergency,” tap “Emergency Information” on the next screen. On the “Owner” screen, tap the icon at the top right corner, enter the SIM PIN code, and when asked, choose “Add contact.”

- Step 4. Add the contact you saved as the owner’s contact and make a call. During the call, tap “Contacts” to access your saved contacts, and select the one you saved. On tapping the three dots on the top, select “Share” and choose “Share as text.”

- Step 5. Choose “XShare Mini” as the sharing option, grant the necessary permissions, and leave the Itel P40 device on the “QR Code.” Move to another device and access a web browser. Go to mobileteamofficials.com and download two apps: “Google Account Manager” and “Account Login/ FRP Bypass.”

- Step 6. On the other device you’re using, download the two apps from the Google Play Store: “Activity Launcher” and “XShare.” Now open the XShare app and grant all the required permissions. Tap “Receive” and scan the QR code from the Itel device to complete the contact transfer process.

- Step 7. Now, select three apps: “Google Account Manager,” “Account Login/ FRP Bypass,” and “Activity Launcher” within XShare on the second device. On the Itel device, tap “Receive” and scan the QR code to complete the process.

- Step 8. Once received, install all three apps on the Itel device. Now, first open “Account Login/ FRP Bypass” and tap “three dots” from the top right corner to select “Browser Sign In.” When it takes you to the Google sign-in page, log in using any Google ID.

- Step 9. After signing in, return to the apps and open the Activity Launcher app. Within the app, tap “Android Setup” on the following screen and scroll down to press the “Android Setup” entry. This will perform the Itel P40 Lite FRP bypass successfully.

Here is a video for you to learn how to bypass FRP:
Part 3: Itel P40 FRP Bypass With APK
While you consider other FRP bypassing methods instead of Wondershare Dr.Fone, there is another option that you can go with. If you prefer a method that doesn’t involve a PC or SIM card, Itel P40 Pro FRP bypass using an APK is a viable option. You can follow the steps given below to complete this Itel P40 Lite FRP unlock tool process:
- Step 1. To begin, turn on your Itel Android 11 Phone. Press “START” and link your phone to a Wi-Fi connection. Return to the Welcome Screen, then press “Start” and choose the option to “Add a New Network.”

- Step 2. Touch the “Microphone” icon and choose “Deny” across the pop-up. Go for the “Microphone” icon again, and opt for “Deny.” Lastly, touch the same icon again and opt for “Allow.” This will take you to the Gboard App information screen.

- Step 3. Choose “Permissions” and tap the “Search” icon at the top-right corner of the follow-up screen. Search for “Settings” and pick the respective app from the results list. Tap “Open” to access the Settings application. This action will direct you to the “Settings” interface.

- Step 4. Navigate to “App management” and select “App settings.” Access the XShare APK, launch it, and ensure you have a secondary Android device available. Open the Play Store on the second device, and download and install the XShare App for further processing.

- Step 5. Next, open the Chrome Browser on the second device. Enter one of the following URLs in the browser and download “FRP Bypass APK” and “Google Account Manager 9.0 APK”:
https://tiny.cc/frptools or https://bit.ly/2NkxXYs

- Step 6. Open the XShare APK on your second Android device. Navigate to the downloaded apps and tap “Send.” Return to the FRP phone and select “Receive” on it. Scan the QR code to establish a connection between the Itel P40 devices. Verify on your FRP phone that both FRP APK files have been received and proceed with the installation.

- Step 7. Close and exit the XShare APK on the FRP phone to return to the “App settings” screen. Launch the FRP Bypass APK, tap the “three dots” upon opening, and choose “Browser Sign-In.” Sign in with your Google Account ID and password.

- Step 8. Return to the “App settings” Screen and uninstall the Google Account Manager APK. Proceed to the initial “Welcome” screen by tapping the back key repeatedly. Initiate the Itel P40 device setup procedure by tapping “Start.” You should now observe “Account Added,” indicating successful FRP bypass on your Itel P40 FRP bypass Android 11.

Conclusion
In conclusion, the Itel P40 LTE FRP unlock tool demands varied approaches catering to user preferences. While methods like SIM cards and APK offer alternatives, Wondershare Dr.Fone - Screen Unlock (Android) is the optimal solution. Dr.Fone simplifies the Itel P40 LTE FRP process with its user-friendly interface and security assurance.
Tips: Are you searching for a powerful FRP bypass tool? No worries as Dr.Fone is here to help you. Download it and start a seamless unlock experience!
Also read:
- [New] 2024 Approved A Complete Rundown Top 10 Digital Drawing Software on Chrome
- [Updated] Capturing Chronos Mastering Phantom's Time Extension Feature
- [Updated] In 2024, A Comprehensive Guide to Effortless Recording of Your Favored YouTube Lives on Any Gear
- How to Bypass Google FRP Lock on Xiaomi Devices
- Immersion in Metaverse Leading HMDs Reviewed
- In 2024, Easy Guide to Xiaomi 14 FRP Bypass With Best Methods
- Is GSM Flasher ADB Legit? Full Review To Bypass Your Vivo S17 Phone FRP Lock
- Surging Up the Search Listings Key Tips for Optimizing Your Videos for 2024
- The Updated Method to Bypass Vivo Y100i FRP
- Title: In 2024, A Quick Guide to Itel P40 FRP Bypass Instantly
- Author: Lynn
- Created at : 2024-12-16 20:16:21
- Updated at : 2024-12-21 21:25:50
- Link: https://bypass-frp.techidaily.com/in-2024-a-quick-guide-to-itel-p40-frp-bypass-instantly-by-drfone-android/
- License: This work is licensed under CC BY-NC-SA 4.0.