
About Itel P40+ FRP Bypass
About Itel P40+ FRP Bypass
To ensure that your phone data and details do not leak to unauthorized people, several security features on Android devices are set and one of them is Factory Reset Protection. Under this feature, the Google Account ID and password have to be entered for factory resetting your device. If you are an authorized owner, this should not be an issue in an ideal situation, but what if you have forgotten your Google details? How will your factory reset now? No need for panic as there are workarounds available.
So, for Itel FRP bypass when you have forgotten your Google details or have purchased a second-hand device with a lock, we will help you with the best possible solution.
Part 1. Can I Solve Itel google Locked?
If you know the Google ID and the password of your device, the Itel google locked can be easily opened. But if you have forgotten the details or do not have them, you will have to look for the methods that can let you bypass this lock and have access to the Itel P40+ device. For process FRP bypass for Itel, we have listed the best methods for bypassing the Google lock in the following parts of the topic.
Part 2. How to Get Itel FRP Bypass without OTG
One of the most widely used methods to bypass the Itel FRP lock is Swift Key and this is a free solution that does not require any software download or installation.
Steps for Itel bypass google account
Step 1. First of all, reset your Itel device and then turn it on.
Step 2. Choose your preferred language and then click on the Start.
Step 3. Connect your device to a WIFI network and start the configuration.
Step 4. Next, keep skipping the steps till you arrive at the Verify Account screen.
Step 5. Click on the email address that will activate the keyboard and now to get access to the Swift Key keyboard, click on the menu icon on the keyboard.
Step 6. Next, select Settings > Languages. If you are asked for the Google Account sign-in choose the No, Thanks option.

Step 7. At the Google search bar, type Settings and then choose the Settings option.
Step 8. If the Swift Key menu appears, choose Got it > Not Now > Back-Up Reset.
Step 9. Now choose the Factory Data Reset option for resetting your device.
Finally, when you switch on your phone again, the FRP lock will not appear, and you’ve got FRP Itel disabled.
Part 3. How to Bypass Google Verification on Itel Without SwiftKey
If the SwiftKey method is not working for removing the FRP lock, another way is to use the APK tools. There are several APK files available to get this task done like FRP Bypass APK, Pangu FRP bypass, and more. Depending on the model of your device, you can choose a free or a premium version as available.
To bypass FRP lock using this method, you would need an APK file, OTG cable, USB stick, and an internet connection that is stable.
Steps Itel FRP Bypass Tool APK
- Step 1. Restart your device and choose Language > English > Next.
- Step 2. Skip the option of Insert SIM card and then connect your Itel P40+ to a stable WiFi network.
- Step 3. Transfer the downloaded APK file to the USB drive.
- Step 4. Connect the SUB drive to the Itel P40+ device using an OTG cable.
- Step 5. Transfer and install the APK file to your Itel device. During the APK installation process, security certification permission needs to be provided.
- Step 6. After the APK installation is done successfully, access to the phone settings will be provided after which you can find the synced Google Account data and delete the same. Alternatively, you can also delete all the settings of the phone.
With the above steps, the FRP lock will be bypassed and removed.
Part 4. How to Delete a Google Account on Itel after Factory Reset
Removing the FRP lock can put your device at risk if it lands into unauthorized access, but if you find hassle in remembering the Google Account details and doubt you can easily forget it, removing the associated Google account is better as it will also disable the FRP lock.
Also, if you are selling your phone or gifting it to someone, then remove the associated Google Account so that the new owner does not have any issues with the factory reset of the Itel P40+ device.
Steps for removing the Google Account from Itel Phone
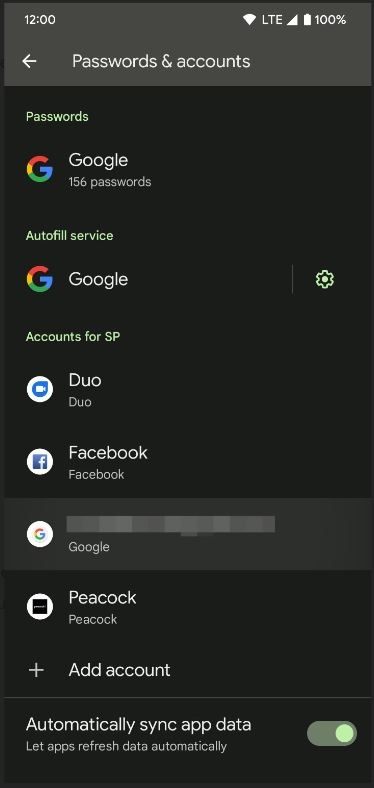
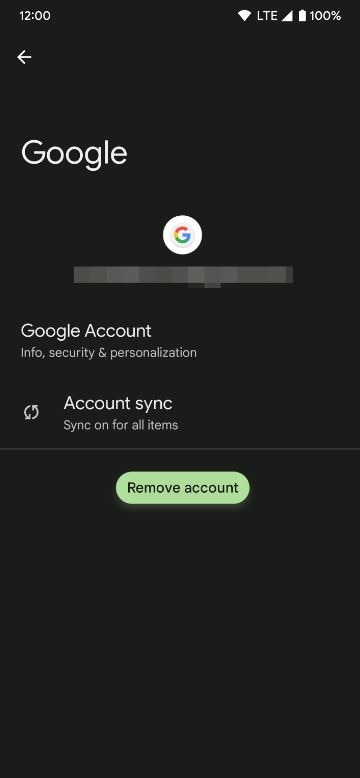
- Step 1. On the phone home screen, click on the Settings icon and then look for the Passwords & Accounts option.
Note: The option can also be looked at Users & accounts section.
- Step 2. Click on the Accounts option and the list of the associated and linked accounts will appear.
- Step 3. Select the Google account that you want to delete and then click on the Remove account option.
- Step 4. Again, click on the Remove account option to confirm deleting the account.
- With the steps above, the synced account will be deleted and thus the FRP lock will be removed.
Part 5. How to Bypass Screen Lock from Itel
Nothing can be more annoying than forgetting the screen lock of your Itel phone as it will prevent you from getting access to the Itel P40+ device and using any of its functions. So, if you too are in a similar situation when you have forgotten the set password, Dr.Fone –Screen Unlock (Android) is the recommended tool.
 safe & secure
This professional Windows and Mac-based software will let you remove all types of screen locks including password, PIN, pattern as well as fingerprint, in just a few simple steps. The software is simple to use and can remove the screen lock on all popular Android devices in a hassle-free manner.
![]()
Dr.Fone - Screen Unlock (Android)
Get into Locked Itel without Password [Most Efficient]
- Easily remove the lock screen; No need to root your device.
- Bypass Android FRP lock without a PIN or Google account.

- Support 20,000+ mainstream models of Android phones & tablets.
- Provide specific removal solutions to promise good success rate

4,008,669 people have downloaded it
Steps to remove screen lock from Itel using Dr. Fone-Screen Unlock (Android)
Step 1. Launch the Dr. Fone software on your system and choose the Screen Unlock option on the main page.

Step 2. Using a USB cable, connect your phone to your PC, and then on the software interface choose Unlock Android Screen option.

Step 3. Next, choose the phone model from the given list so that the right recovery package can be downloaded.

Step 4. Next, you need to put your phone into specific. Dr.Fone will start to unlock Android screen after getting into the specific mode.
Step 4. Wait for the unlock process to complete, the screen lock will be removed and the Itel P40+ device can be now accessed.

safe & secure
Conclusion
Above we have listed different tools for Itel Google bypass. Depending on the model of the phone and requirements, you can choose the best suitable solution. Also, for removing screen lock on Itel and other devices, Dr.Fone - Screen Unlock (Android) works as an excellent tool.
The Updated Method to Bypass Itel P40+ FRP

Android smartphones have a security feature called FRP (Factory Reset Protection) that shields user data from theft or loss. Like other manufacturers, Itel uses FRP as a security feature to make sure that, in the event of a factory reset, only the original owner with the Google account credentials linked with the Itel P40+ device would be able to access the Itel P40+ device. This aids in preventing the Itel P40+ device’s theft or unauthorized use.
FRP, however, can also be a problem if a user forgets their Google account login information or loses access to their device. Our step-by-step method will walk you through the most effective ways to bypass FRP on Itel P40+ devices in 2023, ensuring you can regain access to your device without any hassle. Say goodbye to FRP Xiaomi and Itel P40+ FRP challenges with our complete method.
We have included more than two ways to unlock your mobile without any hassle and complication. Just follow this guide, and you will regain access to your device in no time.
Part 1: Precautions To Take Before and After FRP Bypass?
Precautions are necessary for a safe and effective process when overcoming FRP (Factory Reset Protection) on your Itel P40+ device. In order to safeguard your data, guarantee device performance, and maintain device security, we’ll highlight the essential steps you should take before the Itel FRP bypass.
Precautions:
- Backup Your Data: In order to prevent data loss during FRP bypass, be sure to back up all vital information from your smartphone, including contacts, pictures, videos, and documents, to a secure location.
- Charge the battery: To prevent any delays during the FRP bypass procedure, ensure your device has enough battery life or is connected to a charger.
- **Conduct Thorough Research:**To prevent any potential threats or damage to your device, conduct thorough research and follow instructions from reliable sources or respected guidelines.
Part 2: How to remove Itel P40+ FRP with the most reliable software - Dr.Fone?
Wondershare Dr.Fone - Screen Unlock (Android) is well-known for its ease to use and data-security. The Unlock Android Factory Reset Protection feature helps you enter home screen without effort. Dr.Fone not only supports Itel FRP bypass, it also supports other device brands, such as Samsung , OPPO , etc.
Dr.Fone - Screen Unlock (Android)
Itel P40+ FRP Lock Removal Made Easy
- Pattern, PIN, password, fingerprints & face screen lock can all be unlocked.
- Bypass Android FRP lock without a PIN or Google account.
- Unlock mainstream Android brands like Samsung, Redmi, Xiaomi, etc.
- No tech knowledge required, Simple, click-through, process.
3,981,454 people have downloaded it
Check the following steps to see how to bypass Itel FRP with Wondershare Dr.Fone.
Step 1: Launch Wondershare Dr.Fone first and choose Toolbox > Screen Unlock > Android.
Step 2: Select Remove Google FRP Lock.
Step 3: Choose Itel among the Itel P40+ device brands.

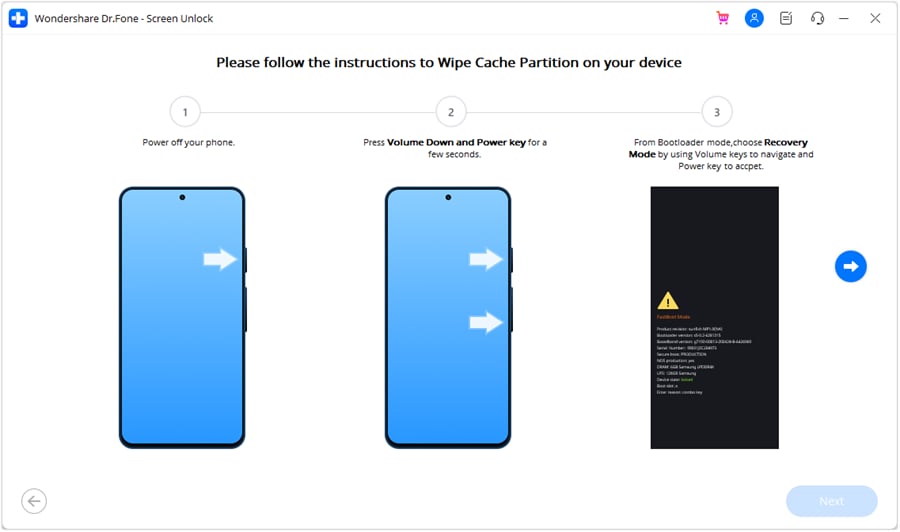
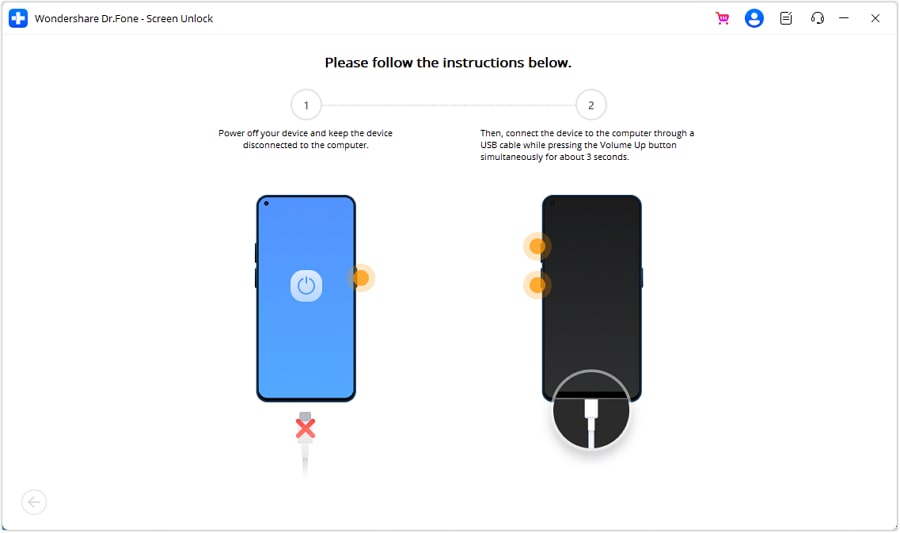
Step 4: Dr.Fone will start to download driver. And then turn off the Itel P40+ device and connect to the computer. During the connecting process, please keep pressing Volume Up and Down button simultaneously for around 3 seconds.
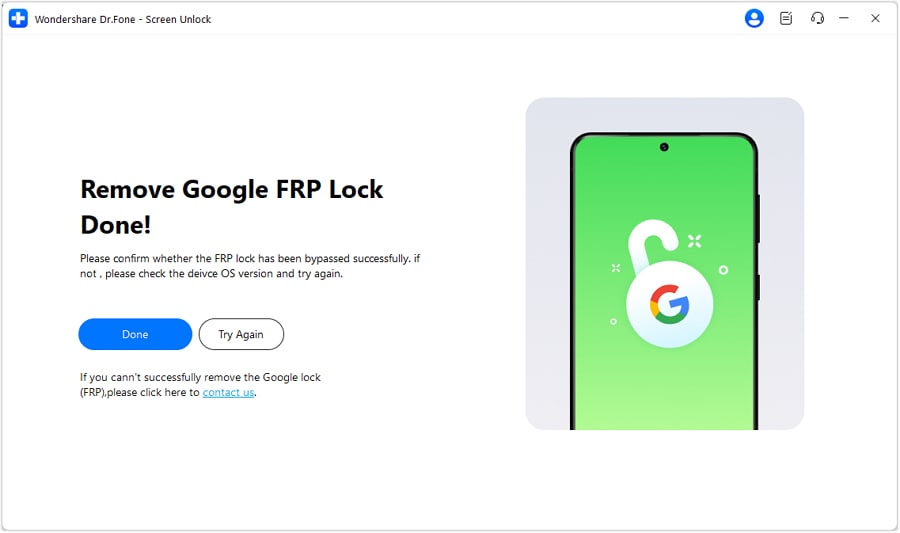
Step 5: Wait for a few minutes and when it’s done, click Done button.
Part 3: How To Bypass Itel P40+ FRP in Traditional Method
With each phone, operating system, and version of Android having its own technique, bypassing Itel FRP on the most recent versions of Google’s operating system is becoming increasingly challenging. You can use the FRP bypass software that works with your device to employ the free FRP bypass approach.
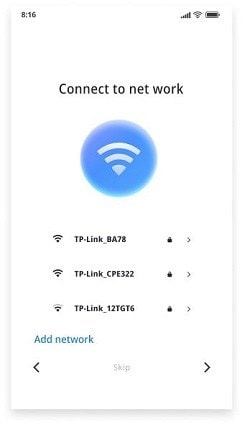
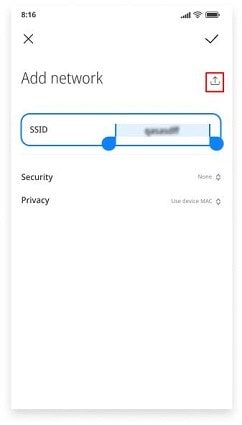
- Click Add Network at the bottom of the screen in network settings.
- In the SSID field, type any random text you like and long-press to pick it. To share it with Gmail, tap the share icon. Tap Notifications > Additional Settings on the App Info screen.
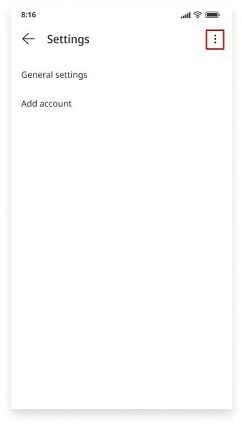
- Click the three dots in the top right corner and select “Help and Feedback.”
- Open the search bar and type “Delete and disable apps on Android.” Tap “Tap to go to Application Settings” on the following screen.

- Enable the Accessibility Menu Shortcut by selecting Settings > Additional Settings > Accessibility > Accessibility menu.

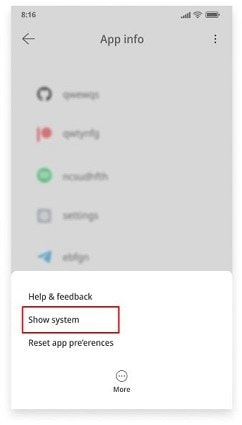
- Repeat the back button to go back to the App info screen. Click More, then select Show System.
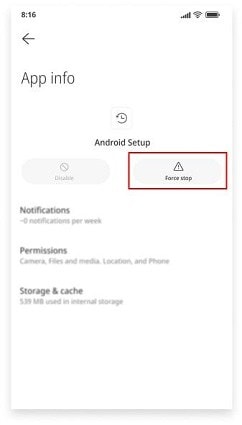
- Tap Disable and Disable app after choosing Android setup, then tap Force stop and OK.
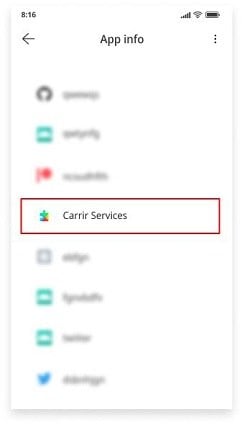
- Return to the App info screen and select Carrier Services. Then, select Disable and Disable app. Finally, select Force to stop and OK.
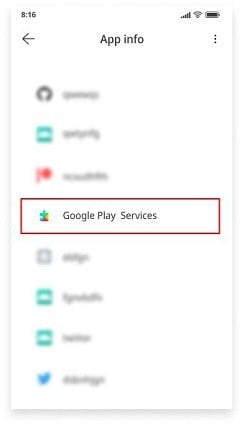
- Go back to the App info screen, choose Google Play Services, and then touch Disable to remove the app. Click OK after tapping Force Stop.
- To get back to the Connect to the Network screen, press the back button and the Next icon.
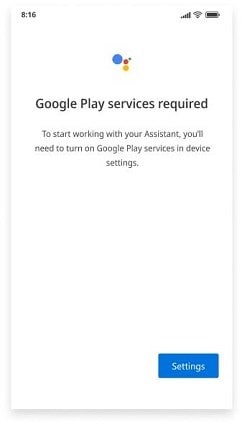
- Tap the person icon in the lower-right corner of the screen to access Google Assistant > Settings on the Checking for Updates page. To access the Google Play services App information page, repeat this process numerous times. To enable Google Play Services, select Enable.
- Wait until the procedure is finished before going back to the Checking for Updates page. When the procedure is finished, select More, then select Accept.
- You can finally disable Xiaomi’s Google account verification when the Setup Complete page appears.
Part 4: How To Bypass Itel P40+ FRP With ADB Command on a PC?
ADB and Fastboots, which stand for Android Debug Bridge and Android Debug Bridge, respectively, are two ways that a computer can communicate with an Android smartphone. The commands and actions delivered by the system are carried out on your Android device using this technique.
Depending on the OS version, the Google FRP lock can be removed using a variety of commands using the flexible ADB command-line tool and Fastboots. This software uses a client-server architecture and a client that transmits commands.
- Download the ADB installed setup file first, and then extract the toolkit files to a folder on your computer.
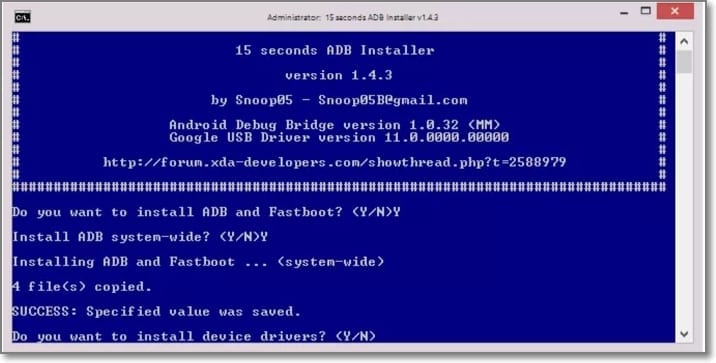
- Run adb.setup.exe next, and then press Y to accept the prompt to install the ADB drivers.
- When the drivers have been successfully installed, type Y once more, and the command window will close.
- Next, please turn on your Android device and connect it to your PC using a USB cord. Ensure your Android device’s USB debugging mode is also on here.
- Then, while holding down the Shift key, right-click somewhere that is empty in the ADB folder and select the Open command window here.
- Then, to delete the FRP, run the following lines one at a time at the command prompt, pressing enter after each line. Below is the code for CMD.
- Your Android device’s FRP lock will be removed following the execution of the commands.
Part 5: How To Disable FRP Itel P40+?
Disabling FRP on Itel P40+/Poco devices is relatively simple. Once you’ve removed the Google account from your device, the FRP lock will be disabled, and you’ll no longer need to bypass Itel FRP.
- Go to “Settings” from the menu.
- Go down the page and click “Accounts & Sync.”
- To delete a Google account, tap on it.
- Confirm your selection of “Remove Account” by clicking.
- You might be asked to enter your device password or PIN to finish the process.
Summary
In conclusion, unlocking Itel P40+ FRP can be difficult, but it can be done quickly with the correct tools. You can either use the traditional method, which may prove quite long. We would recommend using the Itel FRP bypass tool. The top Itel P40+ Google FRP Unlock tools, such as Dr.Fone - Screen Unlock (Android) , have been covered in this article. Since Dr.Fone - Screen Unlock (Android) is an all-in-one solution for Samsung, Xiaomi, Redmi, Oppo, Realme, Vivo FRP unlocking, we advise readers to give it a try.
How To Bypass Itel P40+ FRP In 3 Different Ways
Are you having trouble bypassing Itel P40+ FRP? If so, you’re not alone. A lot of people are struggling with this particular task. But don’t worry - We are here to help.
Since many Itel P40+ users do not need to log in more than once, they commonly forget their Google email and password.
If you have used this device for an extended period, you might have forgotten the password. A factory reset requires you to log in to your Itel P40+ device and use the same Gmail account.
To unlock the Itel P40+ smart 5 FRP, you must use any bypassing tool or method. In this blog post, I’ll walk you through the process of bypassing Itel P40+ FRP. So read on for instructions on how to get the job done.
Let’s get started!
Part 1: Some Common Reasons To Bypass Itel P40+ FRP
Itel P40+ devices are often bypassed for the following reasons:
1. Forgotten Google Account Credentials
One of the most common reasons for needing to bypass FRP is that you simply forgot your Google account login credentials. Whether you have a new phone and are setting it up for the first time, or you’ve had the same phone for a while and are just now adding a Google account, there’s always a chance that you might forget your password.
2. A Second-Hand Phone
Another common reason for wanting to bypass FRP is if you’ve purchased a second-hand phone. If the previous owner of the phone didn’t correctly remove their Google account from the Itel P40+ device before selling it to you, then you’ll be stuck with their account on the phone and won’t be able to use it yourself until you bypass FRP.
3. Factory Reset In An Untrusted Environment
If you’ve performed a factory reset on your phone to try and fix an issue or start fresh, you’ll need to bypass FRP to use the Itel P40+ device again. It is because a factory reset will also remove your Google account from the phone, leaving you locked out unless you can remember the login credentials.
Part 2: Bypass Itel P40+ FRP With 3 Easy Methods
Bypassing FRP can be a bit tricky, but it’s possible to do it if you have the right tools and know-how. If you’re looking for a quick and easy way to bypass FRP on your Itel P40+ device, below are the methods you can use to Itel P40+ Hot 10 FRP bypass.
Method #1: Recover the Google Account Of Your Device
Performing a Factory Reset requires restoring a Google account. It is advisable to recover your email ID or password from another device before attempting Itel P40+ Hot 8 FRP bypass.
You can solve the problem if you have an alternate email address or phone number associated with the account you want to recover. By inserting a verification code, you can easily change the password for your Google account.
After resetting your password, it will take 24 to 72 hours to sync the new password with all devices registered to the account.
Once synced, you can perform a factory data reset by providing an email and a new password. Following this method, you can factory reset your Itel P40+ Hot S without bypassing FRP.
However, if you provide the wrong password in this process, the time will restart for the next 24-72 hours to sync.
So, be careful when entering your email and password on the Itel P40+ device.
Method #2: Bypass Itel P40+ FRP With FRP Bypass APK
Itel P40+ Hot 8 FRP bypass is done using FRP Bypass APK, an Android application. FRP Bypass APK will prove helpful if you cannot retrieve your Google account, which is logged into your Itel P40+ smart 5 FRP bypass.
The APK lets you remove the Google account verification process without a password. You can use this method for free, safely, and quickly.
If you use FRP Bypass APK, you can bypass FRP lock on Itel P40+ Hot 10 FRP bypass and any Android phone running version 5.1 or higher.
Using FRP Bypass APK, you can unlock Google lock on the Itel P40+ Hot 8 FRP bypass:
Step 1: Download the latest FRP Bypass, Following the official website.
Step 2: Copy the APK file to a USB drive.
Step 3: Use an OTG cable to connect the flash drive and Itel P40+ Hot 10 FRP bypass, pulling up a file explorer.
Step 4: After downloading the app, you must install it on your smartphone. You must enable unknown sources before installing.
Step 5: Select the settings menu in the app after completing the installation process.
Step 6: Click on the “Backup and Reset” option.
Step 7: Click the Factory Data Reset button, then select Confirm.
Step 8: The Google account verification will be removed without a password within a few seconds.
Step 9: Restart your device after completing all the procedures.
Step 10: Create a new Google account or skip the option to do so later.
Itel P40+ Hot 8 FRP bypass using FRP Bypass APK is a simple method that a beginner can utilize.
Method #3: Bypass Itel P40+ FRP Without PC Via Settings Menu
Do you want to bypass the Google account verification FRP on the Itel P40+ Smart 5 phone? Using this method, you can bypass the FRP on Itel P40+ Smart 5.
Wait until the Itel P40+ Hot 8 reboots and prompts you to select a language before performing a factory reset.
You can follow the steps below after selecting:
Step 1: Set up Wi-Fi on the Itel P40+ Smart 5.
Step 2: A Google account request page will appear.
Step 3: After tapping the text box, the keyboard will appear.
Step 4: As soon as you click the “@” button, the settings menu will appear.
Step 5: Choose Google keyboard layout from the list. Check it and ensure that the Google keyboard layout is correct.
Step 6: Click on the three dots in the upper right corner of the screen.
Step 7: Select “Help & Feedback” after opening a new page.
Step 8: Click on the search button and send the result from the keyboard once the new dialog box has been opened.
Step 9: Then ignore the guide; it will show you how to do it.
Step 10: Click and hold any word on your screen to highlight it in blue.
Step 11: Click the “Web Search” button on the right-hand side of the screen.
Step 12: A new page guides you through the next step. You can see the web results for the word you just Googled using the Google App.
Step 13: Find the search box in the upper center of the page. Click the search button after typing “setting” in the search bar.
Step 14: You will now see a system settings icon on your home screen. You can reset the factory data by clicking on the following steps: system setting icon > Backup & Reset > Factory Data Reset.
Step 15: Reset the Itel P40+ device to factory settings. After completing the reset, you will see the Itel P40+ Smart 5 welcome page.
Step 16: Reconnect your Itel P40+ to your Wi-Fi network. The phone will instead ask you to add a new Google account if you can do it successfully.
Step 17: Sign up for a Google account, and then the Itel P40+ Smart 5 is ready to use.
Bypassing the FRP on your Itel P40+ Smart 5 is as simple as following these steps.
Conclusion
It is not illegal to bypass Google verification when you are doing a factory reset in case you forget your password or don’t remember your Google account. The Itel P40+ Smart 5 FRP bypass becomes useless if you don’t bypass the FRP lock, so FRP bypass Itel P40+ Hot S matters.
You can bypass the Itel P40+ Hot 8 FRP by using a few practical methods listed above. You can try another whenever one of the above procedures does not work accurately.
Also read:
- [New] 2024 Approved Trending Vids The #VideoViral Phenomenon
- [New] Unveiling the Path to Your Facebook Status Video Archive
- [New] Voice Recording Mastery with iPad Tools for 2024
- [Updated] In 2024, 'Mirthful Missions' - Delving Into The Goofy Movie VHS
- A Quick Guide to Vivo Y56 5G FRP Bypass Instantly
- Hassle-Free Ways to Remove FRP Lock on Vivo G2with/without a PC
- In 2024, AddROM Bypass An Android Tool to Unlock FRP Lock Screen For your Xiaomi Redmi A2
- In 2024, Complete Review & Guide to Techeligible FRP Bypass and More For Realme
- In 2024, FRP Hijacker by Hagard Download and Bypass your Vivo S18e FRP Locks
- In 2024, How Can We Bypass Honor Magic 6 Lite FRP?
- In 2024, Is GSM Flasher ADB Legit? Full Review To Bypass Your Infinix Smart 7FRP Lock
- In 2024, Latest Guide How To Bypass Infinix Zero 5G 2023 Turbo FRP Without Computer
- In 2024, The Complete Guide to Xiaomi Redmi Note 12T Pro FRP Bypass Everything You Need to Know
- In 2024, Why is iPogo not working On OnePlus Ace 2V? Fixed | Dr.fone
- Love for Filmora Top 10 Editing Highlights Revealed
- Section Ve or Other Dietary Restrictions Should Be Considered when Planning Meals for Patients. The Patient's Preferences Can Also Play a Role in Enhancing Their Satisfaction with the Food Provided.
- The Basics of DEXs: How Decentralized Exchange Systems Work in the Crypto World
- Title: About Itel P40+ FRP Bypass
- Author: Lynn
- Created at : 2024-12-16 20:07:30
- Updated at : 2024-12-20 23:38:06
- Link: https://bypass-frp.techidaily.com/about-itel-p40plus-frp-bypass-by-drfone-android/
- License: This work is licensed under CC BY-NC-SA 4.0.