
:max_bytes(150000):strip_icc():format(webp)/Childlearningonline_WillieBThomas_Getty-3e51600a64d742a0b5db4fadacead069.jpg)
A Step-by-Step Guide on Using ADB and Fastboot to Remove FRP Lock from your Tecno Pova 5
A Step-by-Step Guide on Using ADB and Fastboot to Remove FRP Lock on your Tecno Pova 5
Factory Reset Protection is one of the security measures available on Android 5.1 and later devices to prevent intruders’ unauthorized factory resetting of the Tecno Pova 5 device. Among the several ways to fix this issue and remove the lock, one is ADB and Fastboot commands. So, if you are aware of using Android Debug Bridge, the below content will help you understand how it can be used to remove the FRP lock.
You can watch the video below to bypass FRP lock without hassle!
Part 1: Quick Overview of ADB and Fastboot Commands
1. What are ADB and Fastboot?
Standing for Android Debug Bridge, ADB and Fastboots are the methods through which communication with an Android device can be done through a computer. Under this method, the commands and the actions that are sent from the system are performed on your Android device.
Several issues can be resolved, and multiple functions can be performed using the ADB format tool and Fastboots, and this also includes removing the FRP lock on your Android device. To use this method, USB debugging should be enabled on the Tecno Pova 5 device.
For specific brands of Android phones, specific utility tools are available like the Vivo ADB format tool and the Samsung ADB format tool, which are used explicitly for Vivo and Samsung phones, respectively.
2. How Do ADB and Fastboot Bypass FRP?
Using the versatile ADB command-line tool and Fastboots, the Google FRP lock can be removed using several commands depending on the OS version. This is a client-server program that includes a client who sends the commands, a daemon used to run the commands on the Tecno Pova 5 device, and a server that facilitates communication between the client and the daemon.
ADB comes included in the Android SDK Platform-Tools package, and this can be downloaded using the SDK manager.
3. What Are the Android Versions that ADB and Fastboot Command Support?
The Android versions on which ADB and Fastboot commands can be used are as follows:
_Android 5 – Lollipop__Android 6- Marshmellow__Android 7 – Nougat__Android 8- Oreo__Android 9- Pie__Android 10 – Q ( expected to work though not tested as yet)_
Part 2: How to Set Up ADB and Fastboot Commands to Remove FRP Lock on Android?
To remove FRP lock using ADB, you first need to install and set up ADB and then remove them using the command. The steps for the same are enlisted below.
Steps to remove FRP using ADB

Step 1. Firstly, download the ADB installed setup file and then extract the files from the toolkit on your system in a folder.
Step 2. Next, you need to run adb.setup.exe and then type Y for installing the drivers for ADB and Fastboot.
Step 3. Again, enter Y for installing the drivers and when done successfully, the command window will close.
Step 4. Next, power on your Android device and connect it to your PC using a USB cable. Here also ensure that USB debugging mode is enabled on your Android device.
Step 5. Next, hold down the Shift key and then right-click at any place blank in the ADB folder, and then choose the Open command window here option.
Step 6. Now to remove the FRP you need to enter the following commands at the command prompt one by one where enter needs to be clicked after every line.
_Adb shell am start -n com.google.android.gsf.login/__adb shell am start -n com.google.android.gsf.login.LoginActivity__adb shell content insert –uri content://settings/secure –bind name:s:user_setup_complete –bind value:s:1_Step 7. The above commands are for Samsung devices. If you want to remove the FRP on other brands, enter the following commands:
_Adb shell content insert –uri content://settings/secure –bind__name:s:user_setup_complete –bind value:s:1_
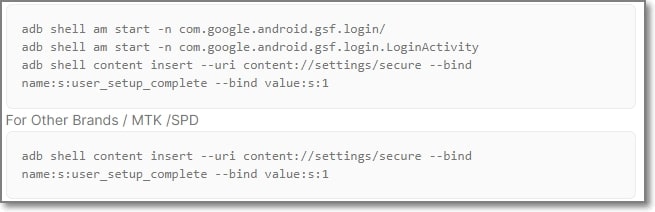
After the execution of the commands, the FRP lock will be removed from your Android device.
Steps to remove FRP using Fastboot
Step 1. Put the Android device into the bootloader or fastboot mode. ( depending on the model and brand of your Android device, the process of entering into the fastboot will differ).
Step 2. Connect your phone to your PC using a USB cable.
Step 3. Next, depending on the system, enter the following command in the CMD window:
_Lenovo FRP command__fastboot erase config__fastboot reboot__XIAOMI FRP command__fastboot -w__MICROMAX YU YUPHORIA FRP__Fastboot -i 0x2a96 erase configFastboot -i 0x2a96 reboot__DEEP/HTC/Other Brands FRP__fastboot erase configfastboot reboot_
Part 3: Limitations of Using ADB and Fastboot Command Method
The ADB and Fastboots command is a workable solution for removing the FRP lock on your Android device, the drawback is that the method is quite complicated and requires thorough technical know-how of ADB and its working. There are several limitations associated with this method as enlisted below.
- Requires technical know-how
To remove FRP using the ADB command you need to have a thorough knowledge of using the tool. The tool has a deep learning curve which makes this method little for the majority of the users.
- Might not unlock the phone
You can try the ADB method for removing the FRP lock but there is no guarantee that the results will be positive and your device will be unlocked.
- Issues with the drivers
Several times while using this method, you might encounter driver issues when your device is not detected as proper drivers are not installed.
- Unexpected issues and errors
ADB is a command-based method, and thus it is important that the commands are entered right. If there is a slight error in the typing of the command, it might lead to major issues and can even be the Tecno Pova 5 device damaged.
- The process is not user-friendly
ADB is a technical process aimed toward the geeks, and thus the overall process is not user-friendly and complicated.
Part 4: The Best ADB Alternative to Bypass FRP Lock on Android Phones
Considering the several limitations of the ADB and Fastboot command method, the need for a simple, user-friendly, and workable solution for removing FRP lock on Android devices arises. One of the best software here that we recommend is Dr.Fone - Screen Unlock (Android) which helps in removing and bypassing many Android phone screen locks including the one appearing due to FRP lock.
Dr.Fone - Screen Unlock (Android)
Remove Google FRP on Samsung without PIN code or Google accounts.
- Pattern, PIN, password, fingerprints & face screen lock can all be unlocked.
- Bypass Google FRP on Samsung without pin code or Google accounts.
- No tech knowledge asked, everybody can handle it.
- Work for Samsung, Xiaomi, Redmi, OPPO, etc.
4,005,551 people have downloaded it
The process of using the software is user-friendly and thus can also be used by non-techy users.
Steps for removing FRP lock on Android using Dr.Fone Screen Unlock
- Step 1. Launch the installed software and choose the Screen Unlock option from the main interface. Choose Android and then select the Remove Google FRP Lock option.

- Step 2. Select the model brans from the options shown on the interface, and then connect your phone to your PC using a USB cable. The connected device details will appear on the interface.

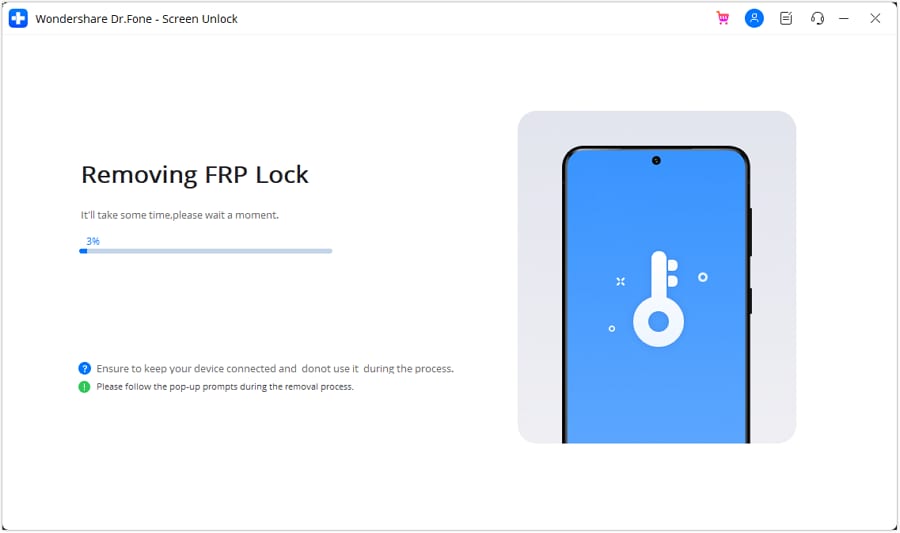
- Step 3. Follow the next steps as they appear. Once the FRP lock is successfully removed, the prompt window will show its completion. Click Done if you have successfully executed the process.
The above is the brief steps for the process. You can check the bypass Samsung FRP lock guide in detail.
Conclusion
If you are well versed with the commands of ADB and Fastboots you can go ahead and use the ADB bypass FRP tool for removing the FRP lock but if this command line method seems complicated for you, Dr.Fone Screen Unlock is the best tool to use.
How To Bypass Tecno Pova 5 FRP In 3 Different Ways
Are you having trouble bypassing Tecno Pova 5 FRP? If so, you’re not alone. A lot of people are struggling with this particular task. But don’t worry - We are here to help.
Since many Tecno Pova 5 users do not need to log in more than once, they commonly forget their Google email and password.
If you have used this device for an extended period, you might have forgotten the password. A factory reset requires you to log in to your Tecno Pova 5 device and use the same Gmail account.
To unlock the Tecno Pova 5 smart 5 FRP, you must use any bypassing tool or method. In this blog post, I’ll walk you through the process of bypassing Tecno Pova 5 FRP. So read on for instructions on how to get the job done.
Let’s get started!
Part 1: Some Common Reasons To Bypass Tecno Pova 5 FRP
Tecno Pova 5 devices are often bypassed for the following reasons:
1. Forgotten Google Account Credentials
One of the most common reasons for needing to bypass FRP is that you simply forgot your Google account login credentials. Whether you have a new phone and are setting it up for the first time, or you’ve had the same phone for a while and are just now adding a Google account, there’s always a chance that you might forget your password.
2. A Second-Hand Phone
Another common reason for wanting to bypass FRP is if you’ve purchased a second-hand phone. If the previous owner of the phone didn’t correctly remove their Google account from the Tecno Pova 5 device before selling it to you, then you’ll be stuck with their account on the phone and won’t be able to use it yourself until you bypass FRP.
3. Factory Reset In An Untrusted Environment
If you’ve performed a factory reset on your phone to try and fix an issue or start fresh, you’ll need to bypass FRP to use the Tecno Pova 5 device again. It is because a factory reset will also remove your Google account from the phone, leaving you locked out unless you can remember the login credentials.
Part 2: Bypass Tecno Pova 5 FRP With 3 Easy Methods
Bypassing FRP can be a bit tricky, but it’s possible to do it if you have the right tools and know-how. If you’re looking for a quick and easy way to bypass FRP on your Tecno Pova 5 device, below are the methods you can use to Tecno Pova 5 Hot 10 FRP bypass.
Method #1: Recover the Google Account Of Your Device
Performing a Factory Reset requires restoring a Google account. It is advisable to recover your email ID or password from another device before attempting Tecno Pova 5 Hot 8 FRP bypass.
You can solve the problem if you have an alternate email address or phone number associated with the account you want to recover. By inserting a verification code, you can easily change the password for your Google account.
After resetting your password, it will take 24 to 72 hours to sync the new password with all devices registered to the account.
Once synced, you can perform a factory data reset by providing an email and a new password. Following this method, you can factory reset your Tecno Pova 5 Hot S without bypassing FRP.
However, if you provide the wrong password in this process, the time will restart for the next 24-72 hours to sync.
So, be careful when entering your email and password on the Tecno Pova 5 device.
Method #2: Bypass Tecno Pova 5 FRP With FRP Bypass APK
Tecno Pova 5 Hot 8 FRP bypass is done using FRP Bypass APK, an Android application. FRP Bypass APK will prove helpful if you cannot retrieve your Google account, which is logged into your Tecno Pova 5 smart 5 FRP bypass.
The APK lets you remove the Google account verification process without a password. You can use this method for free, safely, and quickly.
If you use FRP Bypass APK, you can bypass FRP lock on Tecno Pova 5 Hot 10 FRP bypass and any Android phone running version 5.1 or higher.
Using FRP Bypass APK, you can unlock Google lock on the Tecno Pova 5 Hot 8 FRP bypass:
Step 1: Download the latest FRP Bypass, Following the official website.
Step 2: Copy the APK file to a USB drive.
Step 3: Use an OTG cable to connect the flash drive and Tecno Pova 5 Hot 10 FRP bypass, pulling up a file explorer.
Step 4: After downloading the app, you must install it on your smartphone. You must enable unknown sources before installing.
Step 5: Select the settings menu in the app after completing the installation process.
Step 6: Click on the “Backup and Reset” option.
Step 7: Click the Factory Data Reset button, then select Confirm.
Step 8: The Google account verification will be removed without a password within a few seconds.
Step 9: Restart your device after completing all the procedures.
Step 10: Create a new Google account or skip the option to do so later.
Tecno Pova 5 Hot 8 FRP bypass using FRP Bypass APK is a simple method that a beginner can utilize.
Method #3: Bypass Tecno Pova 5 FRP Without PC Via Settings Menu
Do you want to bypass the Google account verification FRP on the Tecno Pova 5 Smart 5 phone? Using this method, you can bypass the FRP on Tecno Pova 5 Smart 5.
Wait until the Tecno Pova 5 Hot 8 reboots and prompts you to select a language before performing a factory reset.
You can follow the steps below after selecting:
Step 1: Set up Wi-Fi on the Tecno Pova 5 Smart 5.
Step 2: A Google account request page will appear.
Step 3: After tapping the text box, the keyboard will appear.
Step 4: As soon as you click the “@” button, the settings menu will appear.
Step 5: Choose Google keyboard layout from the list. Check it and ensure that the Google keyboard layout is correct.
Step 6: Click on the three dots in the upper right corner of the screen.
Step 7: Select “Help & Feedback” after opening a new page.
Step 8: Click on the search button and send the result from the keyboard once the new dialog box has been opened.
Step 9: Then ignore the guide; it will show you how to do it.
Step 10: Click and hold any word on your screen to highlight it in blue.
Step 11: Click the “Web Search” button on the right-hand side of the screen.
Step 12: A new page guides you through the next step. You can see the web results for the word you just Googled using the Google App.
Step 13: Find the search box in the upper center of the page. Click the search button after typing “setting” in the search bar.
Step 14: You will now see a system settings icon on your home screen. You can reset the factory data by clicking on the following steps: system setting icon > Backup & Reset > Factory Data Reset.
Step 15: Reset the Tecno Pova 5 device to factory settings. After completing the reset, you will see the Tecno Pova 5 Smart 5 welcome page.
Step 16: Reconnect your Tecno Pova 5 to your Wi-Fi network. The phone will instead ask you to add a new Google account if you can do it successfully.
Step 17: Sign up for a Google account, and then the Tecno Pova 5 Smart 5 is ready to use.
Bypassing the FRP on your Tecno Pova 5 Smart 5 is as simple as following these steps.
Conclusion
It is not illegal to bypass Google verification when you are doing a factory reset in case you forget your password or don’t remember your Google account. The Tecno Pova 5 Smart 5 FRP bypass becomes useless if you don’t bypass the FRP lock, so FRP bypass Tecno Pova 5 Hot S matters.
You can bypass the Tecno Pova 5 Hot 8 FRP by using a few practical methods listed above. You can try another whenever one of the above procedures does not work accurately.
How to Bypass Google FRP Lock on Tecno Pova 5 Devices
Technological advancements in the IT and telecommunication industry simplify your tasks and provide security against cyber malpractices. The advantages are numerous and appealing, but there are downsides too. One such inconvenience is caused by Google FRP lock in Tecno Pova 5 smartphones. The facility keeps your device information safe against unauthorized access. However, users often report issues like lockouts not being removed due to several causes. Such scenarios raise the demand for Tecno Pova 5 Nord FRP bypass solutions for seamless device access.
Part 1. What Is Google FRP and How Does It Work?
Google Factory Reset Protection (FRP) is an in-built security function in Android 5.1 and later versions. The feature protects these devices against intentional data loss on unauthorized access. The utility does not allow a factory reset of your device in case it is lost or stolen. Your data is hence, safe from unwanted mishandling. The feature also protects the Tecno Pova 5 device’s data encryptions and screen locks. The functionality gets enabled when you register a Google account on your Android device. As is obvious, the feature gets disabled when the Google account is removed before beginning the Factory Data Reset process.
If your device is under untrusted access and the FRP lock is enabled, the latter will prevent the factory reset of your phone. It is because; the active FRP lock requires entering the Google account credentials registered with the Tecno Pova 5 device. Therefore, unwanted users will not be possible to factory reset the Tecno Pova 5 phone. However, there may be instances when you need to factory reset your FRP-enabled device to its default settings. Ensure that the registered Google account credentials are available to you under such circumstances.
Part 2. How to Remove Google FRP Lock on Any Tecno Pova 5 Phone?
To remove the Google FRP lock on your Tecno Pova 5 device, you can follow any of the methods discussed below:
1. Bypass Google FRP Lock on Your Tecno Pova 5 Phone
- Switch on the Wi-Fi network of the Tecno Pova 5 phone and head to the ‘Hello’ screen.
- Take the following path:
Emergency Call> Emergency Rescue> Add Contact

- When the permission prompt pops up, click on ‘Deny’ and tap “Go to Settings”.
- Hit the ‘Permission’ tab and tap the ‘Search’ button.
- Enter ‘Settings’ in the search field, choose the ‘Settings App Info’ option, and tap the ‘Open’ button.
- Take the path given below to enable the system shortcuts:
System> Accessibility> Accessibility Menu> Toggle the Button to Turn it On> Allow> Got it
- Head to the “Settings” app and tap “Apps and Notifications”. Next, click on “See All Apps”.
- Find and disable the ‘Android Setup’ and ‘Google Play Service’ within the application list.

- Navigate back to the ‘Hello’ screen to completely disable the setup by taking the following path:
Start> Agree> Agree> Skip> Don’t Copy> Ok> Agree
- Skip the ‘Set Screen Lock’ task for completing the setup.
2. Using FRP Bypass APK
This is a quick and smart way to address the FRP lock removal issue within several minutes. Here’s what you need to do:
- Download the FRP Bypass APK to a PC or some other smartphone from the latter’s official website, followed by copying it into a pen drive.
- Use an OTG to connect the pen drive to the FRP-locked device.
- Head to the destination folder of the downloaded APK in the “File Manager” application.
- Install the APK in the FRP-locked phone by allowing the app permissions.
- Navigate to ‘Settings’ and enable the ‘Install from Unknown Source’ option.
- Reinstall and open the APK.
- The ‘Settings’ menu will pop up. Head to the “Backup and Reset” option.
- Click on ‘Factory Data Reset’, followed by “Erase Everything”.
- Tap ‘Confirm’ to erase all the Tecno Pova 5 device data.
- Register with a new Google account to use the phone.

3. Deactivate FRP in Your Tecno Pova 5 Phone
Removing the Google FRP lock using a computer is impossible in some instances. Deleting your registered Gmail account from the Tecno Pova 5 device can help you in these circumstances. The downside of this method is that your device’s data will lose protection from Google. Here’s how you can delete your Gmail account from the FRP-locked phone:
- Launch the “Settings” app on your Tecno Pova 5 device.

- In the app’s opening interface, click on the ‘Accounts’ tab to open the section.

- A list of all the accounts linked to your Tecno Pova 5 device will be displayed. Tap on the desired Gmail account to unlink it from your phone.

- The device data linked with the selected account will appear on the screen. Click on ‘Remove Account’ to proceed further.

- A confirmation prompt will pop up to ensure a willful deletion of the account from the Tecno Pova 5 device. Tap on ‘Remove Account’ to confirm the action. This will cause all data linked with the account to get deleted from the phone.

FAQs about Google Lock Bypass
1. Does Factory Reset Remove Google Account?
There may be instances when you require wiping out smartphone data to keep it safe against unauthorized access. Maybe you wish to pass on your device to another user or migrate to a different device. It is important to make sure that all accounts linked to the phone are deleted from the Tecno Pova 5 device. It should be understood here that a factory reset will not remove Google or other accounts from the Tecno Pova 5 device. The process restores the default factory settings of the phone that you got at the first purchase.
2. How to Enable Factory Reset Protection?
Enabling the Factory Reset protection feature is a smart way to protect the important data on your phone. However, issues of unethical access in cases of theft or loss are quite prominent. You can enable the FRP functionality by taking the following steps:
- When using a new device, sign in to the phone with your Google account. You can use an existing account or create a new one.
- Set a pattern or password screen lock on your device. It is not advisable to use swipe unlock or leave the phone unlocked at all. If you forget the pattern or password, Google credentials can be used to unlock the Tecno Pova 5 device.
These steps will cause the automatic configuration of the Factory Reset Protection feature. The invader will be prompted to enter the registered Google account credentials on every attempt to access the phone.
Conclusion
Developments in electronic technology have brought a series of benefits, covering easy access, security, and everything in between. One such feature is the Google Factory Reset Protection to protect your device data against untrusted access. The feature is undoubtedly credible, but there may be situations that require bypassing the FRP lock. For affordable solutions to address the concern on Tecno Pova 5 phones, pick the one that corresponds to your specific situation.
Dr.Fone - Screen Unlock (Android)
Unlock Your Tecno Pova 5 Phone in a Flash
- Remove 5 screen lock types: pattern, PIN, password, ingerprints & Face ID.
- Bypass Android FRP lock without a PIN or Google account.

- Unlock mainstream Android brands like Samsung, Huawei, LG, Xiaomi, etc.
- No tech knowledge required, Simple, click-through, process.

3,981,454 people have downloaded it
Also read:
- A Step-by-Step Guide on Using ADB and Fastboot to Remove FRP Lock from your Infinix Note 30i
- In 2024, Step-by-Step Tutorial How To Bypass Xiaomi Redmi Note 13 Pro+ 5G FRP
- In 2024, Step-by-Step Tutorial How To Bypass Xiaomi Redmi Note 12R FRP
- How to Bypass Google FRP Lock from Tecno Pop 8 Devices
- Tecno Camon 20 Premier 5G ADB Format Tool for PC vs. Other Unlocking Tools Which One is the Best?
- In 2024, Is GSM Flasher ADB Legit? Full Review To Bypass Your Xiaomi Redmi Note 12 Pro 4GFRP Lock
- FRP Hijacker by Hagard Download and Bypass your Vivo T2 5G FRP Locks
- 5 Quick Methods to Bypass Vivo Y100 5G FRP
- In 2024, A Step-by-Step Guide on Using ADB and Fastboot to Remove FRP Lock from your Vivo T2x 5G
- In 2024, The Complete Guide to Honor 70 Lite 5G FRP Bypass Everything You Need to Know
- About Tecno Pop 8 FRP Bypass
- In 2024, Ultimate Guide on Vivo T2 5G FRP Bypass
- Xiaomi Redmi A2 ADB Format Tool for PC vs. Other Unlocking Tools Which One is the Best?
- A Step-by-Step Guide on Using ADB and Fastboot to Remove FRP Lock from your Samsung Galaxy M14 4G
- In 2024, A Quick Guide to Tecno Pova 5 FRP Bypass Instantly
- In 2024, A Quick Guide to Honor 70 Lite 5G FRP Bypass Instantly
- Latest Guide How To Bypass Tecno Spark 10C FRP Without Computer
- In 2024, Latest Guide How To Bypass Vivo Y200e 5G FRP Without Computer
- Is GSM Flasher ADB Legit? Full Review To Bypass Your ZTE Blade A73 5G Phone FRP Lock
- Ultimate Guide on Xiaomi 14 FRP Bypass
- In 2024, Is GSM Flasher ADB Legit? Full Review To Bypass Your Google Pixel 7aFRP Lock
- Top 5 Samsung Galaxy M14 4G Bypass FRP Tools for PC That Actually Work
- Easy Guide How To Bypass Samsung Galaxy XCover 7 FRP Android 10/11/12/13
- Latest Guide How To Bypass Xiaomi Redmi A2 FRP Without Computer
- A Quick Guide to Tecno Spark Go (2024) FRP Bypass Instantly
- In 2024, Is GSM Flasher ADB Legit? Full Review To Bypass Your Vivo T2x 5G Phone FRP Lock
- In 2024, Ultimate Guide from Infinix Note 30i FRP Bypass
- In 2024, 5 Quick Methods to Bypass Xiaomi Civi 3 FRP
- Hassle-Free Ways to Remove FRP Lock on Xiaomi Redmi Note 12 Pro+ 5G Phones with/without a PC
- In 2024, Is GSM Flasher ADB Legit? Full Review To Bypass Your XiaomiFRP Lock
- The Complete Guide to Infinix Hot 40i FRP Bypass Everything You Need to Know
- In 2024, Is GSM Flasher ADB Legit? Full Review To Bypass Your Vivo S17 Pro Phone FRP Lock
- Latest Guide How To Bypass Infinix Note 30 Pro FRP Without Computer
- In 2024, Hassle-Free Ways to Remove FRP Lock on Itel P55T Phones with/without a PC
- Latest Guide How To Bypass Infinix Smart 8 FRP Without Computer
- In 2024, Full Guide to Bypass Xiaomi Civi 3 FRP
- A Step-by-Step Guide on Using ADB and Fastboot to Remove FRP Lock on your Itel A60
- 5 Quick Methods to Bypass Tecno Camon 20 Pro 5G FRP
- In 2024, Hassle-Free Ways to Remove FRP Lock on Vivo Y27 4Gwith/without a PC
- In 2024, Hassle-Free Ways to Remove FRP Lock on Tecno Camon 30 Pro 5G Phones with/without a PC
- Xiaomi Redmi Note 12 Pro 4G ADB Format Tool for PC vs. Other Unlocking Tools Which One is the Best?
- Samsung Galaxy A15 4G ADB Format Tool for PC vs. Other Unlocking Tools Which One is the Best?
- In 2024, FRP Hijacker by Hagard Download and Bypass your Tecno Camon 30 Pro 5G FRP Locks
- In 2024, Ultimate Guide from Honor 70 Lite 5G FRP Bypass
- Is GSM Flasher ADB Legit? Full Review To Bypass Your Vivo Y27s Phone FRP Lock
- In 2024, FRP Hijacker by Hagard Download and Bypass your Vivo X90S FRP Locks
- Infinix ADB Format Tool for PC vs. Other Unlocking Tools Which One is the Best?
- In 2024, A Quick Guide to Xiaomi 13T FRP Bypass Instantly
- How to Unlock SIM Card on Apple iPhone 15 Pro online without jailbreak
- Here Are Some Reliable Ways to Get Pokemon Go Friend Codes For Vivo V30 Lite 5G | Dr.fone
- In 2024, Does Airplane Mode Turn off GPS Location On Vivo Y55s 5G (2023)? | Dr.fone
- How to Transfer Photos from Realme Note 50 to New Android? | Dr.fone
- In 2024, How To Pause Life360 Location Sharing For Apple iPhone SE (2022) | Dr.fone
- How To Fix Part of the Touch Screen Not Working on OnePlus 11R | Dr.fone
- How to Change Spotify Location After Moving to Another Country On Vivo Y100i | Dr.fone
- How to Fix Pokemon Go Route Not Working On Apple iPhone 12? | Dr.fone
- In 2024, A Detailed Pokemon Go PvP Tier List to Make you a Pro Trainer For Apple iPhone 15 Pro | Dr.fone
- How To Upgrade or Downgrade iPhone 12 mini Without iTunes? | Dr.fone
- Best Ways on How to Unlock/Bypass/Swipe/Remove Xiaomi 14 Ultra Fingerprint Lock
- App Wont Open on Your Realme Note 50? Here Are All Fixes | Dr.fone
- Turning Off Two Factor Authentication From iPhone XS Max? 5 Tips You Must Know
- Possible solutions to restore deleted call logs from Oppo Find N3
- In 2024, 3 Ways to Track Xiaomi Redmi K70 Pro without Them Knowing | Dr.fone
- 3 Ways to Change Location on Facebook Marketplace for Realme Narzo N53 | Dr.fone
- Why Your Motorola G54 5G Screen Might be Unresponsive and How to Fix It | Dr.fone
- In 2024, Lock Your Realme GT 3 Phone in Style The Top 5 Gesture Lock Screen Apps
- In 2024, The 6 Best SIM Unlock Services That Actually Work On Your Oppo A18 Device
- How to Recover deleted pictures on iPhone SE (2022)? 5 Best Solutions | Stellar
- How to Change GPS Location on Motorola Moto G34 5G Easily & Safely | Dr.fone
- In 2024, Why Your WhatsApp Location is Not Updating and How to Fix On Honor 90 GT | Dr.fone
- In 2024, How Do I Stop Someone From Tracking My Xiaomi Redmi Note 12R? | Dr.fone
- In 2024, How to Screen Mirror on Apple iPhone 7? | Dr.fone
- In 2024, iSpoofer is not working On Apple iPhone 13 mini? Fixed | Dr.fone
- In 2024, The Best Android Unlock Software For Vivo T2x 5G Device Top 5 Picks to Remove Android Locks
- Tips and Tricks for Setting Up your Nokia C02 Phone Pattern Lock
- How To Restore Missing Pictures Files from Xiaomi .
- In 2024, How to Mirror Vivo Y27 5G to Mac? | Dr.fone
- Is your Honor 90 working too slow? Heres how you can hard reset it | Dr.fone
- In 2024, How to Use Pokémon Emerald Master Ball Cheat On Vivo V27 | Dr.fone
- Complete guide for recovering music files on Honor 90
- Use Device Manager to identify malfunctioning drivers with Windows Device Manager in Windows 11/10/7
- How To Unlock Apple iPhone 6 Plus Without Passcode? 4 Easy Methods | Dr.fone
- Does Airplane Mode Turn off GPS Location On Vivo Y100i? | Dr.fone
- Top 10 Fixes for Phone Keep Disconnecting from Wi-Fi On Samsung Galaxy A24 | Dr.fone
- In 2024, 3 Facts You Need to Know about Screen Mirroring Nokia C210 | Dr.fone
- In 2024, How to Transfer Apps from Realme 12 Pro 5G to Another | Dr.fone
- Top 4 Ways to Trace Xiaomi Redmi Note 12 Pro+ 5G Location | Dr.fone
- Title: A Step-by-Step Guide on Using ADB and Fastboot to Remove FRP Lock from your Tecno Pova 5
- Author: Lynn
- Created at : 2024-04-09 09:53:46
- Updated at : 2024-04-10 09:53:46
- Link: https://bypass-frp.techidaily.com/a-step-by-step-guide-on-using-adb-and-fastboot-to-remove-frp-lock-from-your-tecno-pova-5-by-drfone-android/
- License: This work is licensed under CC BY-NC-SA 4.0.
