
5 Quick Methods to Bypass Itel FRP
5 Quick Methods to Bypass Itel P55T FRP
Google Factory Reset Protection, a.k.a FRP, is developed by Google for all Android phones. It adds an extra layer of security to your phone and the data on it. It is aimed at making it difficult for the illegal holder of your phone to factory reset your phone and remove tracking information. Then why do we need to discuss the Itel P55T FRP bypass?
Though the protection is meant for you, sometimes you may forget the password and want your Itel P55T FRP removed. Also, if you bought a used phone and the previous user has set up FRP with her password, you need to bypass it.
Part 1: In what cases does the Itel P55T FRP bypass works?
How and why should I bypass Itel P55T FRP? Let us look at the valid reasons.
1. Buy a locked second-hand Itel
When you buy a second-hand phone, ideally, the previous user must format and hard reset the Itel phone to remove all locks and password requirements. However, if it doesn’t happen, you cannot use some options on your phone and configure security because of FRP. Here, your savior is the option of the Itel P55T FRP bypass.
2. Forget Google account ID and password
Even if you have locked your Itel phone yourself, you are stuck when you forget your Google username and password. So, you can only recover your phone using the Itel P55T FRP bypass.
3. The person with a Itel from his company no longer works for it
Some employees also receive official phones from their company which they have to return when they leave the company. Now, it becomes a horror story for the new employee if he gets the same phone locked with the previous user’s ID.
Part 2: 5 quick methods to bypass Itel P55T FRP
Ok, now this is established that there are certain situations when you need to conduct a Itel P55T FRP bypass. So how do you do the Itel P55T FRP bypass?
Method 1. Retrieve your Google account from another device
If your phone is locked with a Google account whose password you do not know or have forgotten, then you can use this method to Itel P55T FRP bypass. In this method, you can try to retrieve your Google account from another device. It is a simple step-by-step process tha can be completed from a PC or another mobile device.
If you have forgot the email address but remember the password, then follow these steps.
- Navigate to Google’s Find My Email page in your browser.
When you can’t remember the email address that was configured, go to the Find My Email page and start account recovery process.
- Enter your recovery email or phone number
On the next screen, provide a recovery email or phone number and click Next.

- Provide your first and last name
Enter your first and last name in the given form and click Next.
- Verification code
Google will send a verification code to the setup recovery email or phone number, click Send.
- Verification code entry
Check your email inbox or phone messages depending on the recovery method and find the verification code. Enter it in the given form. If it is correct, you can go to the next final step.
- Choose an account
From the list of accounts showing on the screen, select the account you want to recover.
- Enter your password
Enter the password in the text box and you are done.
If you remember the email but not the password, then the Itel P55T FRP bypass method will go like this.
- Google’s Account Recovery page
Navigate to the Account Recovery page from the browser on your PC or other mobile devices.
- Enter your email address
Fill in the form with your Google account and click Next.

- Enter the last password you remember
The next form will ask you to enter the last password you remember and that worked
Now, you will receive a message to your registered device, to verify it’s you. Open it and click , Yes, it is me.
Now, wait for six hours for Google to verify it’s you and then they will send a password reset link to your email.
Now, what if you can’t remember your last password, then use the next method.
- Click on “Try another way”
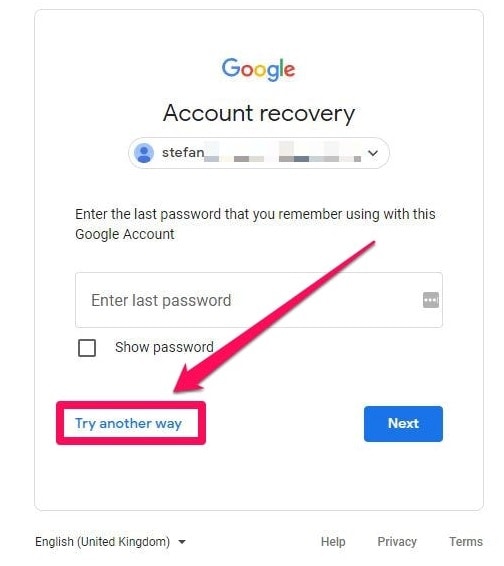
Now Google will send a message to your phone to verify it’s you. On your phone, open the message and click Yes, it’s me.
After verification, Google will send you a password reset link after six hours.
If your phone is not registered in your Google account then, try the next method.
- Click on “Try another way” again

If your phone is enabled to check for the code, click Try another way again.
Google will then ask you to send a verification code to your registered phone number. Click Send.
Find the code from your messages, enter it, and click Next.
Now again, you will wait for six hours till Google sends the password reset link to your email.
Method 2. Use FRP Bypass APK
FRP bypass APK is another tool you can use to Itel P55T FRP bypass easily. Let us see how it works step by step.
- Download FRP Bypass APK for Itel P55T FRP bypass android 11.
- Once it’s downloaded, open the File Manager using the Open Files app
- Find the suitable Apk and click on it
- Install & open the APK.
- Open the browser on your phone.
- Launch any of these two below URL.
- Go to the FRP bypass APK >FRP APPS section
- Open Settings leading to the Itel P55T device Settings>System Settings> Backup & Reset >Reset Phone
- Now click on Reset System Settings Only, and confirm Reset System Settings Only.
- Select Erase All data and confirm.
- Your device will be rebooted.
- Wait till the factory reset process completes.
Now, reboot your device and set it up according to your requirements.
Method 3. Deactivate FRP
Another way to come around Itel P55T FRP bypass is to deactivate FRP. Let us follow the step-by-step process.
- Launch the “Settings” app and scroll to the Apps.
- Click on the “Manage apps” (applications) and then the “All” tab.
- Open “Google App.”
- Click on the “Clear cache” to remove the Google account cache.

- Also, clear all data to erase data stored.
- Click the “Back” button, and go to “Gmail.”
- Click on the “Clear cache” and “Clear data.”

- In the Itel P55T device Settings menu and click “Data synchronization.” When your device asks you to enter your Google account, enter your new Gmail account.
You have successfully completed the Itel P55T FRP bypass process.
Method 4. Bypass with SideSync
You can use SideSync to share the screen and data between your computer and mobile phone. How can we use this for FRP bypass?
- Download the SideSync from the official site and install the SideSync application on your computer.

- Connect your phone and computer to the Google account verification screen.
- Now plug in the first end of your OTG adapter with your phone and connect another end to the flash drive with APK.
- Your phone will launch the file explorer automatically, showing the root directory of the flash drive.
- Now click on the APK file.
- Click Settings and allow to install from Unknown sources, and click OK.
- After installation, open SideSync.
- Disconnect the OTG cable from your Samsung phone.
- Now access the Settings menu and go to the Backup & reset option and conduct a factory reset.
Method 5. 3 Steps to Bypass Itel FRP Bypass
Dr.Fone - Screen Unlock (Android) is a reliable and efficient tool designed to help users bypass FRP (Factory Reset Protection) locks on Android devices, including Itel smartphones. This powerful software provides a hassle-free solution for those locked out of their Itel devices due to FRP lock. With its user-friendly interface and advanced features, Dr.Fone makes FRP bypassing a straightforward process, even for users with limited technical knowledge.
Dr.Fone - Screen Unlock (Android)
Remove Google Lock (FRP) from Itel Devices
- Pattern, PIN, password, fingerprints & face screen lock can all be unlocked.
- Bypass Android FRP lock without a PIN or Google account.

- Unlock mainstream Android brands like Samsung, Itel, Xiaomi, etc.

- No tech knowledge required, Simple, click-through, process.
3,981,454 people have downloaded it
3 Steps to Bypass Itel FRP Lock with Dr.Fone - Screen Unlock (Android)
- Step 1. After installing Dr.Fone - Screen Unlock (Android), launch the program and select the “Screen Unlock” option from the main menu. Continue to Android > Remove Google FRP Lock.

- Step 2. Then select Itel and click the Start button to continue. Then, connect your locked Itel device to the computer using a USB cable. Ensure that USB debugging is enabled on your Itel device before proceeding with the next steps.

- Step 3. Once your Itel device is successfully connected, Dr.Fone - Screen Unlock (Android) will automatically detect it. Follow the on-screen instructions to put your Itel device into specic mode. Once in the correct mode, Dr.Fone will start downloading the necessary firmware to bypass the FRP lock.
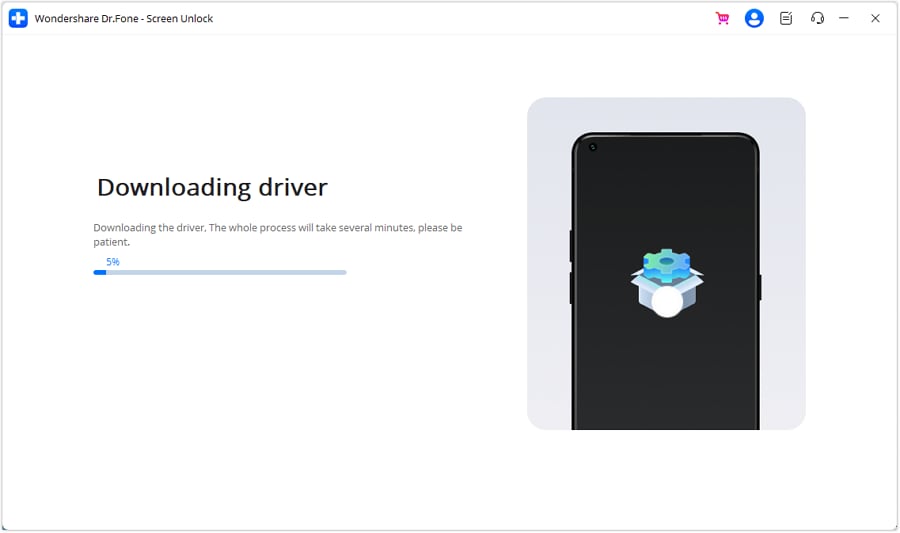
During the process, it’s crucial to keep your device connected to the computer and refrain from disconnecting it until the bypass is complete. After the firmware download is finished, Dr.Fone will initiate the FRP lock bypass process. Once completed, your Itel device will restart, and you’ll regain access to it without encountering the FRP lock.
 safe & secure
The Bottom Line
FRP is a great feature to add security to Android phones. However, sometimes it is necessary to bypass it to fully use your phone. When you are stuck with an FRP lock, it is a frustrating situation, especially when you want to factory reset your phone. We have described various methods so that you choose the best solution according to your requirements for the Itel P55T FRP bypass. Among them, bypassing Itel FRP lock is made simple and efficient with Dr.Fone - Screen Unlock (Android). Say goodbye to FRP lock frustrations and regain access to your Itel device swiftly with Dr.Fone - Screen Unlock (Android) .
safe & secure
Is GSM Flasher ADB Legit? Full Review To Bypass Your Itel P55T Phone FRP Lock
When encountering factory reset protection (FRP) locking on your device, the search for solutions often leads to recommendations for the GSM Flasher ADB Bypasser FRP tool.
But before you are thinking of using it, make sure you understand its features, benefits, and how to download and use this tool effectively. This article provides you a comprehensive overview of the GSM Flasher Adb Bypass FRP tool, covering essential information that will guide you through the FRP bypass process.
Part 1. Full Review of the GSM Flasher ADB Bypasser FRP Tool
The GSM Flasher ADB Bypasser FRP tool is a reliable solution designed for users encountering FRP activation on their Android devices. It offers a quick and effective solution to regain access to your locked device by bypassing the FRP lock in just a few minutes.
To help you make an informed decision about using this tool, let’s explore its key features:
- Helps you to unlock various screen locks on Android, including patterns and PIN locks
- Exhibits broad compatibility, extending its support to a majority of Android devices
- Free of charge
While the GSM Flasher ADB Bypass FRP boasts a visually appealing interface, it’s worth noting that the software may present a steeper learning curve for some users. If you are not familiar with Android debugging and ADB processes, you might find the initial setup somewhat challenging.

GSM Flasher ADB Bypasser FRP compatibility list
The GSM ADB FRP Tool is compatible with a wide range of Android devices and Windows operating systems. Here’s the breakdown of its compatibility list:
Android:
Android 5.1 Lollipop, Android 6 Marshmallow, Android 7 Nougat, Android 8 Oreo, Android 9 Pie, Android 10, Android 11, and Android 12.
Windows:
Windows XP, Windows 7, Windows 8, Windows 10, Windows 11 (X32 and X62 bit).
Supported phone models
| Samsung | Samsung A3, A5, A7, A9, A40, A10, A30, A20, J7, J2, J7 Prime, J5, J1, core 2, M10, M20, M30, M40 |
|---|---|
| Moto | Moto G3, Moto E, Moto G4 Play, Moto E 4 Plus, Moto M, Moto G 5S Plus, Moto G Turbo, Moto Turbo |
| ZTE | ZTE Sonata 3, ZTEZ982, ZTE Z835, ZTE Blade, ZTE Z833, ZTE N9560, ZTE Zmax Pro, ZTE Z831, ZTE Z981 |
| LYF | Jio LYf Phone, Jio Keypad Phone |
| Intex | Intex Aqua, Aqua Star 2, Aqua Power Plus, Aqua Y2 |
| Lenovo | Lenovo Z2 Plus, Vibe K5, A2010, K5, Vibe, A6600, Lenovo A1000 |
| LG | LG Aristo, LG stylo 3, LG K10, LG K20, LG Stylo 2, LG G6, LG G4, LG G5, LG G20, LG K20 Plus |
Pros and Cons of Using GSM Flasher ADB Bypass FRP Tool
Dealing with FRP lock using the GSM Flasher tool also comes with its share of drawbacks. Let’s break down its strengths and weaknesses to help you decide if it’s the right fit for your needs.
Pros:
- A free solution to unlock their Android devices from FRP lock
- While it works with other Android devices, Samsung users have higher success rates of unlocking their devices with this tool
Cons:
- You need to disable antivirus software when using the tool, raising security concerns
- The tool does not work uniformly across all Android devices and versions
- The tool’s usability may pose a challenge, especially for beginners
Part 2. How To Use GSM Flasher ADB Bypasser FRP Tool
Now, we are moving on to the crucial aspect: How to use the GSM Flasher FRP tool. Employing this tool to unlock your Android device from FRP lock requires a systematic approach. If you’ve decided to use this bypasser FRP tool, the first step is to download GSM flasher tools and install them from this link.
Once the installation is complete, you can proceed with the following step-by-step guide to efficiently use GSM Flasher ADB Bypasser FRP and regain access to your locked Android device.
- Step 1: Make a connection between your phone device and your PC
After completing the tool download, employ a USB cable to connect your Itel P55T. The GSM Flasher FRP tool will be recognized by your Android device, while the tool will identify the name and Android version of your connected device at the same time.
- Step 2: Perform FRP lock bypass
Proceed by clicking “Remove FRP” on your computer. It’s essential to be aware that this process will require a few minutes, so be patient until the tool successfully unlocks the FRP lock on your phone.

Part 3. Quick and Easy Bypasser FRP Tool Alternative
If your phone model is not compatible with GSM Flasher ADB or if the tool doesn’t seem to suit your needs, a reliable and swift alternative for FRP bypass is Wondershare Dr.Fone. Dr.Fone offers the Screen Unlock feature that is intricately crafted to streamline the FRP bypass process, ensuring both ease and efficiency.
Additionally, Dr.Fone offers support for a vast array of over 2000 Android phone models, providing a comprehensive solution that caters to a more diverse range of devices.
List of features:
- Supports a vast range of iOS and Android device models
- Minimizes the risk of data loss during the FRP unlocking process, preserving crucial files and information
- Dependable to unlocking Android devices when faced with forgotten screen lock credentials
How to bypass Google verification using Dr.Fone’s Screen Unlock:
- Step 1: Launch Dr.Fone Screen Unlock and connect Android device.
Launch Wondershare Dr.Fone on your computer and connect your Android devices. Go to Toolbox > Screen Unlock.

- Step 2: Select Remove Google FRP Lock.
On the next screen, choose Android as your device type and select Remove Google FRP Lock to proceed.
- Step 3: Select the Android device model.
Pick your Android device model and proceed by clicking the Start button.
- Step 4: Choose the Android version.
Now, specify your Android version. If you’re unsure about the Android OS version on your Android or prefer the quickest method to eliminate the Google Lock, select the All Android versions (One-Click Removal) option. Click “Start” to continue.

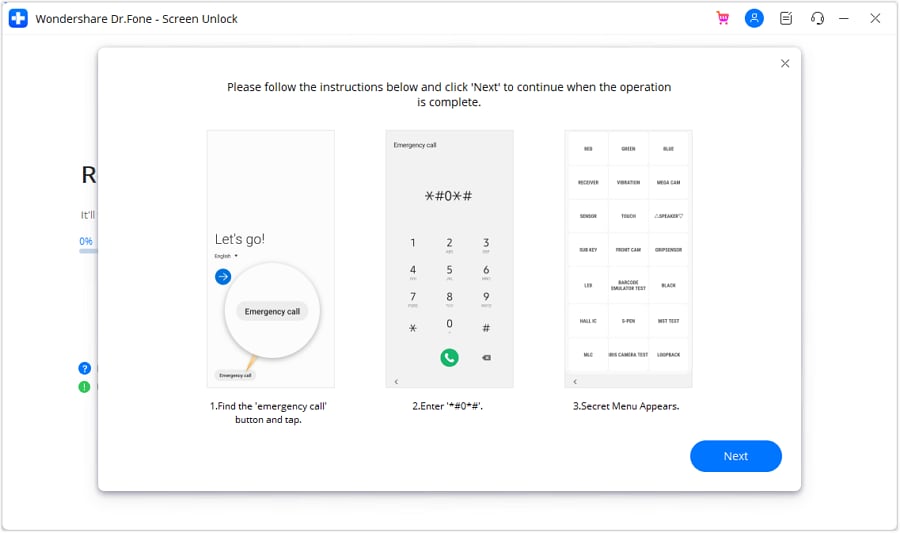
- Step 5: Follow the instructions to access an Emergency Call.
Follow on-screen instructions to open Emergency Call on your Android. Dial #0# to open a secret menu and click Next on your computer.
- Step 6: Enable USB debugging.
Now, your Android screen will display a notification to enable USB debugging. Once you grant permission on your phone device, proceed to click “Authorized” on your computer screen.

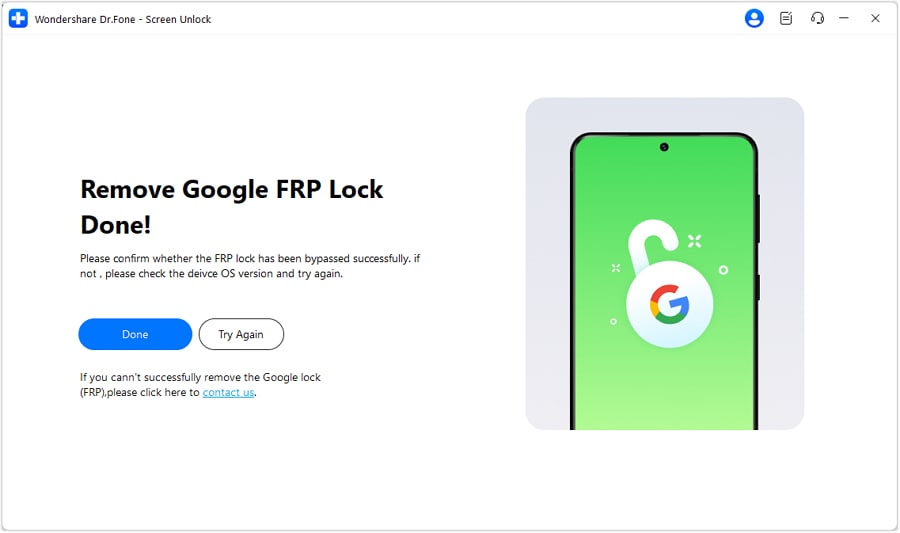
On your computer, the next screen will show that the FRP lock is being removed from your Android device. Once it’s successfully removed, a window will pop up saying it’s done. Click “Done” if you’ve completed the process successfully.
Tips: Are you searching for a powerful FRP Unlock tool? No worries as Dr.Fone is here to help you. Download it and start a seamless unlock experience!
Conclusion
The GSM Flasher ADB Bypasser FRP tool offers a cost-free and versatile solution to bypass FRP locks on a range of Android devices. While it provides an effective means to unlock your device, you might need to consider its compatibility, potential legal implications, and the learning curve associated with its usage.
As an alternative, tools like Dr.Fone can be explored for additional compatibility and ease of use. And, of course, the choice between these tools depends on your preferences and specific device requirements.
The Updated Method to Bypass Itel P55T FRP

Android smartphones have a security feature called FRP (Factory Reset Protection) that shields user data from theft or loss. Like other manufacturers, Itel uses FRP as a security feature to make sure that, in the event of a factory reset, only the original owner with the Google account credentials linked with the Itel P55T device would be able to access the Itel P55T device. This aids in preventing the Itel P55T device’s theft or unauthorized use.
FRP, however, can also be a problem if a user forgets their Google account login information or loses access to their device. Our step-by-step method will walk you through the most effective ways to bypass FRP on Itel P55T devices in 2023, ensuring you can regain access to your device without any hassle. Say goodbye to FRP Xiaomi and Itel P55T FRP challenges with our complete method.
We have included more than two ways to unlock your mobile without any hassle and complication. Just follow this guide, and you will regain access to your device in no time.
Part 1: Precautions To Take Before and After FRP Bypass?
Precautions are necessary for a safe and effective process when overcoming FRP (Factory Reset Protection) on your Itel P55T device. In order to safeguard your data, guarantee device performance, and maintain device security, we’ll highlight the essential steps you should take before the Itel FRP bypass.
Precautions:
- Backup Your Data: In order to prevent data loss during FRP bypass, be sure to back up all vital information from your smartphone, including contacts, pictures, videos, and documents, to a secure location.
- Charge the battery: To prevent any delays during the FRP bypass procedure, ensure your device has enough battery life or is connected to a charger.
- **Conduct Thorough Research:**To prevent any potential threats or damage to your device, conduct thorough research and follow instructions from reliable sources or respected guidelines.
Part 2: How to remove Itel P55T FRP with the most reliable software - Dr.Fone?
Wondershare Dr.Fone - Screen Unlock (Android) is well-known for its ease to use and data-security. The Unlock Android Factory Reset Protection feature helps you enter home screen without effort. Dr.Fone not only supports Itel FRP bypass, it also supports other device brands, such as Samsung , OPPO , etc.
Dr.Fone - Screen Unlock (Android)
Itel P55T FRP Lock Removal Made Easy
- Pattern, PIN, password, fingerprints & face screen lock can all be unlocked.
- Bypass Android FRP lock without a PIN or Google account.
- Unlock mainstream Android brands like Samsung, Redmi, Xiaomi, etc.
- No tech knowledge required, Simple, click-through, process.
3,981,454 people have downloaded it
Check the following steps to see how to bypass Itel FRP with Wondershare Dr.Fone.
Step 1: Launch Wondershare Dr.Fone first and choose Toolbox > Screen Unlock > Android.
Step 2: Select Remove Google FRP Lock.
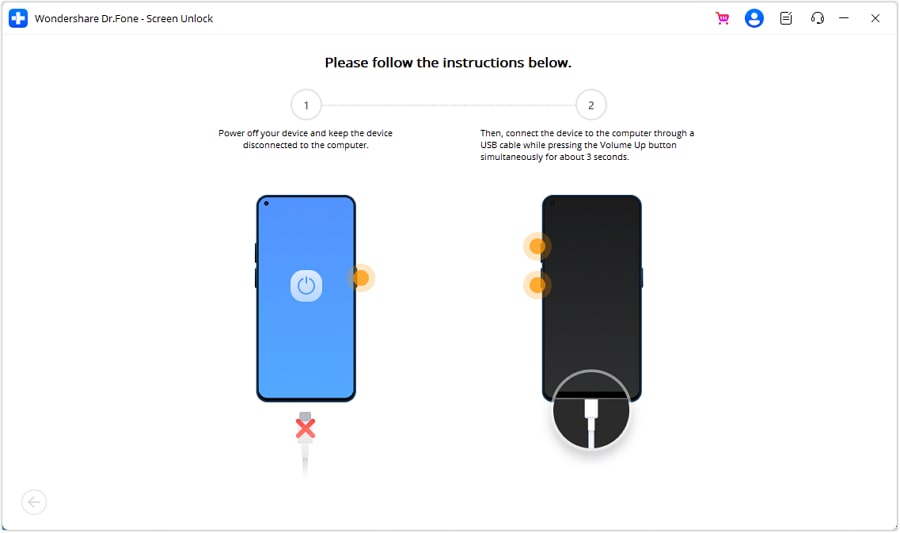
Step 3: Choose Itel among the Itel P55T device brands.
Step 4: Dr.Fone will start to download driver. And then turn off the Itel P55T device and connect to the computer. During the connecting process, please keep pressing Volume Up and Down button simultaneously for around 3 seconds.
Step 5: Wait for a few minutes and when it’s done, click Done button.
Part 3: How To Bypass Itel P55T FRP in Traditional Method
With each phone, operating system, and version of Android having its own technique, bypassing Itel FRP on the most recent versions of Google’s operating system is becoming increasingly challenging. You can use the FRP bypass software that works with your device to employ the free FRP bypass approach.
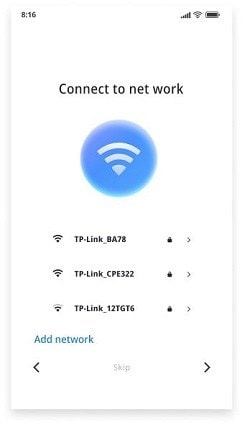
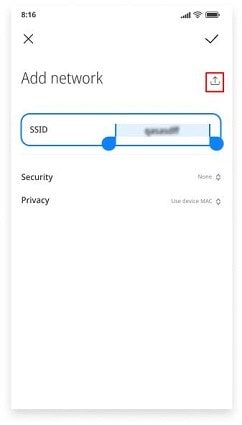
- Click Add Network at the bottom of the screen in network settings.
- In the SSID field, type any random text you like and long-press to pick it. To share it with Gmail, tap the share icon. Tap Notifications > Additional Settings on the App Info screen.
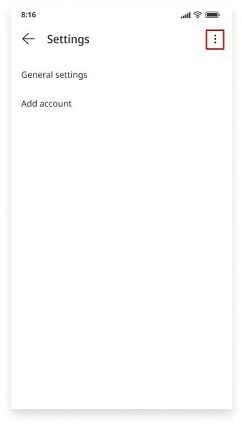
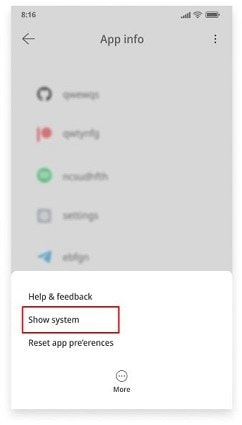
- Click the three dots in the top right corner and select “Help and Feedback.”
- Open the search bar and type “Delete and disable apps on Android.” Tap “Tap to go to Application Settings” on the following screen.

- Enable the Accessibility Menu Shortcut by selecting Settings > Additional Settings > Accessibility > Accessibility menu.

- Repeat the back button to go back to the App info screen. Click More, then select Show System.
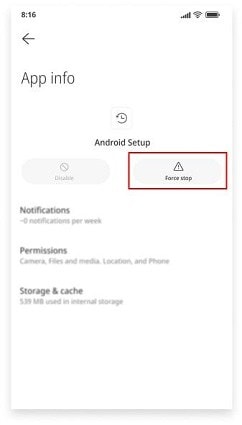
- Tap Disable and Disable app after choosing Android setup, then tap Force stop and OK.
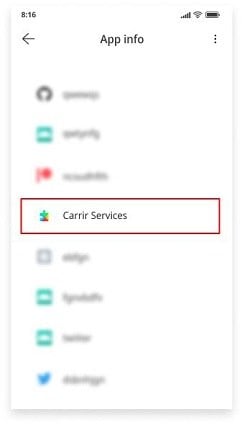
- Return to the App info screen and select Carrier Services. Then, select Disable and Disable app. Finally, select Force to stop and OK.
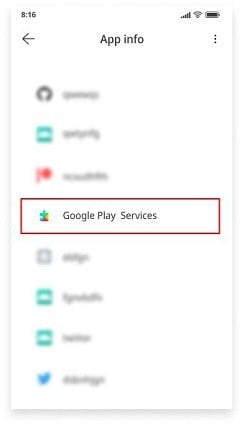
- Go back to the App info screen, choose Google Play Services, and then touch Disable to remove the app. Click OK after tapping Force Stop.
- To get back to the Connect to the Network screen, press the back button and the Next icon.
- Tap the person icon in the lower-right corner of the screen to access Google Assistant > Settings on the Checking for Updates page. To access the Google Play services App information page, repeat this process numerous times. To enable Google Play Services, select Enable.
- Wait until the procedure is finished before going back to the Checking for Updates page. When the procedure is finished, select More, then select Accept.
- You can finally disable Xiaomi’s Google account verification when the Setup Complete page appears.
Part 4: How To Bypass Itel P55T FRP With ADB Command on a PC?
ADB and Fastboots, which stand for Android Debug Bridge and Android Debug Bridge, respectively, are two ways that a computer can communicate with an Android smartphone. The commands and actions delivered by the system are carried out on your Android device using this technique.
Depending on the OS version, the Google FRP lock can be removed using a variety of commands using the flexible ADB command-line tool and Fastboots. This software uses a client-server architecture and a client that transmits commands.
- Download the ADB installed setup file first, and then extract the toolkit files to a folder on your computer.
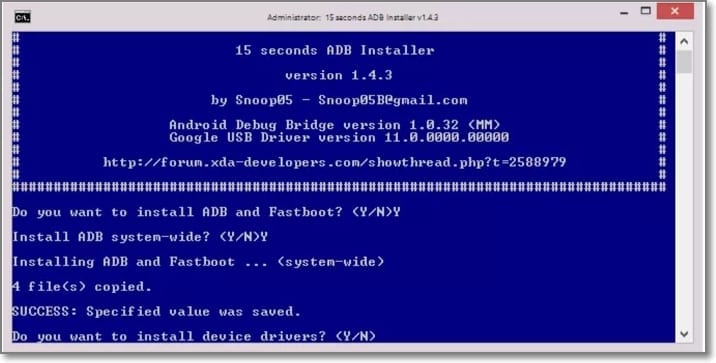
- Run adb.setup.exe next, and then press Y to accept the prompt to install the ADB drivers.
- When the drivers have been successfully installed, type Y once more, and the command window will close.
- Next, please turn on your Android device and connect it to your PC using a USB cord. Ensure your Android device’s USB debugging mode is also on here.
- Then, while holding down the Shift key, right-click somewhere that is empty in the ADB folder and select the Open command window here.
- Then, to delete the FRP, run the following lines one at a time at the command prompt, pressing enter after each line. Below is the code for CMD.
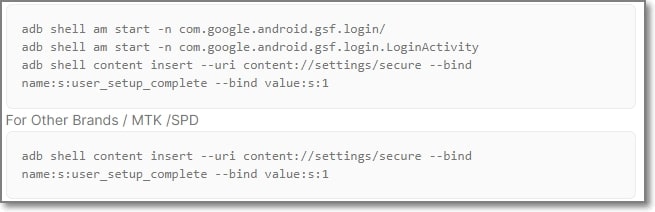
- Your Android device’s FRP lock will be removed following the execution of the commands.
Part 5: How To Disable FRP Itel P55T?
Disabling FRP on Itel P55T/Poco devices is relatively simple. Once you’ve removed the Google account from your device, the FRP lock will be disabled, and you’ll no longer need to bypass Itel FRP.
- Go to “Settings” from the menu.
- Go down the page and click “Accounts & Sync.”
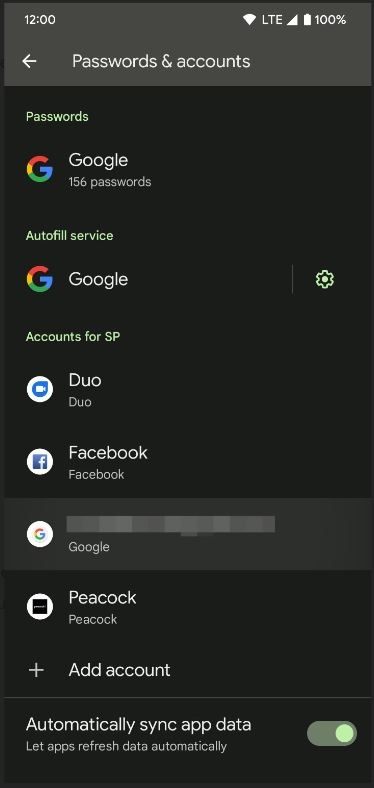
- To delete a Google account, tap on it.
- Confirm your selection of “Remove Account” by clicking.
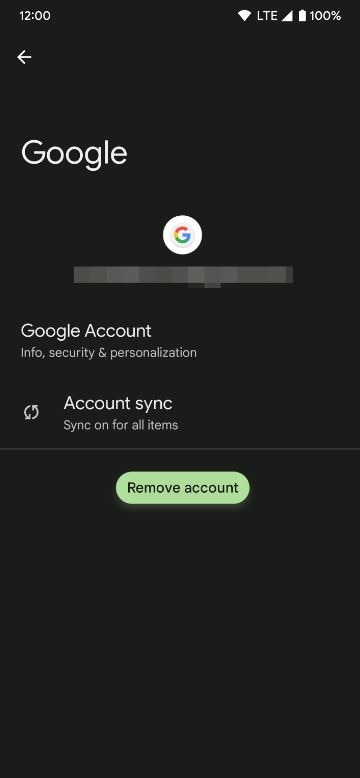
- You might be asked to enter your device password or PIN to finish the process.
Summary
In conclusion, unlocking Itel P55T FRP can be difficult, but it can be done quickly with the correct tools. You can either use the traditional method, which may prove quite long. We would recommend using the Itel FRP bypass tool. The top Itel P55T Google FRP Unlock tools, such as Dr.Fone - Screen Unlock (Android) , have been covered in this article. Since Dr.Fone - Screen Unlock (Android) is an all-in-one solution for Samsung, Xiaomi, Redmi, Oppo, Realme, Vivo FRP unlocking, we advise readers to give it a try.
Also read:
- [New] In 2024, Holographic Horizons Unveiling New Dimensions with Sci-Fi Classics
- [New] One-Stop Solution Mastering GIF Downloads Across All Devices & Systems
- [New] Optimal GPU Choices 4K Editing & Rendering
- Download Tool for Removing Amazon's Kindle Digital Rights Management (DRM)
- Easy Guide How To Bypass Vivo Y200e 5G FRP Android 10/11/12/13
- Full Guide to Bypass Poco FRP
- In 2024, 3 Solutions to Find Your Infinix Smart 7 Current Location of a Mobile Number | Dr.fone
- In 2024, Is GSM Flasher ADB Legit? Full Review To Bypass Your Infinix Note 30 5GFRP Lock
- In 2024, Is GSM Flasher ADB Legit? Full Review To Bypass Your Itel P40+FRP Lock
- In 2024, Vivo S17t ADB Format Tool for PC vs. Other Unlocking Tools Which One is the Best?
- ListenLeap Escaping DaCast's Grip for 2024
- Solutions for Wacom Pen Issues: Working Against Incompatibility with Windows 11/10
- Title: 5 Quick Methods to Bypass Itel FRP
- Author: Lynn
- Created at : 2024-12-16 18:53:56
- Updated at : 2024-12-22 02:05:35
- Link: https://bypass-frp.techidaily.com/5-quick-methods-to-bypass-itel-frp-by-drfone-android/
- License: This work is licensed under CC BY-NC-SA 4.0.